Cinegy Search
Reading time ~13 minutes
Over time, the Cinegy Archive database can expand rapidly, making it essential to have a powerful search engine to locate video material and documents efficiently. A robust search engine becomes crucial for efficiently locating video materials and documents. This article outlines the complete workflow, starting from the preparation of the Cinegy Archive database to the details of crafting optimal search queries in Cinegy Desktop and other related Cinegy products, empowering users to search within Cinegy Archive databases efficiently.
If you want to know how to set up search functionality, prepare and perform search queries, and handle further obtained search results, please refer to the following information:
This article outlines a standalone Search plugin in Cinegy Desktop. Still, the functionality and interface in the separate Search part of the integrated browser used in Cinegy Air software are similar.
Setting Up Search Functionality by Cinegy Archive Database Wizard
This section describes the preparation of the Cinegy Archive database using Cinegy Archive Database Wizard to enable search functionality.
If you are using an existing database with the "Full-Text Catalog" feature already enabled, you can skip this stage. Instructions on how to verify this in Cinegy Archive Manager are provided in the following paragraph.
Otherwise, proceed with the following steps:
1. Preparation
Install the Cinegy Archive Database Wizard tool and ensure that you have full administrator rights on your SQL Server.
2. Creating a Full-Text Catalog
Start Cinegy Database Wizard and choose the appropriate option:
-
Create a new database if you need to set up a new one.
-
Upgrade an existing database if you already have one that requires search functionality to be activated.
Follow the instructions in the wizard based on your needs until you reach the step with custom actions:

Here select the Create Full-Text Catalog option, which enables full-text search functionality in the Cinegy Archive database.
Finish the process of creating/upgrading the Cinegy Archive database as described in the Cinegy Archive Database Wizard documentation.
After that, your Cinegy Archive database will be equipped with robust search functionality to handle efficient retrieval of video material and documents.
Configuring Search Functionality in Cinegy Archive Manager
To optimize and enhance the efficiency of database searches, you need to configure your Cinegy Archive database via Cinegy Archive Manager by following these steps:
1. Preparation
Install Cinegy Archive Manager and ensure that you have full administrator rights on your SQL Server.
2. Checking Full-Text Catalog Status
Launch Cinegy Archive Manager using user account credentials rather than "Trusted Connection" to ensure full access for configuration. Connect to the SQL server and locate the required database in the Object Browser panel. Open its Properties.
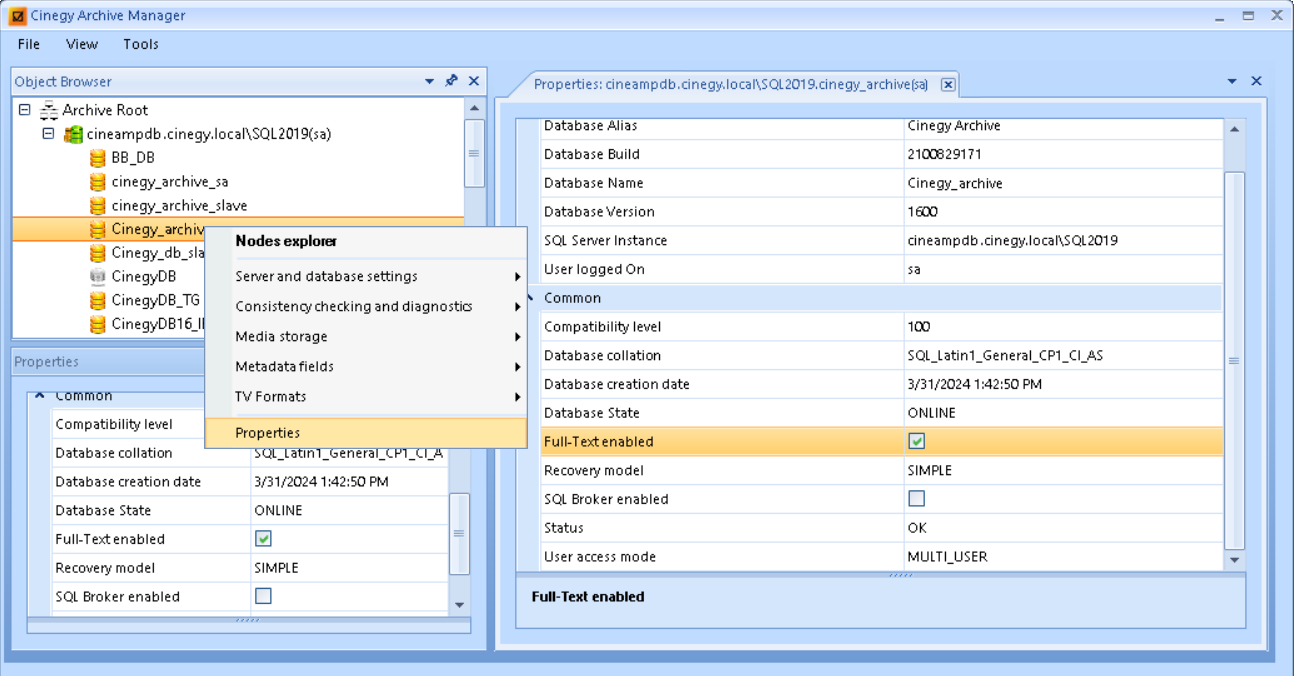
Here, check that the Full-Text enabled option is activated. This indicates that the search functionality is enabled in your Cinegy Archive database.
3. Configure Global Search Settings
To access Global parameters, right-click the required database in the Object Browser and navigate to Server and database settings > Global settings. In the Global parameter window, find the Search group of settings where you can enable and modify the following search options:
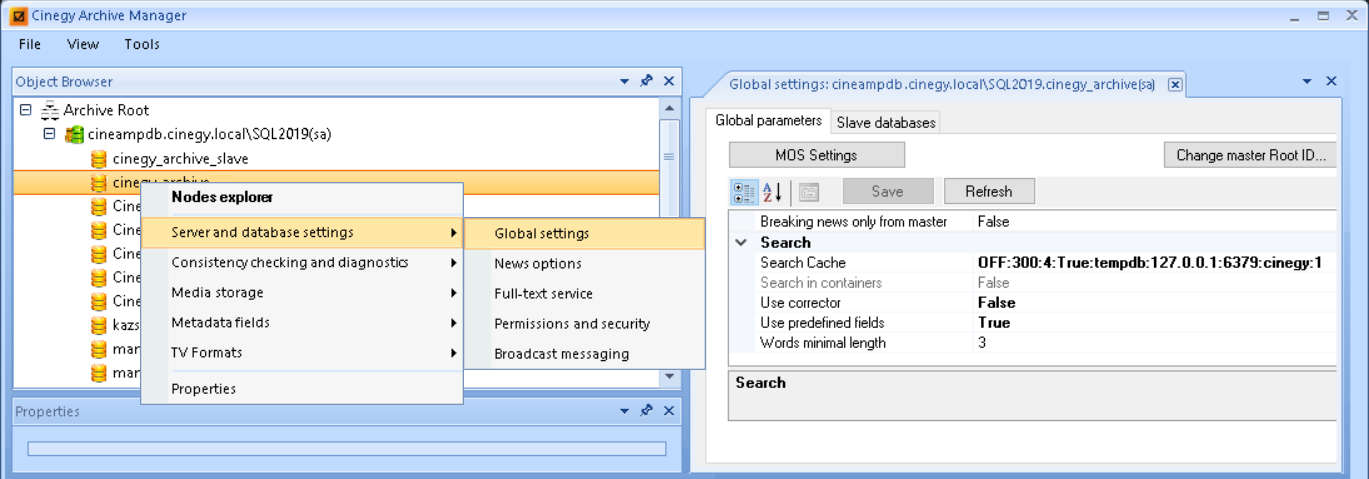
-
Ensure that Use predefined fields is set to True to include predefined fields in searches. If it was previously disabled, rebuild the indexes using the Cinegy Archive Database Wizard.
-
By default, the minimum length for searchable words is 3 characters, but you can change the minimum length here.
4. Enable Full-Text Search Service
From the context menu of the selected Cinegy Archive database, choose Server and database settings > Full-text service:
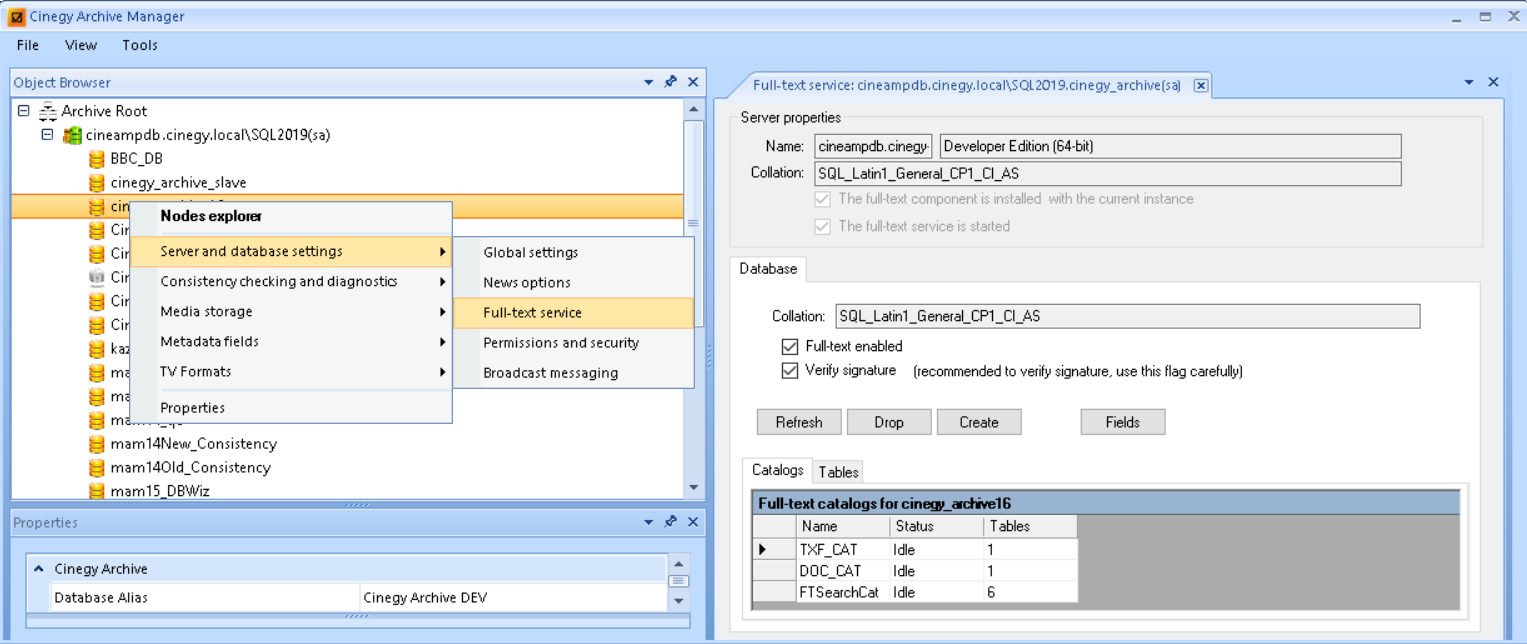
In the configuration panel that appears, the settings are divided into several sections. In the Server properties section, you will see Collation settings, which are preconfigured by Archive Database Wizard.
In the Database section, verify that the Full-text enabled option is selected to activate full-text search for the current database. Additionally, ensure that the Verify signature option is enabled to confirm that external components (e.g., word breakers, filters) are signed, enhancing database security and stability.
In case you need to build a new Full-Text Catalog, confirm that the current catalog is idle and remove it if necessary. Create a new catalog and allow the indexing process to complete.
5. Customize Metadata for Search
Next, in the same tab, optimize search descriptors. Click the Fields button to select specific metadata fields (e.g., Clip description) where the search will be performed. The search will only consider the selected fields, and all other metadata fields will be ignored:
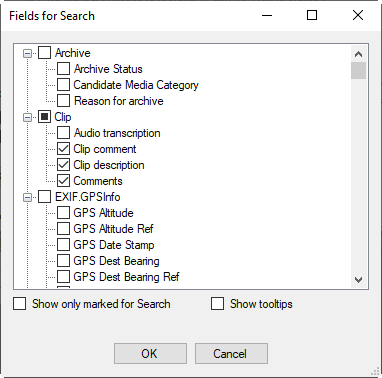
Limit search fields to relevant descriptors for efficient and faster results. Carefully select only the necessary metadata fields to ensure the search process is optimized and does not consume excessive time.
6. Making Descriptors Searchable
Descriptors and presets are managed in the corresponding panel launched via Metadata fields > Descriptors, presets from the database context menu.
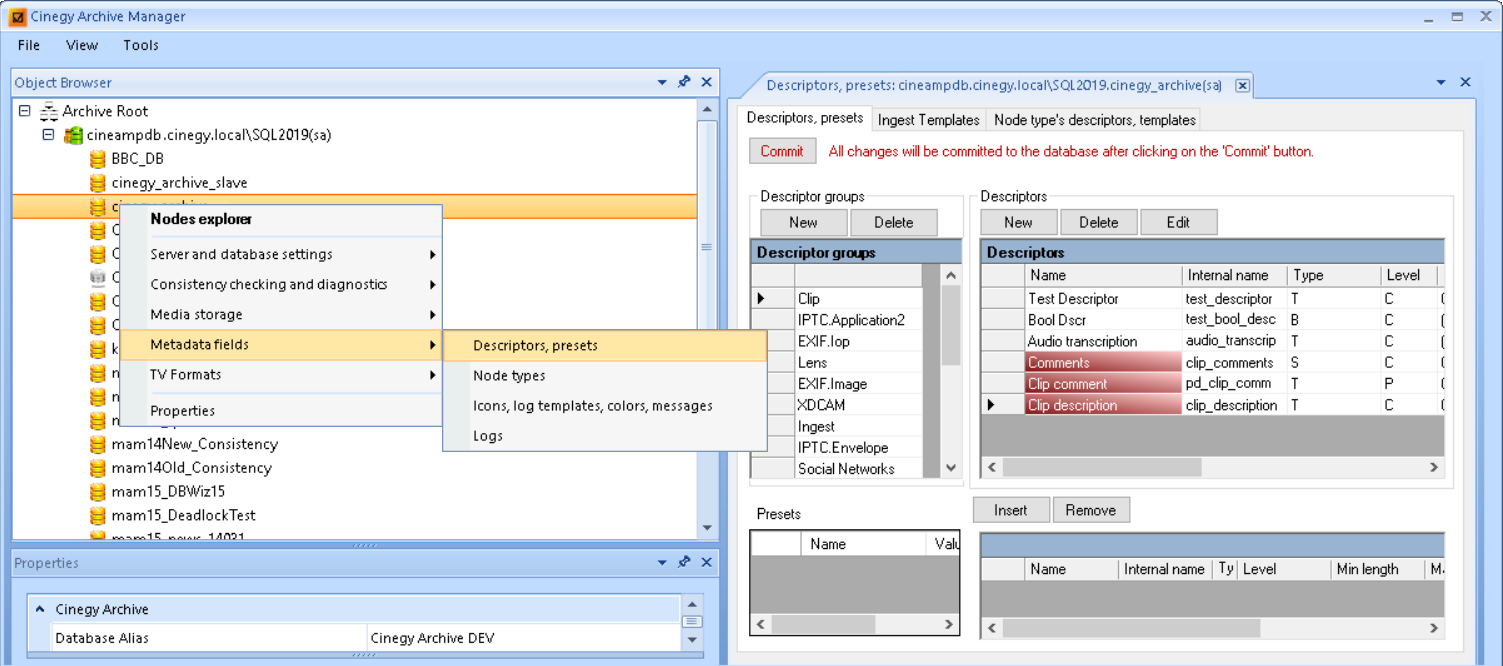
From the Descriptor groups list, select the required group (e.g., Clip). The Descriptors table on the right will display all descriptors for the selected group. Choose the desired descriptor (e.g., Clip description) and click the Edit button to verify if the flag for the "Search" checkbox is enabled.
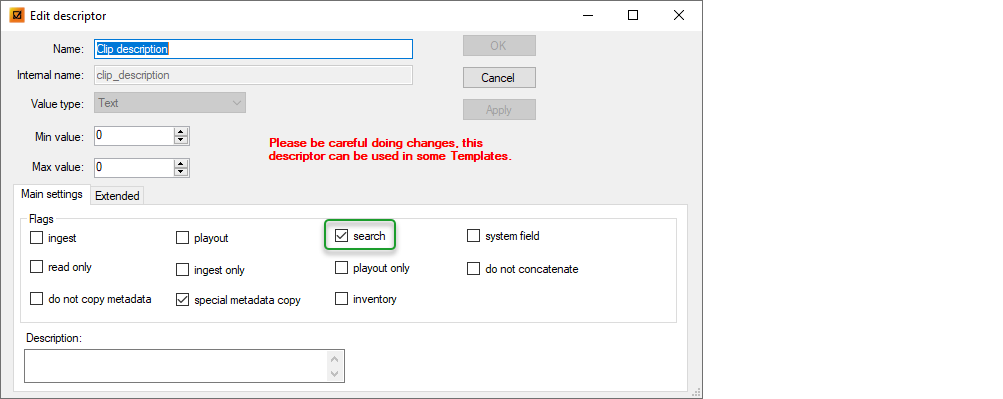
This option makes this field searchable for the "Search" plug-in of Cinegy Desktop or other applications using CBA (Common Bus Architecture).
7. Selecting Nodes for Search
You can refine your search by selecting specific node types to be included in the search. This helps optimize search query processing and accelerates the delivery of results.
You can manage searchable nodes in the Search tab by opening the configuration via Metadata fields > Node types from the database context menu:
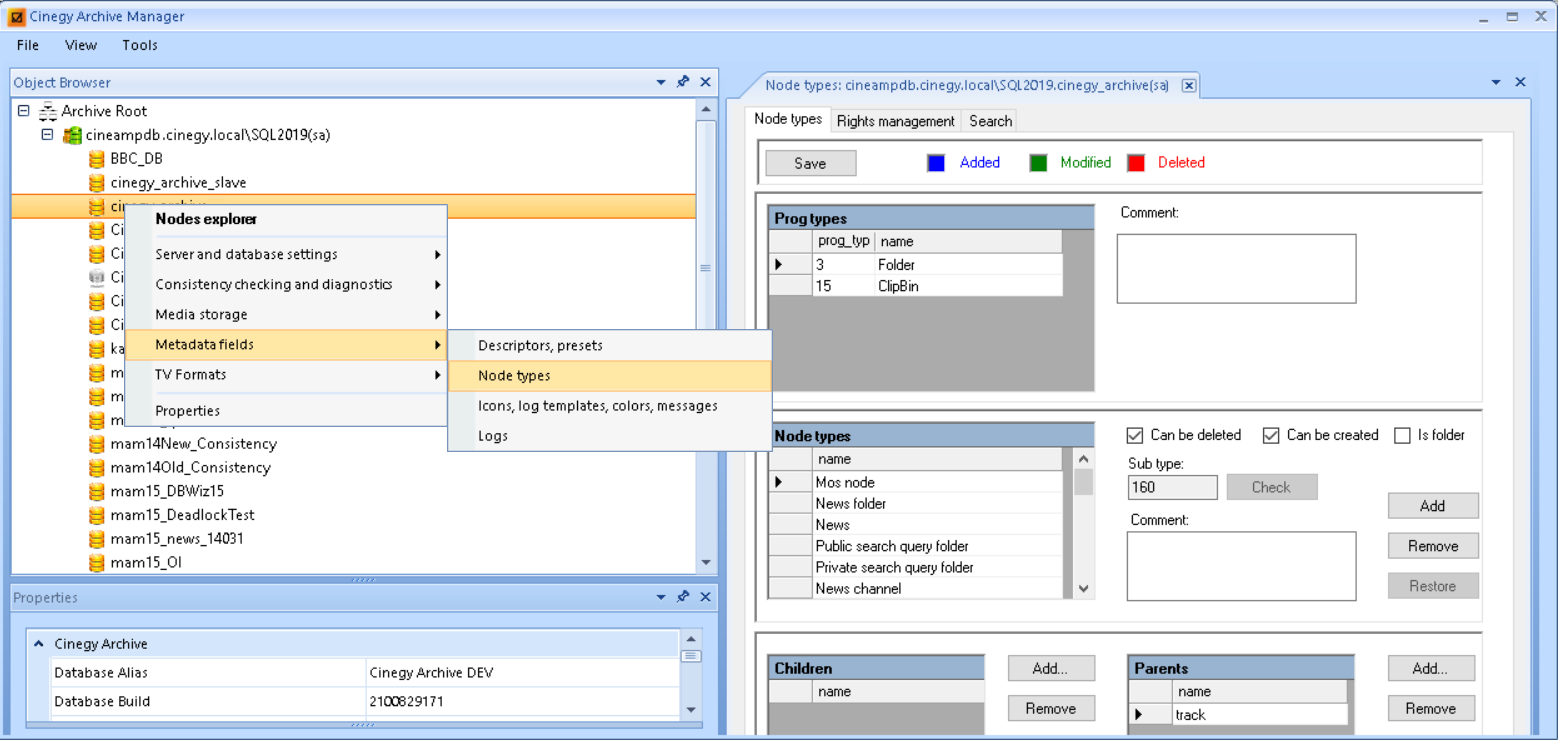
Here select the Search tab. The search will be limited to the node types listed in the right-hand column.
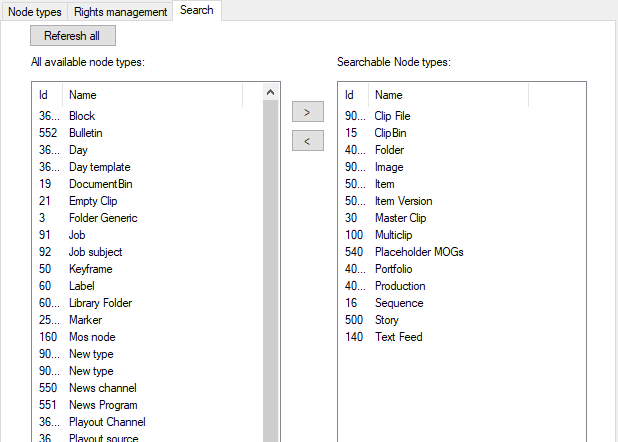
This configuration ensures that only the selected nodes are searchable when using the "Search" plug-in in Cinegy Desktop or the integrated "Search" browser.
Initiating Search in Cinegy Applications
Cinegy search functionality is optimized for the efficient retrieval of specific media material, documents, or containers based on a search request phrase and key attributes, such as metadata, media type, creation date, author, and other relevant details. This feature is particularly valuable for navigating large-scale Cinegy Archive databases with extensive metadata and numerous nodes. Searches can be performed across the entire database or scoped to specific folders, offering flexibility in locating relevant content.
The search functionality is available in both Cinegy Desktop as a standalone "Search" plugin and as a separate part of the Cinegy integrated browser. The interface supports two modes: simple and advanced.
By default, when you open the search plugin, it is displayed in simple mode and appears as follows:
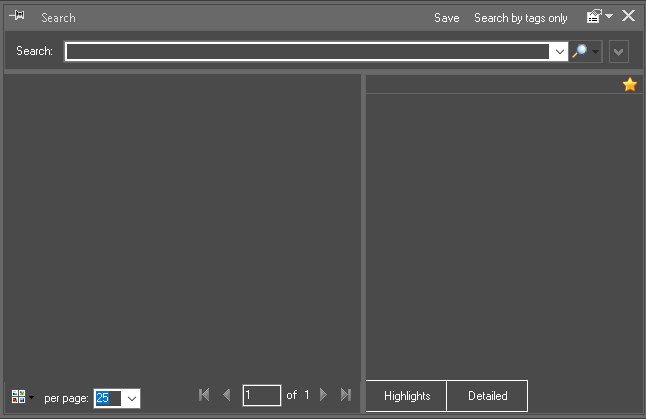
Simple Search
To start searching, enter your request in the Search field and hit Enter or press the  button.
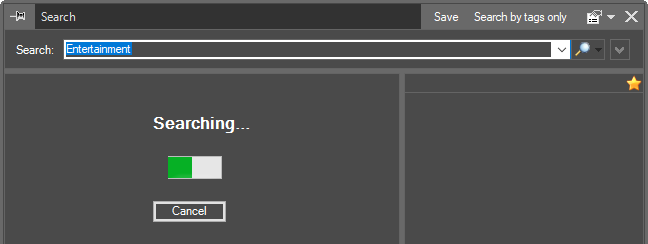
Click the "Cancel" button to stop a long-running query.
Search Request Syntax
By default, a single-word search query shorter than 3 characters is not supported. You can adjust the minimum search query length in "Global parameters" via Cinegy Archive Manager. However, search queries can include multiple words, optionally combined with logical operators or enhanced with wildcards for greater flexibility.
The following tables illustrate the search request syntax and corresponding search results for various search patterns:
Search Query Syntax and Results
| Query | Description | Request Example and Results |
|---|---|---|
|
All the forms of that word in the language used for full-text indexing |
|
|
All the forms and combinations of those words |
|
|
The exact string |
|
|
The exact word combination or phrase |
|
|
Any string of zero or more characters/words according to the defined narrowing parameters |
|
|
Matches any single character when placed within a search query. If used at the beginning or end, it acts as a |
|
|
Matches any single character within the specified range of letters or set of characters enclosed in brackets |
|
|
Matches any single character except those specified within the brackets |
|
Operators
| Operator | Syntax | Description | Example |
|---|---|---|---|
AND |
|
Logical AND |
red monkey |
OR |
|
Logical OR |
Joe | Willy |
NOT |
|
Logical NOT |
Joe NOT Willy |
( ) |
|
Logical grouping |
(~red monkey) | (John Smith) |
LIKE, NOT LIKE |
|
Matching a specified pattern |
LIKE *land |
Search Enhancements
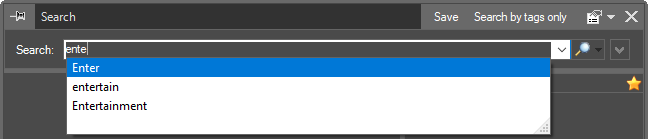
Auto-complete
As you type a new search request, the system suggests matching words based on previous searches. If multiple matches are found, a drop-down list appears for easy selection:
Search by Tags
|
Click the "Search by tags only" button to limit the search to data in the "Tags" metadata field. |

Search Performance Tips
Use targeted directories for faster searches. Leverage saved queries for frequently used searches. Regularly rebuild indexes in large databases to optimize search speed and accuracy.
By understanding and utilizing these search options and features, Cinegy users can navigate databases more effectively and locate information with precision.
Advanced Search
The advanced search feature provides powerful tools for refining search queries, ensuring precise and relevant results even within large Cinegy Archive databases. Users can create complex queries using logical operators and wildcards, define search locations, and limit searches to specific node types. Additionally, conditions can be applied to metadata fields for more targeted results. To further enhance search efficiency, results can be filtered and sorted based on specific criteria.
Press the  button next to the "Search" field to show/hide the advanced search options in the "Search" dialog box.
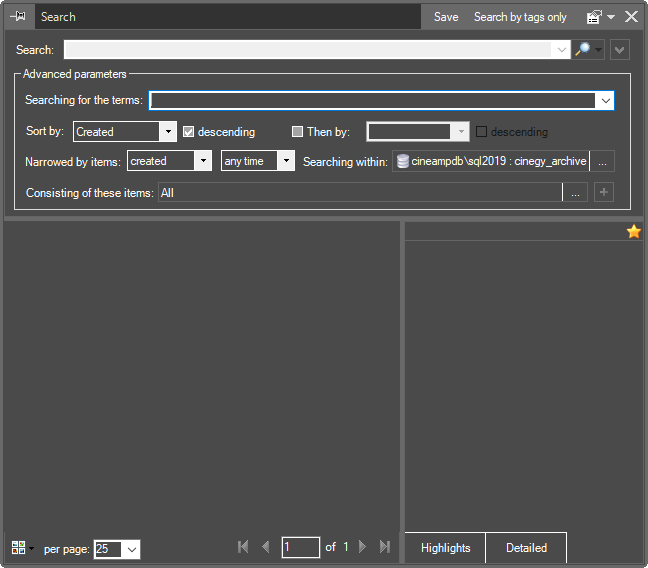
Enter your search request in the Searching for the terms field.
Sorting Search Results
To sort your search results, use the Sort by drop-down list to select your primary sorting criterion. If needed, enable the Then by field to add a secondary sorting criterion.
For each sorting criterion, you can choose descending to reverse the order or leave it unchecked to sort in ascending order.
Narrowing Search Results
To filter search results by time, use the Narrowed by items field to specify whether assets were created or modified within a specific time range.
To specify the search scope, use the Searching within field to limit the search to a specific directory:

Click the "…" button in the Consisting of these items field to choose specific asset types from the list:
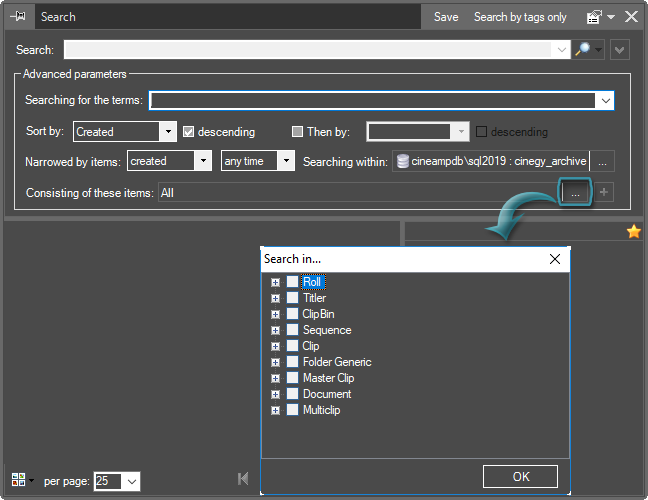
In addition to the predefined list of searchable nodes configured in Cinegy Archive Manager, operators with restricted permissions can further manage searchable nodes within the search configuration. This feature enhances search flexibility and performance while reducing system load, making it especially useful for large databases.
Adding Metadata Field Conditions
You can refine search results by applying specific metadata conditions. To add a condition, click the  button in the advanced parameters.
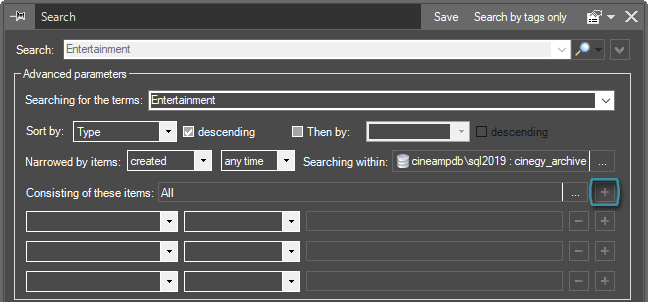
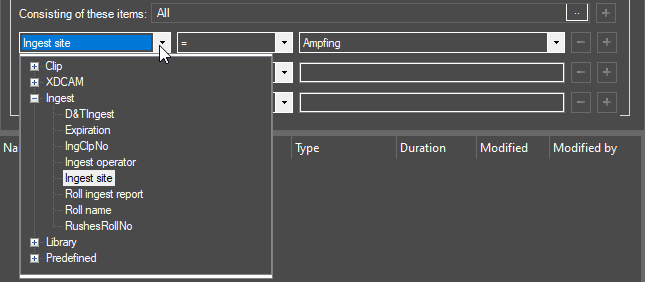
In the first field, select a metadata property from the drop-down list, then define the value or range in the second field. Additional fields may appear depending on the selected metadata type.
The example below demonstrates how to configure a search for assets based on a specific ingest location:
To remove a condition, click the  button.
Saving and Loading Search Queries
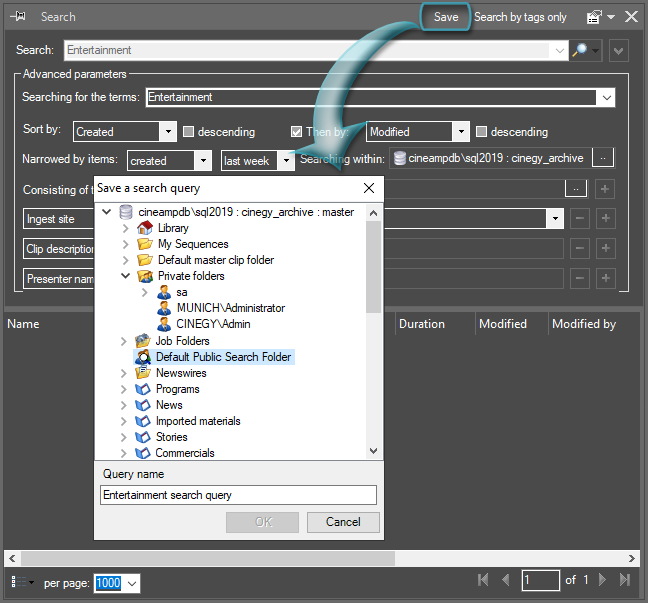
A well-crafted search query can be crucial for obtaining optimal results. To avoid unnecessary time and effort, you can save your search query along with all configured parameters for future use. This allows for quick access to frequently used searches, improving efficiency and preserving resources. Once set up, the search query can be stored in a search folder within the database for easy retrieval.
Search Folders
The search queries are stored in search folders, which can be of two types:
|
A public search query folder is visible to all users and can be created within the Default Public Search Folder. |
|
A private search query folder is visible to the owner/user only and can be created individually for each user within the root of the Private folders. |
Search Query
In the Search window, click the  button. The Save a search query dialog appears, allowing the user to select the search folder for a search query, then enter the name for your query in the Query name box, and press "OK".
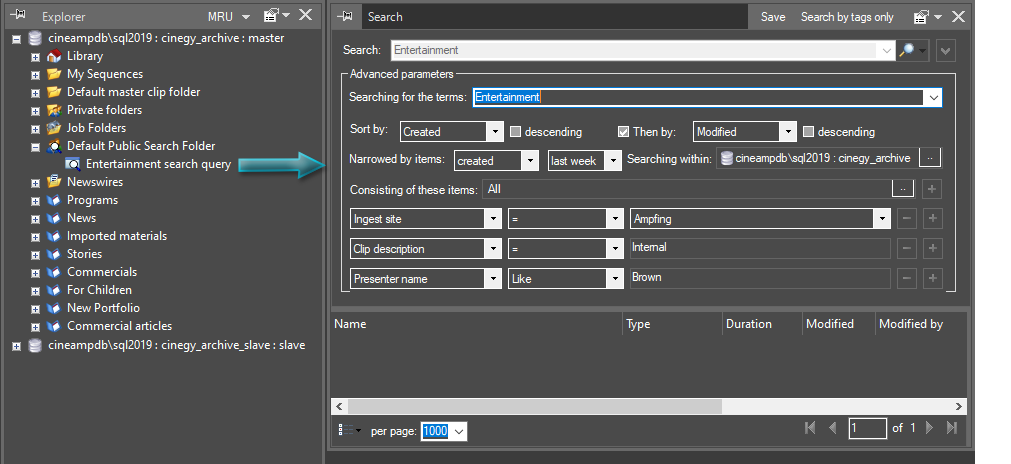
To load previously saved search settings, double-click the relevant search query node in the explorer tree; the corresponding search window will appear, and the stored search settings will be applied:
Viewing and Managing Search Results
Having finished composing the search query, press the  button to start searching.
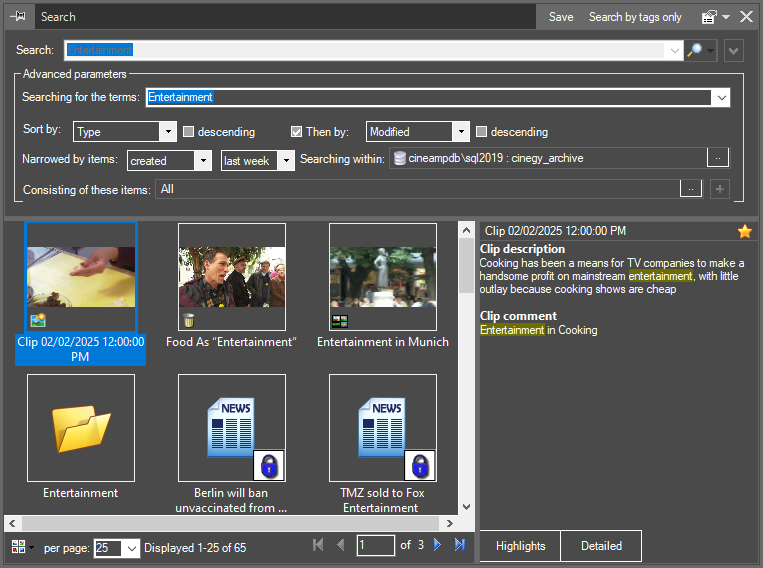
Search results are displayed in the left panel of the "Search" window. If the search comes up with more than one page of search results, use the  and
and  buttons to navigate through the previous and next result pages.
Found objects can be managed just as in the bin interface – renamed, copied, moved, deleted, etc., using the right-click menu commands or standard shortcuts:
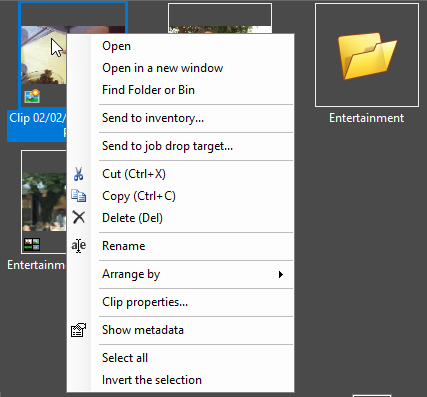
You can manage found items individually or in multiple selections. To select multiple objects, hold down Shift or Ctrl while clicking the desired items. Use the Invert Selection context menu command to reverse the current selection or Select All (Ctrl+A) to select all search results on the current page. To clear the selection, click anywhere within the search results panel.
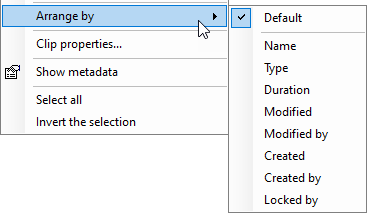
You can also arrange the items by selecting the appropriate option from the context menu:
Changing View
The appearance of search results depends on the selected view, which can be adjusted using the Change your view control in the bottom left corner of the window:
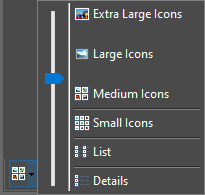
By default, terminal objects are displayed as picons, while objects without previews are represented by their corresponding icons.
Working with Metadata
The right-hand panel of the window displays metadata for the selected object, available in either the highlights or the detailed view. The default highlights view emphasizes the search term within the metadata, allowing users to expand the full text if needed. The detailed view provides access to all available metadata fields, which can be edited based on user permissions. Found objects and their metadata can be managed – copied, moved, deleted, etc. – using the right-click menu commands or standard shortcuts.
Visible metadata fields in the highlights view can be customized using the Favorites button  . By pressing the
  button, you can select the descriptors or entire descriptor groups to be shown in this view:
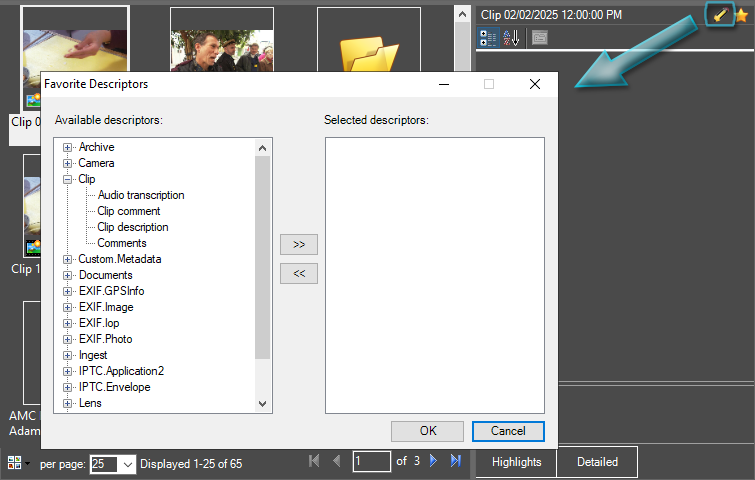
Once applied, only the selected descriptor fields for the respective node type will be shown, while unassigned descriptors will remain hidden.
To return to the default highlights view, press the button again.
Locating Search Results
You can quickly locate the parent containers of search result items using the Find Folder or Bin command from the context menu. This command works with all objects, opening their parent folder or bin in a separate window for easy access.
The Highlight in Explorer command highlights containers and certain terminal objects in Explorer, showing their original locations.
Exporting Search Results to Inventory
Media items from your search results can be saved as MCR items for future use in Cinegy Air. To do this, select the Send to inventory… command from the item’s context menu. In the standard Save as dialog box navigate to your dedicated inventory folder and save the item with your preferred name.
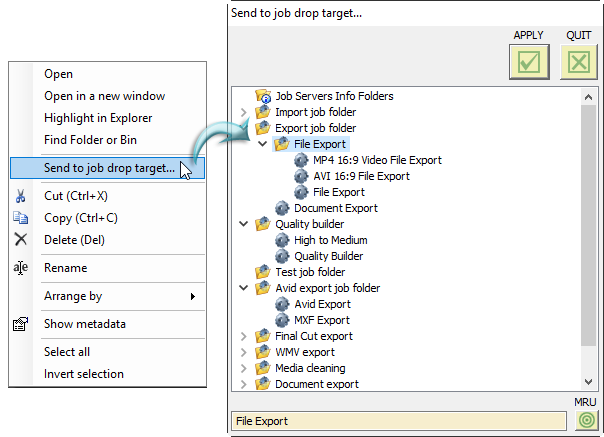
Sending Search Results to Job Drop Target
You can also send your search result item to a job drop target in the Watch Folders Tab in the Cinegy Convert Watch Service. To create a new export task, you need to choose the corresponding context menu command and define the desired job drop target in the appearing Send to job drop target… dialog: