Hacking Cinegy ‒ Cinegy Air
Reading time ~3 minutes
This post provides details on the new Cinegy Playout WEB API available starting from the v11 release. The post explains basic features available and demonstrates the possible results visualization with simple HTML/CSS/JavaScript. Source codes are also available for reference.
Introduction
The idea behind Hacking Cinegy presentations during TechCon 2017 is to demonstrate tips and tricks that can be used to extend the functionality of your products using open Cinegy architecture and APIs. The latest demo showed the following features:
-
Populating Type templates variables dynamically from Excel or RSS;
-
Uploading video to Facebook using Cinegy Convert post-processing scripts;
-
Generating new metadata using Cinegy Convert pre-processing scripts.
Cinegy Playout WEB API
The existing Cinegy Playout WEB API allows an operator to query the engine state and perform basic playback control operations.
All sources are available for download on Cinegy GitHub.
The mobile version of the WEB control panel is available here.
Warning
Please note that the WEB API provided is not feature-complete and does not target to replace the Cinegy Air control application. The fully featured API, with the ability to manipulate the playlist directly in addition to playback control, is planned to be included in the Cinegy Air v12 release.
General Concept
Cinegy Playout WEB API is introduced starting from Cinegy Air v11. This API allows status requests and basic playback control for a specific playout instance/device/layer via HTTP calls.
The WEB API access URL is the following:
http://<host>:<port>/<device>/<action>
where
-
<host> – defines the IP address or host name of the machine running Cinegy Playout;
-
<port> – defines the Cinegy Playout instance number to control;
NoteThe port number equals 5521 + InstanceNumber (zero-based). -
<device> – defines the device and layer to be controlled;
-
<action> – defines the actual command to be executed.
The following devices are defined:
-
video – to control the generic video playlist;
-
titler_0 – to control the Cinegy Titler playlist;
-
logo – to control the basic logo playlist;
-
cg_0..cg_8 – to control Cinegy CG layers;
-
audio – to control the audio ducking playlist.
|
Important
|
Please refer to the Cinegy Air documentation for the up-to-date list of devices and available commands. |
The following actions are used during the demo:
-
status – to get the actual playout instance device state;
-
list – to get the actual playout instance device list;
-
command – to change the actual playout instance device state.
During the demo, the local instance #0 (video layer) is referenced. To control other instances, please update the reference URLs according to the information provided earlier.
Status
To get the current instance device status, an HTTP GET request should be executed on the following URL: http://localhost:5521/video/status
The response is the XML with the following structure:
<Status>
  <Active Id="{77DD5D31-DA5F-4FD1-9885-5F679FDE633C}"/>
  <Cued Id="{7A5F8734-5DB7-4D28-BE0C-80D9DEFCE822}"/>
  <License State="Licensed"/>
  <Output State="Normal"/>
</Status>
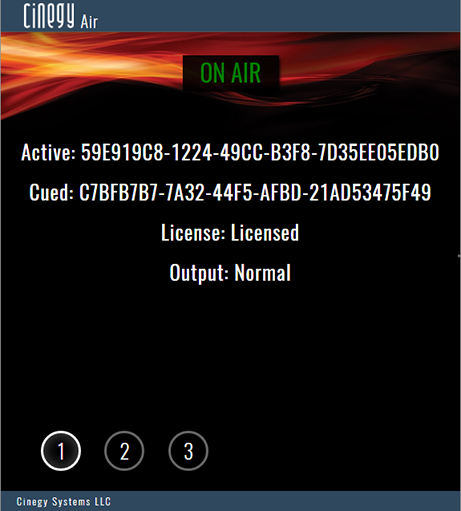
The active and cued item IDs are provided in the corresponding tags. Additionally, the license state and playback output state parameters are provided.
With the help of JavaScript and HTML decoration, the result can also be transformed into something more user-friendly:

Playlist
To get the current instance device playlist, an HTTP GET request should be executed on the following URL: http://localhost:5521/video/list
The response is the XML with the following structure:

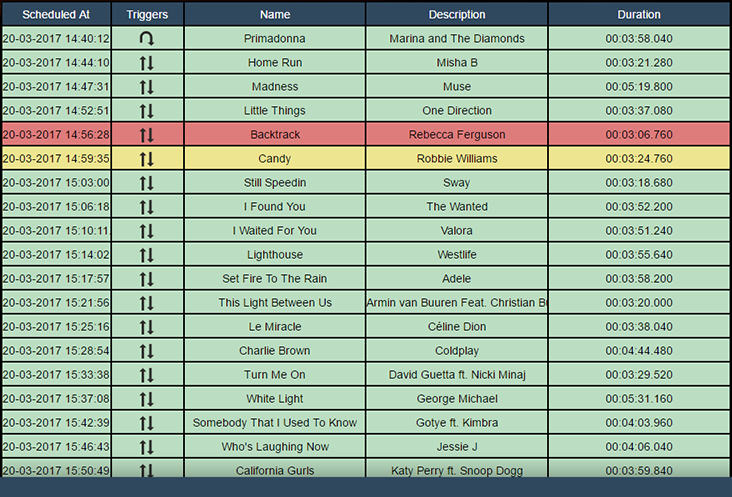
Basic information about the playlist item is provided: ID, name, description, scheduled air time, duration, triggers, etc.
With the help of JavaScript and HTML decoration, the result can also be transformed into something more user-friendly:

Commands
To send the command to the current instance device playlist, an HTTP POST request should be executed on the following URL: http://localhost:5521/video/command
The request body must contain the XML with the following structure:
<Request>
  <StartCued/>
  <SetOutput State="Normal|Black|Bypass|Clean"/>
  <Event Device="<device>" Cmd="<command>" Op1="" Op2="" Op3="" Name="" Description="" ThirdPartyId="" Id="{XXXXXXXX-XXXX-XXXX-XXXX-XXXXXXXXXXXX}"/>
</Request>
With the help of the commands, it is possible to control the playback state of the instance:
