Cinegy MOS Gateway
Reading time ~6 minutes
Cinegy MOS Gateway is a tool for integrating third-party MOS-based newsroom control systems. Cinegy MOS Gateway supports the standard MOS (Media Object Server) protocol, enabling efficient and fast integration with news products such as iNews or Octopus.
NCS (Newsroom Control System) integrates scripts, wire feeds, device control, and production information in the server/client environment. Through the MOS protocol, intelligent interface, and web service, the NCS client integrates with other systems, including playout, media asset management, transport protocols, graphics context, and closed captioning, providing complete story creation and rundown management for news teams.
The MOS Protocol is widely used to enable communication between newsroom systems and controlled broadcast devices such as media servers. Typically, this is a two-way communication. The newsroom system maintains a current running order on controlled devices, while the devices return a media item status. MOS is supported through a dedicated Gateway and also the use of ActiveX controls, which are typically used to provide close integration with controlled devices.
This guide takes you through the steps to install and configure all the components required for integration with a third-party newsroom control system.
STEP ONE: Preparing for Installation
|
Note
|
Cinegy MOS Gateway and Cinegy Archive Browser licenses are required for work with Cinegy MOS Gateway. |
-
Make sure the machine you are using has the required Microsoft Windows operating system installed along with the recommended service packs. Details for system recommendations are available at my.cinegy.com.
-
Download the latest Cinegy Desktop installation package. Extract the package contents to a shared local folder or network location for convenient installation. To start installation, run the Setup.exe file from the corresponding installer directory.
|
Note
|
NCS client and Cinegy Desktop must be installed on the same machine. |
Cinegy ActiveX (MOSOcxCyn.ocx), as well as other required components, will be automatically installed along with Cinegy Desktop, which must be installed on the NCS client dedicated machine used for Cinegy Archive integration.
-
Cinegy Studio as well as Cinegy Playout must be installed according to the instructions provided in the Installation article.
|
Note
|
At least local administrator rights are required for Cinegy components installation. |
STEP TWO: Cinegy MOS Gateway Installation
Cinegy MOS Gateway should be installed separately on a different computer from the NCS. Follow these steps for Cinegy MOS Gateway installation:
-
Run the Setup.exe file from the MOS > MOS Gateway directory of your Cinegy Desktop installation package. The Cinegy MOS Gateway setup wizard will be started. Press "Next" to proceed with the Cinegy MOS Gateway installation.
-
Read and accept the license agreement and proceed with installation.
-
Press the "Change" button to redefine the installation folder, if needed. Press "Next" to proceed.
-
Press the "Install" button to begin installation. A progress bar will show the progress of the installation process.
-
The next dialog will inform you that installation is complete. Press the "Finish" button to exit the setup wizard.
STEP THREE: Configuring NCS Client
iNEWS MOS Gateway Configuration
To prepare the iNEWS system for work with Cinegy playout applications, install and set up the Avid MOS Gateway to work with the iNEWS server. Refer to the iNEWS MOS Gateway Installation and Operations Manual for more information on installation and setup.
Then, edit the Avid MOS configuration file (mosconfig.xml), where you specify Cinegy MOS Gateway as mosDevice and define the following parameters: MOS ID for Cinegy Gateway and IP address of the machine with Cinegy MOS Gateway.
Octopus Configuration
Before using the Octopus system, you should configure it properly. Add the ActiveX device and define all the required parameters, such as MOS ID, MOS protocol version (2.8.3 or earlier), IP address of the machine with Cinegy MOS Gateway; ActiveX GUID (define the {3DF1881C-C31C-49B9-8146-8EE3E3C1F152} value), etc.
STEP FOUR: Configuring MOS via Cinegy Archive Manager
For proper connection to NCS, define settings for the MOS server and NCS server via Cinegy Archive Manager (CAM).
Download the Cinegy Archive Manager installation package and launch the CinegyArchiveManager.exe file. Having logged in, right-click the database and select Server and database settings → Global settings. Specify the following parameters in the dialog box that appears:

Disconnect on deactivation – select "False" to keep connection to database until hosting application is terminated; keep in mind, this option provides significant speeding-up successive ActiveX opening times but requires an individual Cinegy Archive Browser license.
Media group ID – the media group identifier. This is a media group in which the DOC network share is registered. During the object insertion via ActiveX component, the MCRItem is created and saved on the DOC network share.
MOS identifier – the MOS identifier name.
NCS identifier – the NCS identifier name.
STEP FIVE: Configuring Cinegy MOS Gateway
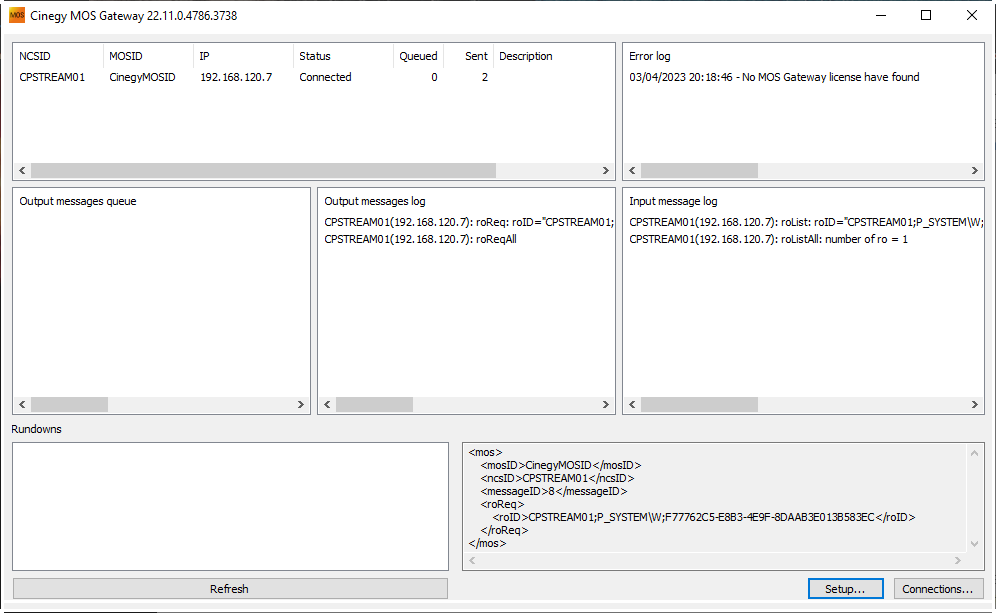
The Cinegy MOS Gateway application connects the NCS server with the Cinegy Studio client and transforms the received Rundowns to the Cinegy Studio format.
To launch Cinegy MOS Gateway, go to Start > Cinegy > Cinegy MOS Gateway.
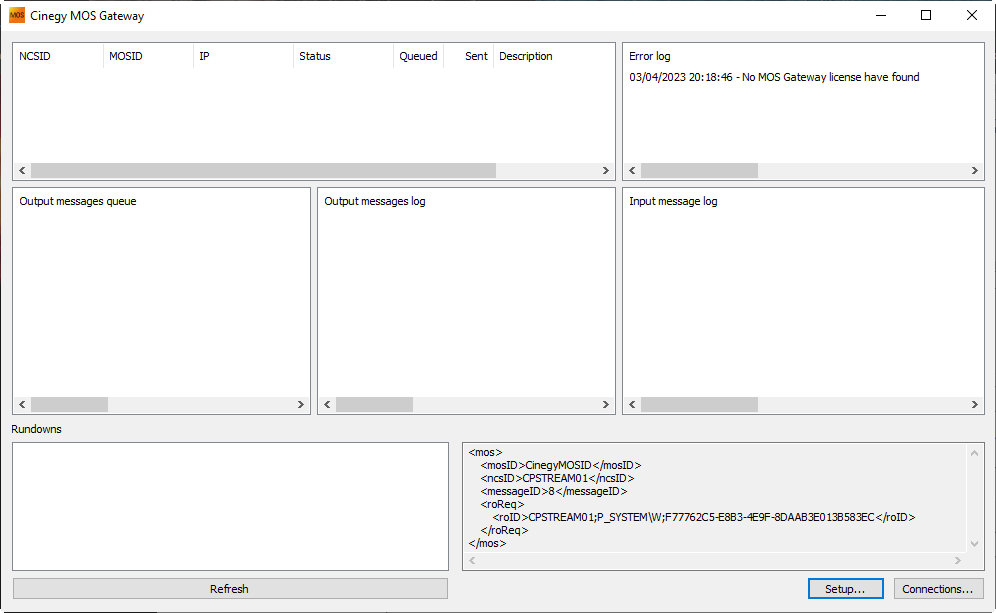
Press the "Setup" button and define the required settings in the dialog box that appears:
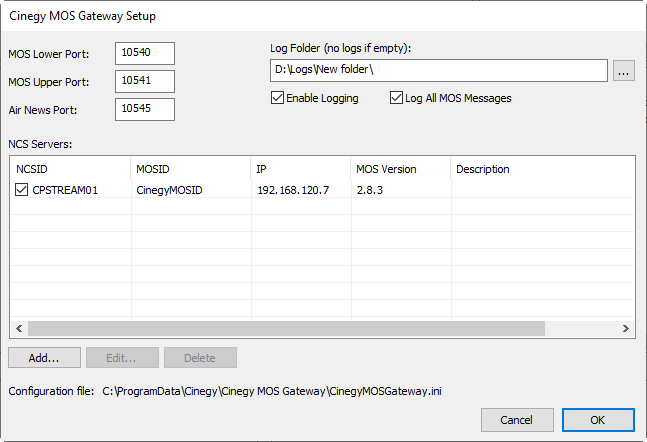
The upper and lower MOS ports should be specified in accordance with their configuration in the NCS client (ports 10540 and 10541 are set by default correspondingly). In the "Air News Port" field, define the port to be used for Cinegy Studio connection to Cinegy MOS Gateway (10545 is set by default).
Press "Add" to add an NCS server; the following configuration dialog appears:
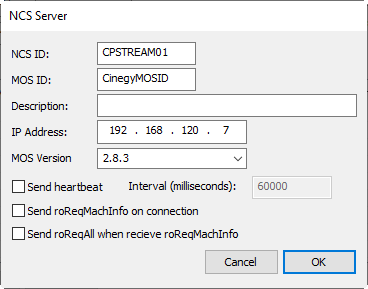
Define the following parameters here: NCS identifier and MOS identifier (identical to the one defined on STEP FOUR in the CAM configuration), NCS server IP address (in IPv4 format), and MOS protocol version identical to the one defined on Step THREE in the NCS configuration.
STEP SIX: Configuring MOS via Cinegy Studio
MOS NCS operation mode enables using the MOS Gateway to browse for Rundowns and should be set up via the Cinegy Studio configuration tool. Go to Start > Cinegy > Cinegy Studio PRO Config. The configurator should be launched using the "Run as administrator" command.

On the "General" tab, select MOS NCS mode and specify its parameters:
Gateway – IP address of the computer running Cinegy MOS Gateway;
Port – the Cinegy MOS Gateway port number (10545 is set by default).
|
Note
|
The port number should be identical to "Air News Port" defined on STEP FIVE in the Cinegy MOS Gateway configuration, as well as open in the Firewall. |
Enable channel filter – check this option to filter out this channel from the playlists that are received via Cinegy MOS Gateway (Optional).
Channel name - set the channel name.
|
Important
|
For a complete description of work with Cinegy Studio, refer to the Cinegy Studio Manual. |
STEP SEVEN: Working with Rundowns
To be able to start working with Rundowns, follow the steps:
-
Open the ActiveX hosting plug-in (installed along with Cinegy Desktop) in the NCS application and create a Story in Rundown.
-
Drag-and-drop the item(s) from the Cinegy ActiveX window into the Story.
-
Mark the Rundown as "ready" to make it available for use by MOS devices.
The approved Rundown will be automatically sent to Cinegy Studio through Cinegy MOS Gateway.