Creating New Database
Reading time ~8 minutes
To create a new database, select the "Create new database" option and press the "Next" button:

Press the "Next" button to proceed with the creation options.
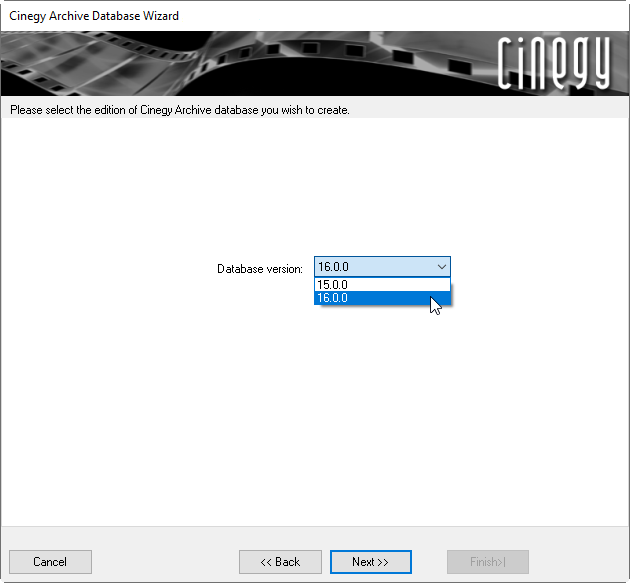
Select the database version from the drop-down list and press the "Next" button:
Choose whether you want to create a new database or overwrite a pre-existing one:
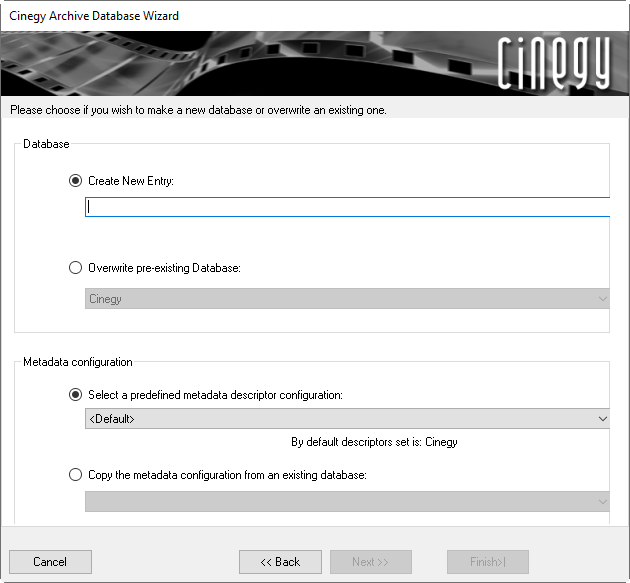
You can change the metadata descriptors set for the database you are creating by choosing the desired one from the drop-down list. The "Cinegy" metadata descriptors set is defined by default. Alternatively, you can copy the metadata configuration from the existing database by selecting the corresponding option and choosing the source database from the drop-down list.
New Database
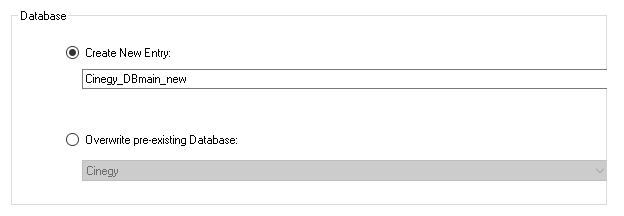
To create a new database, choose the "Create New Entry" option, enter the database name, and press the "Next" button to proceed:
|
Note
|
The name of a new database should be unique. |
|
Important
|
Refer to the Microsoft SQL Server documentation to learn more about the database naming convention rules. |
Press the "Next" button to proceed. In the dialog that appears, configure the database creation settings. You can apply the default settings or select "Advanced" mode to modify the "Database Files" and "Collation" options:
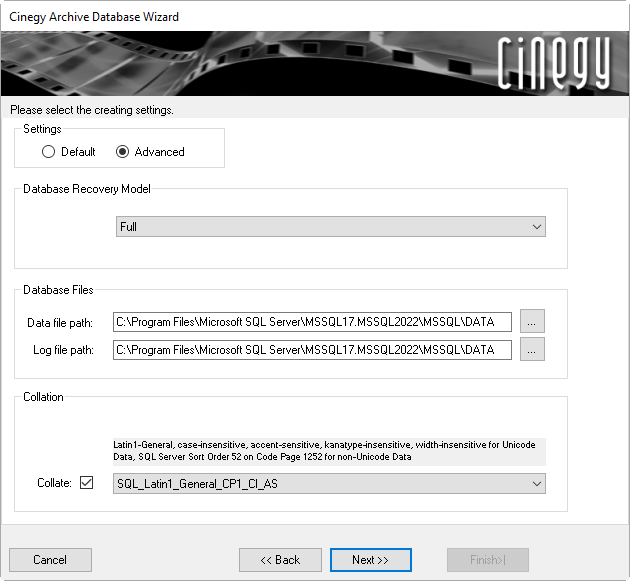
Recovery Model
Recovery models are designed to control the transaction log maintenance. You can set one of the following recovery models:

-
Simple – no transaction log backups are supported; only the most recent full backup can be restored.
-
Full – transaction log backups and full, differential, incremental, and partial backups of the database are supported, allowing you to restore a database at any point in time.
-
Bulk-logged – similar to the full recovery model, but the bulk operations are minimally logged.
|
Important
|
Refer to the Microsoft SQL Server Operations Guide to read more about recovery models. |
Database Files
The data and log information are stored in separate files. With advanced mode selected, you can browse for the folders where the operating system files will be stored:

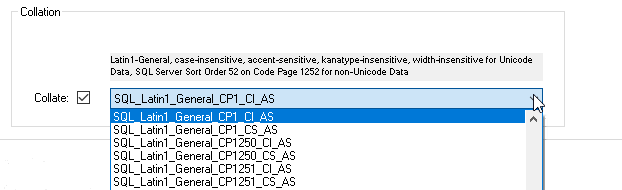
Collation
Collation refers to a set of rules that determine how data is sorted and compared. Character data is sorted using rules that define the correct character sequence, with options for specifying case sensitivity, accent marks, kana character types, and character width.
To change the default collation, in advanced mode, tick off the "Collate" option and select the desired service from the drop-down list that appears:
Having set up all the creation settings, press the "Next" button to proceed. In the window that appears, select the options required for the current database:

|
Important
|
Refer to the Full-Text Service article in the Cinegy Archive Manager Manual for detailed information on its configuration. |
|
Note
|
"Enable search term/phrase correction option" provides a fuzzy search feature. The dictionary for the search term/phrase corrector is saved in the Cinegy Archive database. This functionality works only for English and uses only an English dictionary. This option is not supported for Cinegy Archive databases v16. |
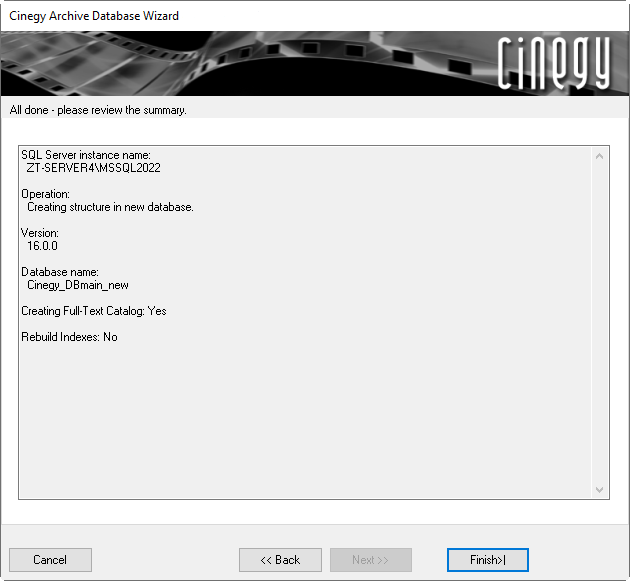
Press the "Next" button to open the summary dialog, which allows you to review the decisions that you made for the database being created. To make changes, use the "Back" button to return to previous steps of the wizard. Press "Finish" to begin the creation of the database.
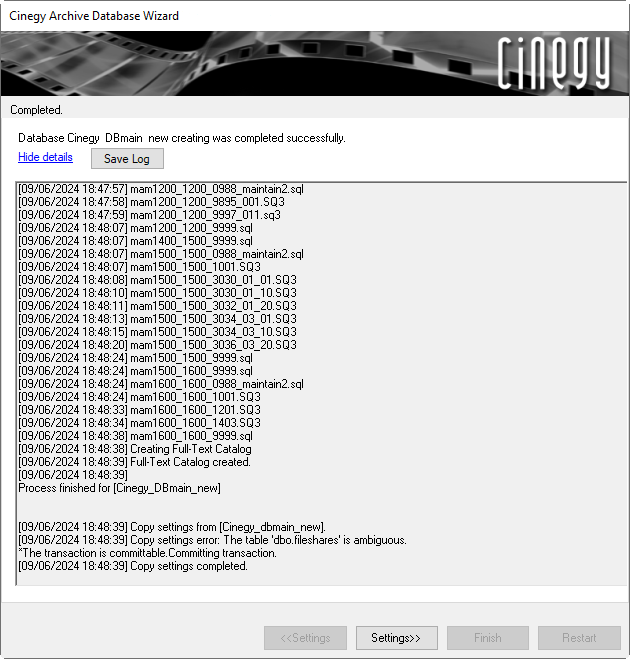
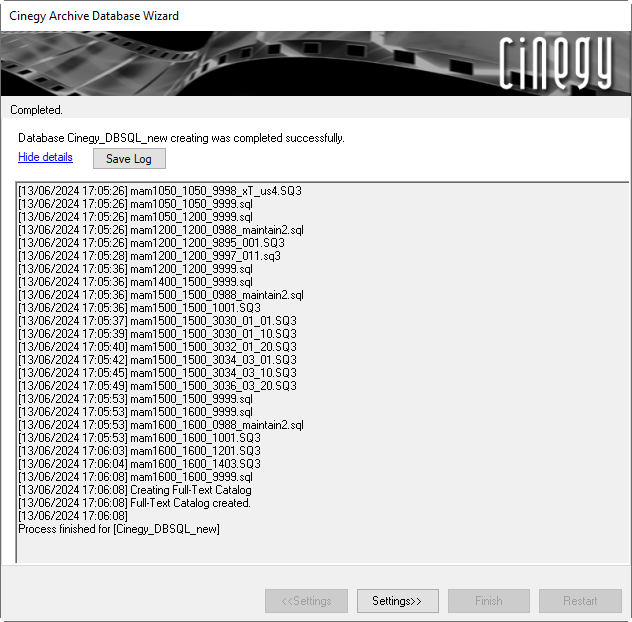
After the creation process is completed, press Show details at the "End of processing" step of the wizard to view the detailed summary about database creation:
|
Use the "Save Log" button to generate the text log file containing the procedure details of the database creation process. |

File Locations Management
|
Caution
|
Note that managing the file locations is an important step in the database creation process and cannot be skipped by pressing "Finish" before completing. |
|
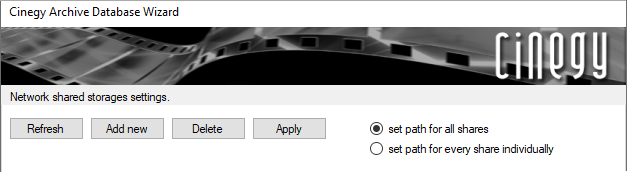
Press the "Settings" button to open the configuration window for network shared storages: |

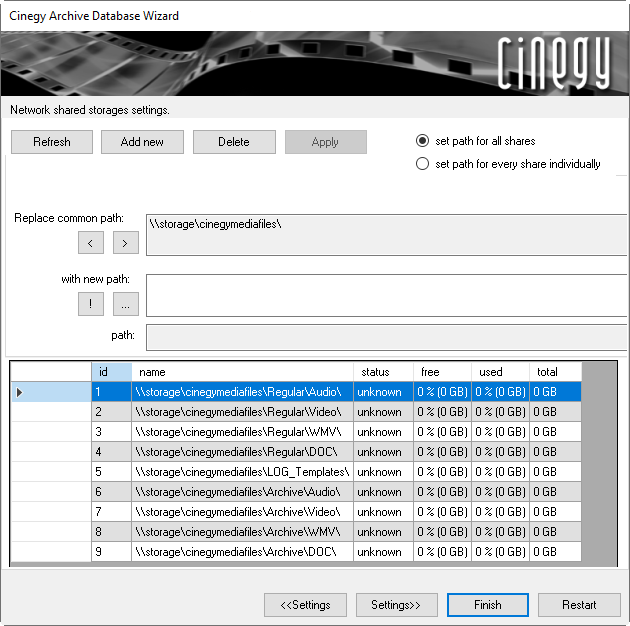
Use the "Network shared storage settings" window for shared storage paths configuration. You can apply the path changes to all shares at once or separately to the selected one, by switching between the "set path for all shares" and "set path for every share individually" options correspondingly:

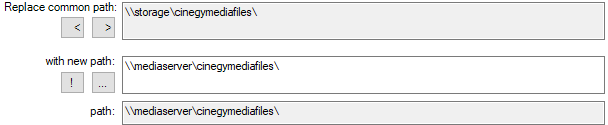
The "Replace common path" field contains the current path for the selected media share or all shares. Use the  button to add a new subpath to the existing media storage path or the
  button to trim the media storage path section.
In the "with new path" section, use the  button to select the root path for a new storage substructure or enter the path via the keyboard:
Use the  button to create a media storage substructure:
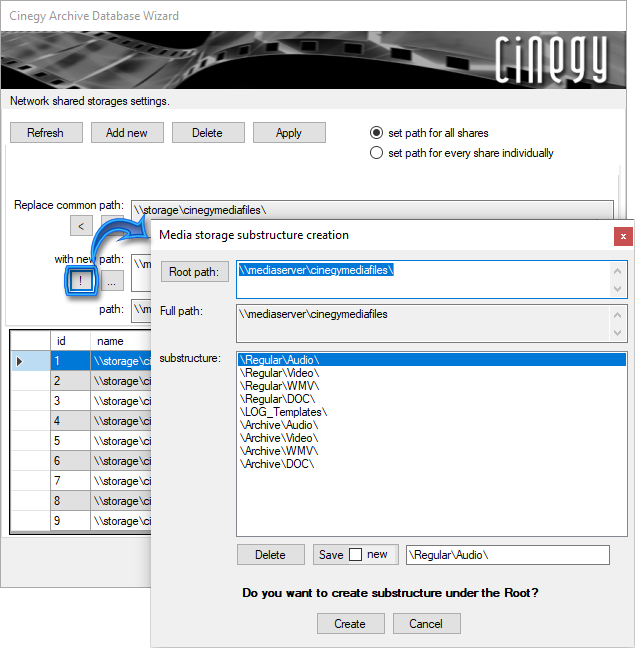
Define the root path and the full path for media storage, and select a substructure type from the list.
|
Press the "Delete" button to delete the selected substructure from the network share. |
|
Press the "Save new" button to save the new substructure for the network share path after editing it in the field on the right. |
|
Press the "Create" button to create new substructures for the selected network share paths. |
|
Press the "Cancel" button to discard changes and exit. |


In the "Network shared storage settings" window, you can use the corresponding buttons to manage the network shared storages:
|
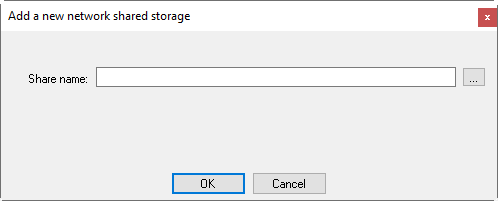
To add a new network share, press the "Add new" button; the following dialog box appears: |
|
|
Use the |

|
Caution
|
Never use the same file locations for different databases. This may cause the deletion of files in another Cinegy Archive database! |
|
Caution
|
The base path for different media file type shares, nested inside each other, cannot be used as file locations; this will lead to incorrect results when performing the consistency checking operations and to the accidental deletion of media files. |
|
To remove the selected network share, press the "Delete" button. |
|
Tip
|
To relocate the network share, enter a new path in the "with new path" field or browse for it via the button.
|
|
Use the "Apply" button to apply the network share location changes. |

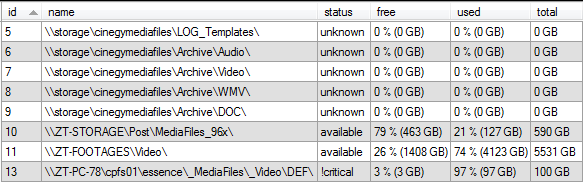
Details of network shared storages are represented in the bottom part of the "Cinegy Archive Database Wizard" dialog box in a table view. Each share is automatically assigned to its own "Share ID" that is used by the system and cannot be changed. The storage status and its consumption are shown in the right-hand columns of the table. When the free space of the storage is less than 20% of the total space, the status is displayed as "!critical".
|
To update the network shared storages information preview, press the "Refresh" button. |

|
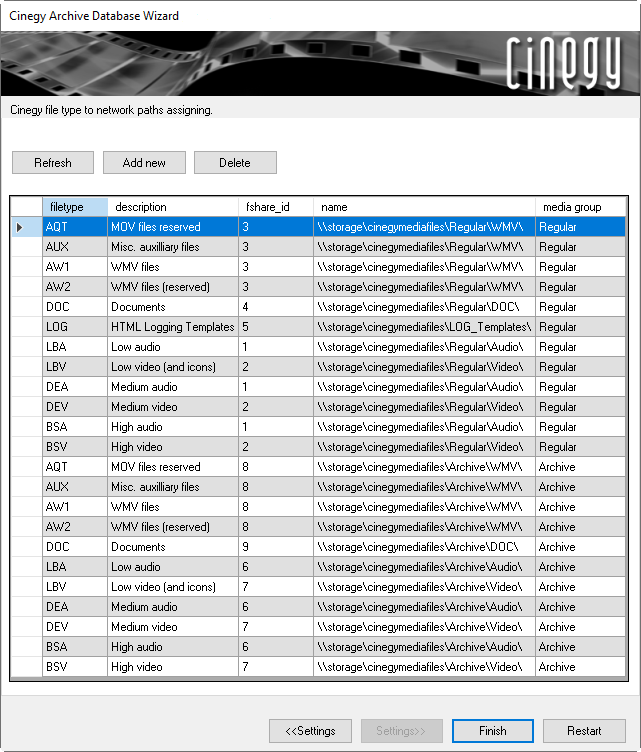
Press the "Settings" button to assign the file types used in Cinegy Archive to the network shared storages: |
|
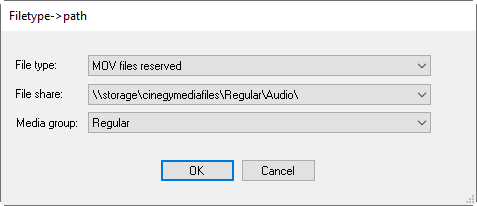
Press the "Add new" button to assign a file type to a file share by choosing the required type and a share from the drop-down lists. |
|
|
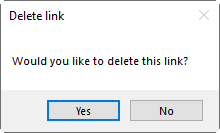
To delete the selected link, press the "Delete" button. The following confirmation window appears: |
|
|
Press the "Finish" button in Cinegy Archive Database Wizard to complete the database configuration. |

|
Important
|
To change network storage locations and reassign media archive file types, use the "File types and locations" configuration group within Cinegy Archive Manager. Refer to the File Types and Locations article in the Cinegy Archive Manager Manual for more details. |
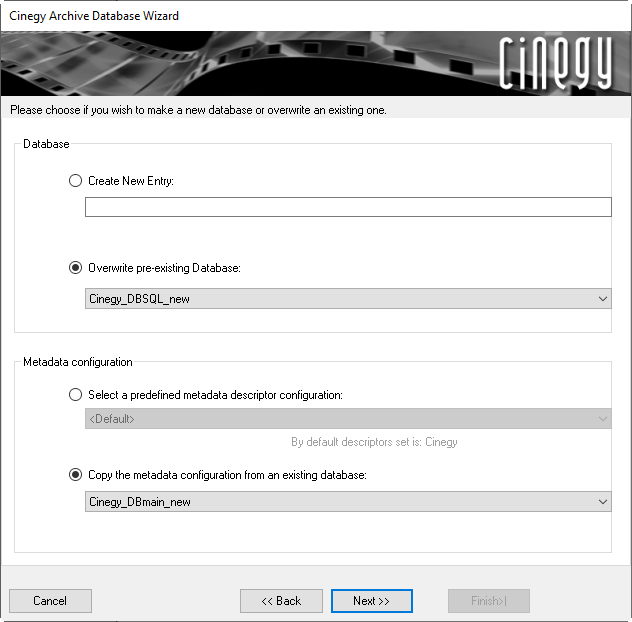
Overwriting Pre-existing Database
To create a new database using the existing empty one, click the "Overwrite pre-existing Database" option, then select the preferred database from the list of active SQL Server databases:
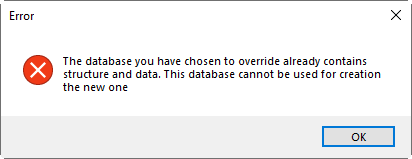
It is not allowed to create a database from one that already contains data. In this case, the following warning message will appear:
You can change the metadata descriptors set for the database you are creating by choosing the desired one from the drop-down list. The "Cinegy" metadata descriptors set is defined by default. Alternatively, you can copy metadata configuration from the existing database by selecting the corresponding option and choosing the source database from the drop-down list.
Having selected an empty database, press the "Next" button to proceed with the installation settings:
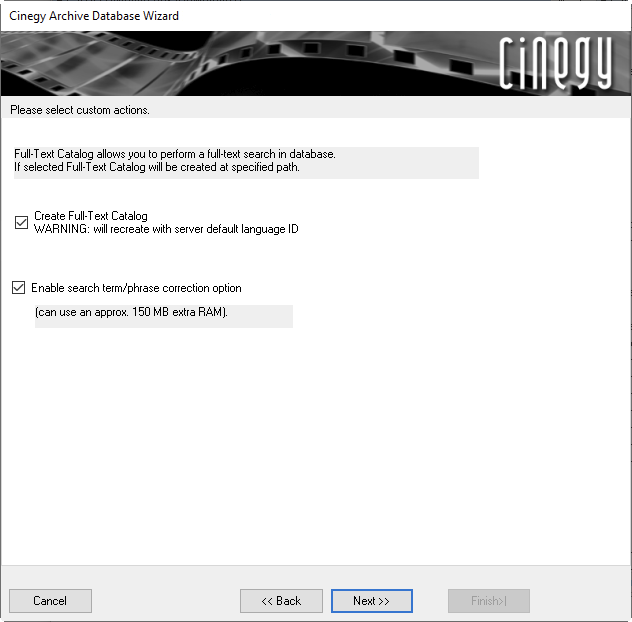
In this step, select the options required for your database:
|
Important
|
Refer to the Full-Text Service article in the Cinegy Archive Manager Manual for detailed information on its configuration. |
|
Note
|
"Enable search term/phrase correction option" provides a fuzzy search feature. The dictionary for the search term/phrase corrector is saved in the Cinegy Archive database. This functionality works only for English and uses only an English dictionary. This option is not supported for Cinegy Archive databases v16. |
Press the "Next" button to proceed.
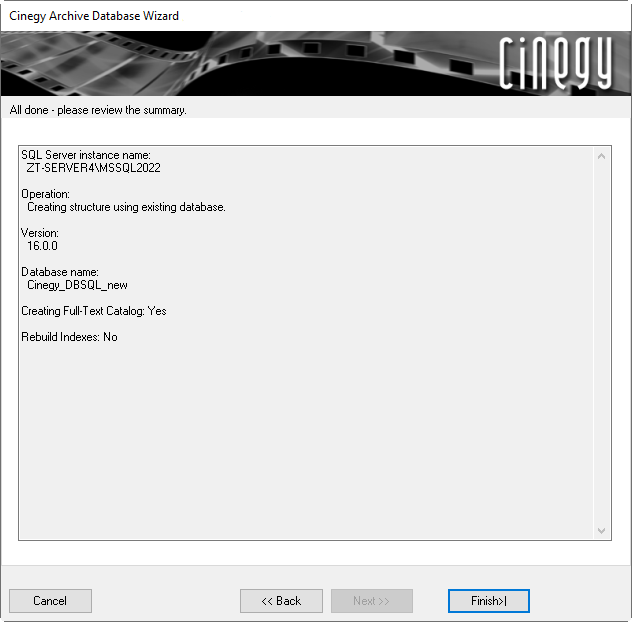
The summary dialog allows you to review the settings summary for the database you are creating. To make changes, you can use the "Back" button to return to previous steps of the wizard. Press "Finish" to begin the creation of the database.
After the creation process is completed, press Show details at the "End of processing" step of the wizard to view the detailed summary about database creation:
|
Use the "Save Log" button to generate the text log file containing the procedure details of the database creation process. |
|
Press the "Settings" button to set up the network shared storages as it is described above. |
|
Press the "Finish" button to close Cinegy Archive Database Wizard. |
|
Press the "Restart" button to restart Cinegy Archive Database Wizard. |

|
Important
|
To change network storage locations and reassign media archive file types, use the "File types and locations" configuration group within Cinegy Archive Manager. Refer to the Media Groups, File Types article in the Cinegy Archive Manager Manual for more details. |