Nodes Explorer
Reading time ~6 minutes
The Cinegy Archive database content is laid out as an explorer tree structure in the "Nodes" dialog:
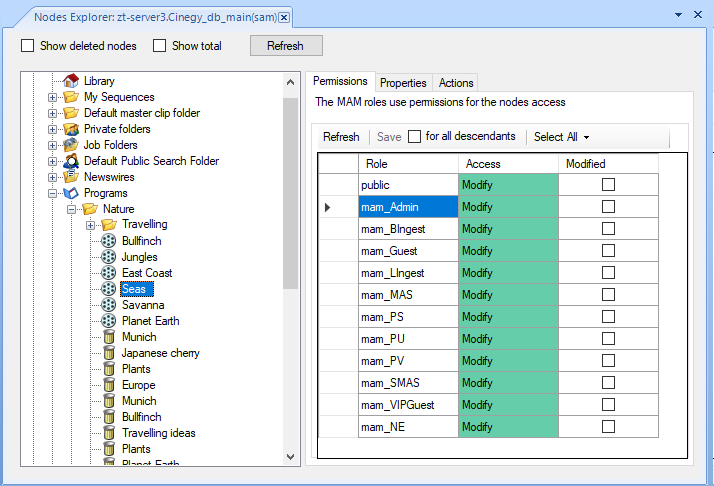
The "Nodes Explorer" window allows you to perform node management, including configuration of the access type to separate nodes, deletion of nodes marked as deleted, etc. The options are divided into 3 subsequent tabs: "Permissions", "Properties", and "Actions".
Show Deleted Nodes
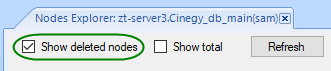
Select the "Show deleted nodes" checkbox to see all removed nodes. Objects deleted by the user disappear from the Cinegy Archive explorer, but the database administrator has to approve permanent deletion from the archive storage.

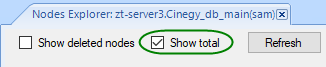
Show Total
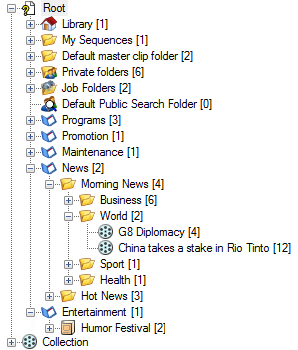
Select the "Show total" checkbox to view all folders and objects in the Cinegy Archive database. For example, the "News" Portfolio in the picture below has the number 2 in square brackets, which stands for the number of folders. The "Morning News" folder contains 4 children: "Business", "World", "Sport", and "Health". The "G8 Diplomacy" Roll has the number [4], meaning that it contains 4 clips.
Press the "Refresh" button to see the latest status in your Cinegy Archive database.
Permissions
The "Permissions" tab allows you to change access rights assigned to every role.
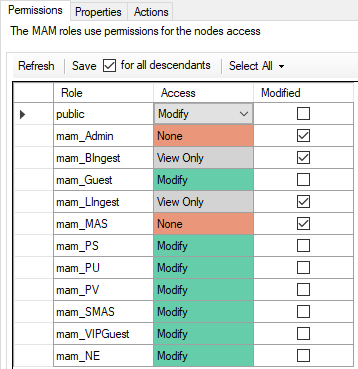
Select the role and assign its access right by choosing the desired option from the drop-down list:
-
Modify – the user has full access to the node;
-
View only – a node is marked with a blue lock. It can be copied, but not changed;
-
None – the user does not see and cannot modify the node.
Select the "for all descendants" checkbox and press the "Save" button to apply the specified rights to all sub-nodes.
Access rights modification is indicated with the selected "Modified" checkbox until it is saved or dismissed.
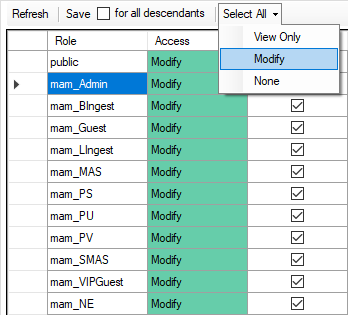
Use the "Select All" drop-down list to assign the same permission type to all roles:
Press the "Refresh" button to reset all changes.
|
Note
|
If the rights are not explicitly specified, they are inherited from the parent object. |
Nodes Access Rights Correlation
|
Note
|
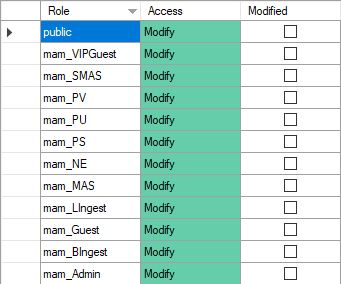
Please note that the "public" role is contained in every database, which includes system databases. Permissions granted to the public role are inherited by all other users and roles because they belong to the public role by default. |
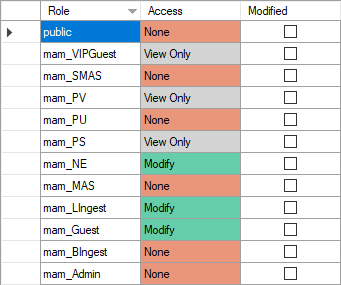
Since the "Modify" permission is of the highest priority, when you assign it to the "public" role, the "Modify" permission is automatically assigned to other roles once you press the "Save" button. "View only"/"None" permissions will be disabled for other roles, even if you choose them in editing mode:
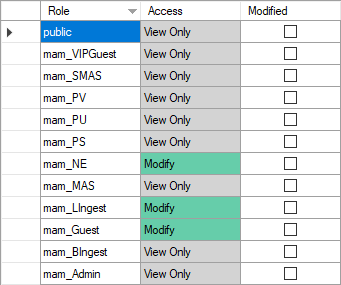
If "View only" is specified for the "public" role, then for other roles the same permission and/or "Modify" can be specified, but not "None", once you press the "Save" button:
If "None" is specified for the "public" role, then for other roles, you can specify any access rights:
Press the  button to save your access rights modifications.
Press the  button to discard changes and restore the previously configured access rights.
Properties
Go to the "Properties" tab to see detailed information on the selected object:

Each object has the following properties:
-
Name – the name of the object;
-
Type – the type of the object;
-
Created – the creation date and time;
-
By – the user who has created the selected object;
-
Modified – the date and time of the latest modification;
-
By – the user who has modified the selected object;
-
Locked by – the user who has locked the selected object, if any;
-
Children total – the number of child elements;
-
Deleted – the number of deleted objects;
-
ID – the internal unique identifier.
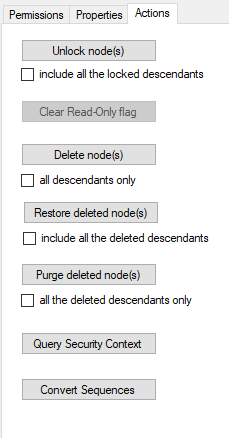
Actions
In the "Actions" tab, you can perform several actions such as unlocking, restoring, or deleting the selected node.
| Command | Action | ||
|---|---|---|---|
Unlock node(s) |
Use this option to unlock the node if it is locked when any action should be performed with it. Select the "include all the locked descendants" checkbox to unlock all sub-nodes. |
||
Clear Read-Only flag |
Use this option to remove the read-only status for the selected node.
|
||
Delete node(s) |
Use this option to delete a selected node. Select the "all descendants only" checkbox to delete the sub-nodes only. |
||
Restore deleted node(s) |
Use this option to restore a deleted node. Select the "include all the deleted descendants" checkbox to restore all deleted sub-nodes. |
||
Purge deleted node(s) |
If you are sure that a node is obsolete, press the "Purge deleted node(s)" button to delete the node permanently. Select the "all the deleted descendants only" checkbox to delete all sub-nodes permanently.
|
||
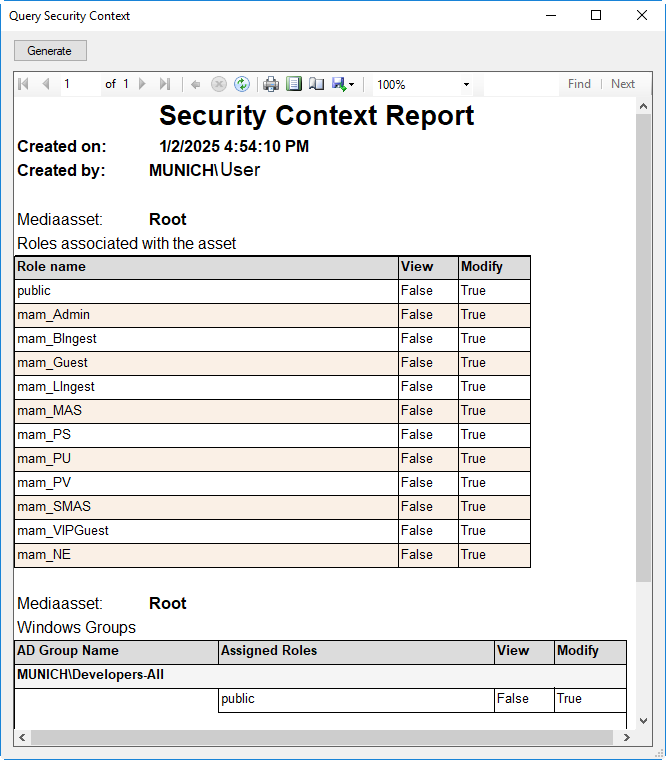
Query security context |
Use this option to generate a report for a selected object that shows the security parameters for AD users and AD user groups. |
||
Convert Sequences |
Use this option to convert Sequences without master audio tracks (prepared in Cinegy Desktop 9.5.5 and earlier) into the new format supporting the mapping of new audio tracks. |
A sample of the security context report is shown below:
Sequences Conversion
Sequences of old types can be converted into the new format according to the selected conversion schema. This operation is pre-configured and performed manually.
|
Press the "Convert Sequences" button; the following dialog appears: |

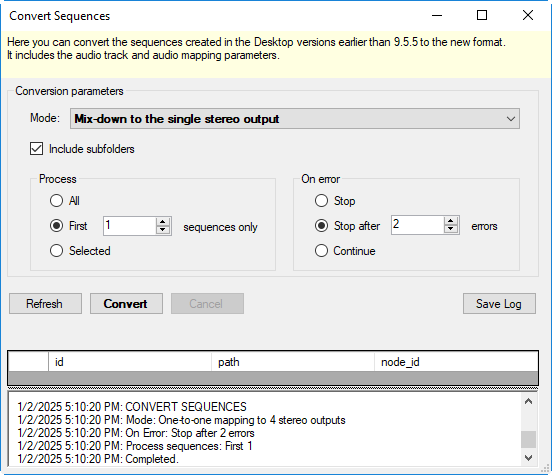
Choose Sequence conversion mode by selecting the desired option from the corresponding drop-down list:
-
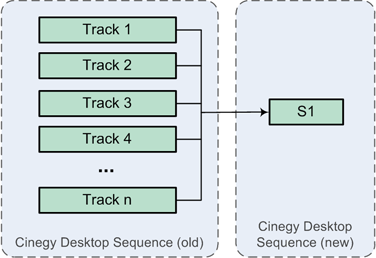
Mix-down to the single stereo output – all audio tracks from the initial Sequence will be mixed down into one stereo output track in the converted Sequence:
-
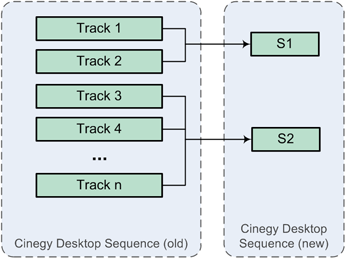
Mix-down to two stereo outputs – all audio tracks from the initial Sequence will be mixed down into two stereo output tracks in the converted Sequence:
-
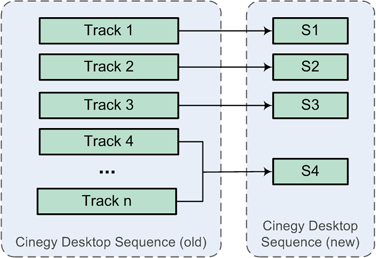
One-to-one mapping to 4 stereo outputs – all stereo tracks from the original Sequence will be mapped into 4 output stereo tracks in the converted Sequence correspondingly:
Select the "Include subfolders" checkbox to apply the conversion from a parent node to its child nodes, including only Sequences.
Narrow the range of Sequences to be processed by choosing the corresponding "Process" pattern:
-
All – all the Sequences from the selected folder will be converted into the new format;
-
First – a specified number of first Sequences from the selected folder will be processed. Enter the desired number in the corresponding field via the keyboard or use the
 arrow buttons;
 -
Selected – only selected Sequences in the selected folder will be processed.
You can also define the application behavior while converting Sequences on error occurrence:
-
Stop – the Sequences conversion will stop immediately if an error occurs;
-
Stop after – the Sequences conversion will stop after a certain number of errors occur (defined in the corresponding field);
-
Continue – the Sequences conversion will continue skipping the errors, if any.
|
Use the "Refresh" button to get the current state of the conversion parameters. |
|
Use the "Save log" button to generate the text log file containing information about the conversion process of Sequences. |
|
Having defined all the parameters, press the "Convert" button to start converting Sequences to the new format. |
|
Press the "Cancel" button if no changes should be applied. |


