Cinegy Route Manager
Reading time ~8 minutes
Cinegy Route Manager allows you to manage the streams and channels that are being registered by Cinegy Route Directory Service.
Once Cinegy Route Manager is started, the following window appears:
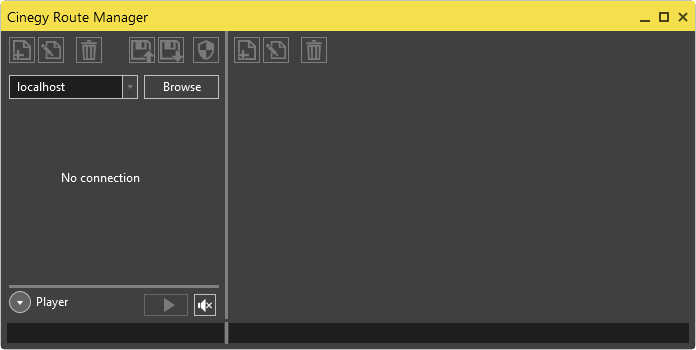
You can connect to localhost if the Cinegy Route Directory Service is installed on your local computer or enter the Cinegy Route Directory Service IP address or the network name in case it is being used remotely.
|
Note
|
Please make sure the Cinegy Route Directory Service is running; otherwise your connection cannot be established. |
|
Press the "Browse" button to connect to the Cinegy Route Directory Service on the specified server. After a successful connection is established, a list of specified streams and channels will appear: |


Main Menu
Using Route Manager, you can organize and set up the physical sources groups and virtual destinations groups used for managing IP streams and channels being registered by the Cinegy Route Directory Service.
|
With the help of the first two buttons of the main toolbar, you can add or edit a physical source or a virtual destination group. |

|
Tip
|
Alternatively, double-click the required physical source / virtual destination to edit it. |
|
To delete an existing physical source, select the required group and press the "Delete" button in the left-hand part of the main toolbar. You will be asked to confirm your decision. |
||
|
The next two buttons allow you to back up the database or restore a previously saved database. |
||
|
|||
|
The "Security" button opens a window to check Route server security settings for the corresponding group. |
||
|
|||


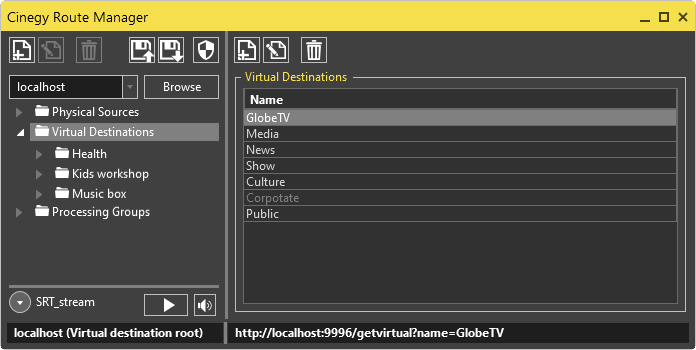
The left-hand panel displays the groups of physical sources and virtual destinations for the currently connected the Cinegy Route Directory Service in the tree-like structure:
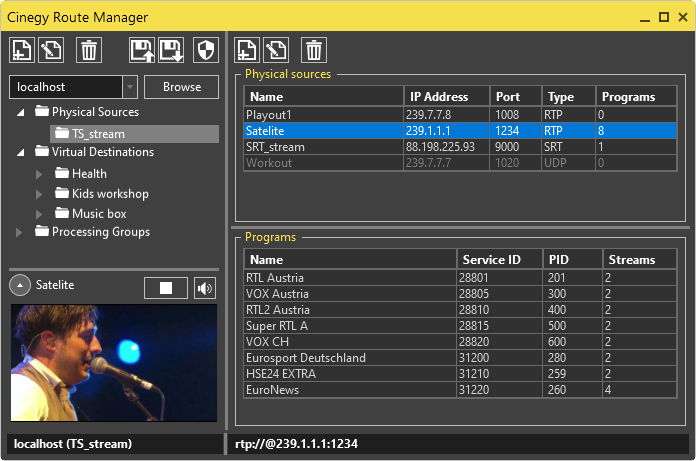
Below this tree there is a player where the video stream of the selected network source is previewed.
|
You can show / hide the player using the corresponding button. |
|
Press the corresponding buttons to start/stop the playback. |
|
You can play/mute audio by pressing the corresponding buttons. |


Once you click the "Physical Sources" or a physical sources group, all the available network physical sources with their corresponding information will be displayed in the right-hand panel of the Cinegy Route Manager window. All the available programs for the selected source are listed in the table below.
The virtual destinations structure allows the user to classify incoming physical streams into logical virtual groups.
All the publicly visible sources are highlighted, whilst non-visible sources are dimmed.
|
Important
|
Refer to the Visibility Management article for details on the visibility configuration. |
|
Tip
|
All the sources and programs in the tables in the right-hand panels can be sorted by pressing the corresponding column header. |
Objects Copying and Moving
Cinegy Route Manager allows you to copy and/or move folders and channels. To copy objects and paste them to a desired location, use the "Copy" and "Paste" context menu commands respectively:

To move the object(s) from one source group to another, use the "Cut" and "Paste" context menu commands.
Physical Sources
Physical Sources Groups
Grouping the physical sources can help the operator to organize and simplify managing of the multicast IP streams.
|
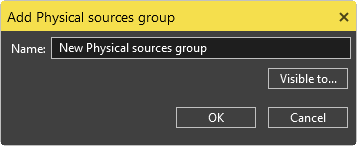
To create a new physical sources group, choose the "Physical Sources" object and press the "Add Physical sources group" button in the left-hand part of the main toolbar. The following dialog box appears: |
|
|
Enter a group name here and define its visibility parameters using the "Visible to…" button. |
|
|
To change the name or visibility parameters of the existing physical sources group, use the "Edit Physical sources group" button in the left-hand part of the main toolbar. |
|
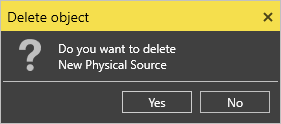
To delete an existing physical sources group, select the required group and press the "Delete Physical sources group" button in the left-hand part of the main toolbar. The following dialog box will appear asking you to confirm your decision: |
|


|
Note
|
The procedure for creating, editing and deleting virtual destination groups is the same as for operations with physical sources groups. |
Physical Source Creation
|
To add a new physical source, select the physical group, in which you would like to create it, and press the "Add Physical source" button located in the right-hand part of the Route Manager main toolbar. |
The following dialog box appears:
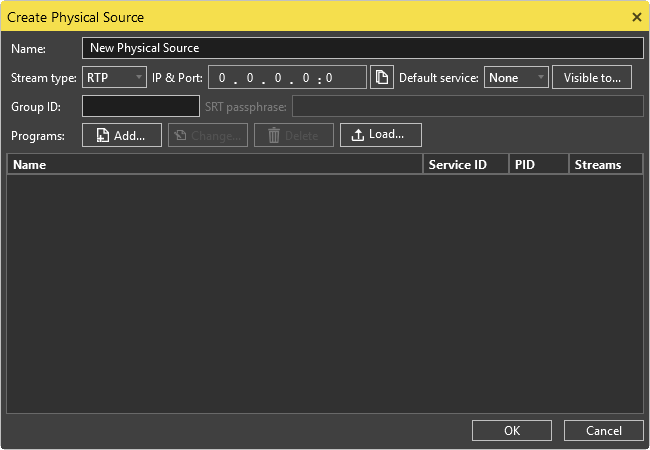
Here define the following parameters:
-
Name – a stream name.
-
Stream type – the stream protocol type (RTP, UDP or SRT).
-
IP & Port – the source IP (multicast group IP) and a port number.
CautionPort 8888 is the default service port; it cannot be used here. TipPress the  button to copy the RTP/UDP/SRT URL to clipboard.
-
Default service – default service ID; it defines which service (program) from the stream will be used by default. Defining this parameter (when it is not "None"), provides you with the ability to manage the whole stream as the program and this very program will be used as the default service for this stream.
When working with a single-program stream, the only existing program is always used as the default service.
NoteThe service ID value is "None" by default.
-
Visible to – define the visibility parameters for the current network source.
-
Group ID – the physical sources group identifier.
-
SRT passphrase – define the passphrase for SRT stream encryption.
To load the stream information directly from either DVB or MPEG stream, press the "Load" button in the "Programs" field and use the corresponding option to create the list of all available channels automatically:

Program Creation
|
To add a channel manually for the current physical source, use the "Add…" button in the "Programs" field. |

The following dialog box appears:
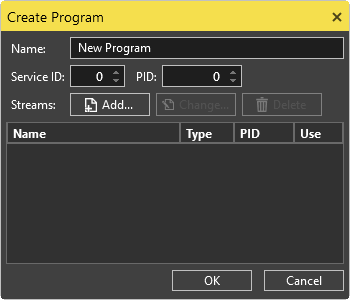
Enter the program name, service ID and a Program Identification (PID) number here.
|
Note
|
The program PID number should be unique. |
|
Press the "Add…" button in the "Streams" field to add a new stream to the "Streams" list for the program you are creating. |
The following dialog box appears:

Enter a name for the new stream and define its type (Video, Audio, Subtitle, Teletext or SCTE35) and PID number. Press "OK" to create the stream.
|
Note
|
The program PID number should be unique. |
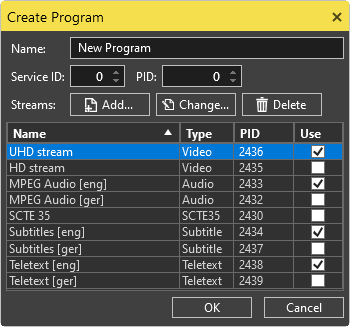
In the "Create Program" dialog box you can also define which streams to use in the current program by selecting the corresponding stream(s) in the "Use" column:
|
Press the "Change…" button to edit the selected object. |
|
Press the "Delete" button to remove the selected object. |


Virtual Destinations
Virtual destinations are intended to create source IP streams using the dynamic physical source IP streams switch. This allows the operator to change the physical source IP stream any time without the necessity for re-configuring all the clients to listen to the new IP stream. When the virtual destination IP stream is changed, all the clients will receive updated info in a few seconds without interrupting the playback.
|
Important
|
Refer to the Cinegy Route Browser article for details on configuring virtual destinations. |
Virtual Destination Groups
Virtual destination groups are intended to organize incoming IP streams into logical groups:
|
Important
|
Creating, deleting and editing virtual destination groups is similar to the physical sources groups operation. |
Virtual destination groups will be shown as separate tabs in the Cinegy Route Control application.
Virtual Destination Creation
|
To add a new virtual destination, choose "Virtual Destinations" or select a desired virtual destinations group, in which you would like to create a new destination and press the "Add Virtual destination" button in the right-hand part of the main toolbar. |
The following dialog box appears:
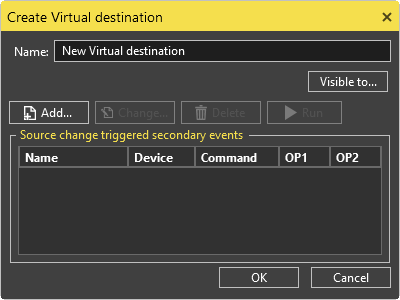
Enter a virtual destination name here and define its visibility parameters using the "Visible to…" control.
|
Important
|
Visibility configuration is described in the Visibility Management article. |
Secondary Events
Cinegy Route Manager allows users to add events to network streams which are controllable via the secondary events through Cinegy Event Manager.
|
To create a secondary event for the current virtual source, use the "Add…" button in the "Source change triggered secondary events" section. The following dialog box appears: |
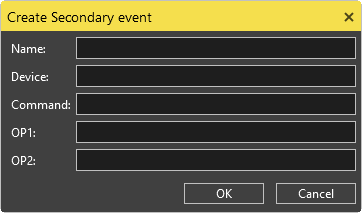
Here define the following parameters:
-
Name – the name of the secondary event.
-
Device – the device that will receive the event.
-
Command – the command.
-
OP1 – the command option 1.
-
OP2 – the command option 2.
Having defined parameters, press "OK".
|
Press the "Change…" button to edit the selected object. |
|
Press the "Delete" button to remove the selected object. |
|
Press the "Run" button to send the event to Cinegy Event Manager for further processing. |

Processing Nodes
Processing nodes are intended to create and edit sets of various video and audio streams. You can select only one video stream from the primary video sources and up to four audio streams from the secondary audio sources. In processing nodes it is possible to mix audio streams, edit the audio delay and signal level values. When the set of video and audio streams is changed, all the clients will receive the updated information in a few seconds without interrupting the playback.
The processing groups and nodes can be created, edited and deleted in the same way as virtual destination groups and nodes.