Scaling with PowerShell
Reading time ~12 minutes
At TechCon, we demonstrated some useful tricks for managing larger-scale Cinegy deployments (or just test labs when you are doing lots of rolling out versions).
This post will recap some of the tricks and tips we showed and provide the relevant PowerShell snippets. You can grab the full PowerShell elements over from our GitHub repos, but right now, let’s jump into the bits that we look at here.
Making Life Easier
We showed off scripts that performed 4 scenarios:
-
Fresh booted auto-email with TeamViewer ID.
-
Cinegy License audit and expiry alarm.
-
Checking installed versions via WMI on many servers.
-
Updating Cinegy Air / Multiviewer with scripted MSI deployment to multiple machines.
Some of the later scenarios build on some bits of script from earlier, so I won’t describe anything twice.
Fresh booted auto-email with TeamViewer ID
If you are rolling out test machines or have created a standard image you copy machines from (for example, an Amazon AMI), it can be useful to have a machine announce that it is up (or had a reboot) and mail you the TeamViewer ID the machine has to reach it on. The script has three main elements:
-
Read TeamViewer ID from the Windows Registry.
-
Prepare an email containing the info.
-
Connect to a mail server and send the email.
First – reading the TeamViewer ID from the Windows Registry. This is a simple single-line, since PowerShell speaks to the Windows Registry just as simply as reading from a file system. Below, we store the value we read from the Windows Registry key into a variable called $clientId.
$clientId = Get-ItemProperty 'HKLM:\SOFTWARE\Wow6432Node\TeamViewer' -Name ClientIDNext, a slightly longer block to create and populate an email message. Most of this should be self-explanatory – once you have the message object created at the top of the block.
# Creating a Mail object
$msg = new-object Net.Mail.MailMessage

# Email structure
$msg.From = "demoscript@cinegy.com"
$msg.ReplyTo = "demoscript@cinegy.com"
$msg.To.Add("lewis@cinegy.com")
$msg.subject = "Templated Cinegy Machine Booted"
$msg.body = "$env:COMPUTERNAME has just booted, and has a TeamViewer ID of " + $clientId.ClientID
The final part of the script takes the resulting email, connects to an SMTP server, and sends the mail. In the example below, we are using an internal open SMTP relay (which does not require any authentication). Such a server is fine in a lab, just don’t expose this SMTP port to the Internet!
# SMTP server name
$smtpServer = "smtp.lab.local"
# Creating SMTP server object
$smtp = new-object Net.Mail.SmtpClient($smtpServer)
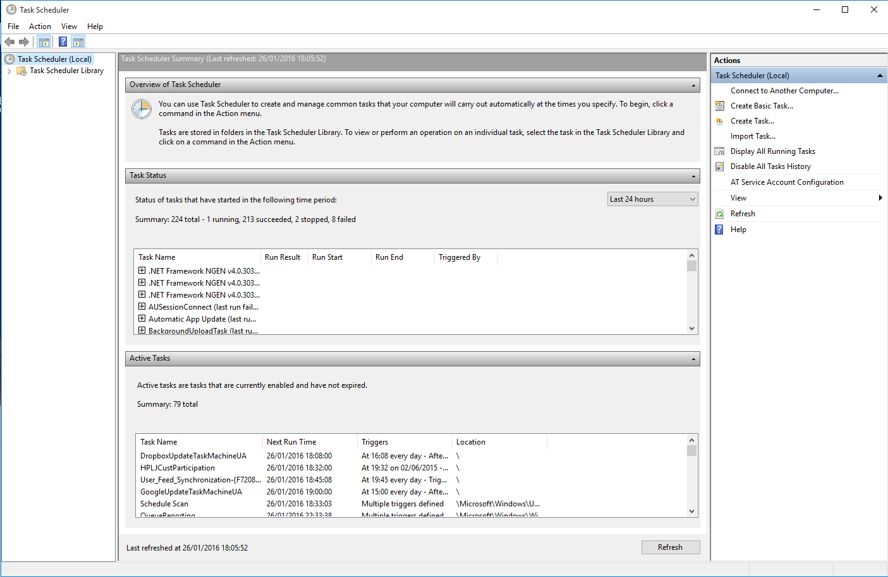
$smtp.Send($msg)To make this actually run at boot, the most reliable mechanism is the in-built Windows Task Scheduler, which is an excellent way to run processes at startup, login, or at other intervals.
Cinegy License audit and expiry alarm
The next scenario is really useful if you ever use the Cinegy software on a temporary or trial basis, and need to be aware when you might suddenly hit the expiry. We don’t provide a central mechanism for alarming, since the products that use our licenses work in very diverse ways. However, we do expose all the status info via an easy-to-consume XML web resource. Reading this and checking the status is a great way to watch out for expirations or just comparing against an expected set and warning that things are not as expected!
Again, this script breaks down into parts:
-
Read a list of servers to query.
-
Pull down XML from the license service.
-
Save the raw XML result to a cache (maybe you want to compare and alert on change?).
-
Loop through XML checking for expirations.
There are many ways to loop through a list of servers, but for this demo, I’ve chosen to arrange servers inside a simple XML list and then read these into an array. Here is a sample XML:
<ServerList>
<Server Name="Microserver" Address="http://10.183.3.69:8989/getinfo"/>
<Server Name="Lewis-T20" Address="http://127.0.0.1:8989/getinfo"/>
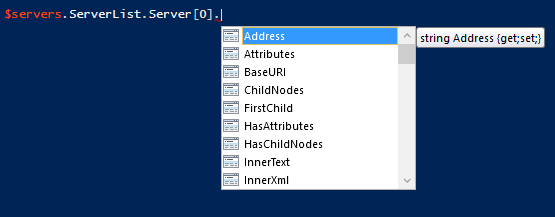
</ServerList>Once we have information inside XML, it is really easy to access that information with PowerShell. This is particularly because PowerShell does one specifically great thing – if you load a variable with some complex object or data, it fills in auto-complete while you explore that variable in the PowerShell editor. It looks like this:
Reading the XML into PowerShell and popping it into a variable to create a loop looks like this:
# read server list from XML
[xml]$servers = Get-Content "ServerList.xml"

ForEach ($server In $servers.ServerList.ChildNodes)
{
    #body of script will go here
}
Reading the list and then accessing the repeated server elements inside a loop is made much simpler thanks to PowerShell’s understanding of XML natively. So, with that done, onto the next step – grabbing the license data from the web resource. The server XML contains the address of each server that indicates the URL location for the license – although, since it is unlikely to move around, you could build it from the server name (we skipped this for simplicity and to show off XML attribute access more clearly here). Now inside the loop for each server, we need to download the details, which we do like this:
# webclient to grab license data from servers
$client = New-Object Net.WebClient
$url = $server.Address
$serverResponse = [xml]$client.DownloadString($url)
Just like the server list, we have now got a variable (which will even support auto-complete as when loaded from a file) that contains the license details. Now we have the response, we can easily save it to a file – but we can’t just save it to the same file, or we will end up with only the last server details. Below you can see generating a unique file name, checking we got a response from the license service, and then writing all the data to it:
$saveFile = ".\\Saved\\" + $server.Name + ".xml"

if($serverResponse)
{
    if($serverResponse.LicensingService)
    {
        $saveTime = Get-Date
        Out-File -filepath $saveFile -InputObject  $serverResponse.OuterXml
    }
}
The final part of this scenario is the most complex (or maybe just the most verbose?) part of the process. Now we need to walk through all the licenses and look to see if any are within a certain number of days from expiring. In this script, we just print to the screen that we found some, but you could very sensibly combine this with the first script and make it email someone when it finds expiring entries.
foreach($licenseTypeNode in $licenseDetails.LicensingService.AvailableLicenses.LicenseType)
{
    foreach($licenseNode in $licenseTypeNode)
    {
        if (($licenseNode.License.minDaysLeft -lt 11) -and ($licenseNode.License.minDaysLeft -gt -1))
        {
            Write-Host -ForegroundColor Red "OMG just" $licenseNode.License.minDaysLeft "days left for" $licenseNode.License.ParentNode.name
        }
    }
}
In the above snippet, again PowerShell auto-complete (in Microsoft-speak, this is called IntelliSense) is your friend while working out the structure of the XML returned. If you need to alter this, just run the script inside the PowerShell ISE and then mess around with the $licenseDetails variable and see what values you have inside it. But most of the work above is cycling through loops, and then finally checking a value. Don’t forget, we mark up "eternal" licenses as having an expiry value of -1, so you need to check your value is not negative when checking!
With this script, you can regularly schedule a sweep of all your Cinegy systems to check for outdated versions, expired licenses, or broken license services (if the call to the web URL fails, that’s probably bad…). Or just take a site audit for record-keeping, because who doesn’t like doing audits!
Checking installed versions via WMI on many servers
The third article starts to show how you can use inbuilt features of Windows to manage querying installed applications. What we show is just as applicable to anything, but in this demo, we show how you can remotely discover Cinegy Multiviewer.
The parts this script breaks down into are:
-
Read a list of servers to query.
-
Check that a machine is alive/reachable.
-
Access metadata via remote WMI.
Now, reading the list of servers is practically identical to the last scenario, so we will skip this (although, since we are not connecting to any URL, we can skip including any of the license URL attributes in the input URL). However, to make things a little more interesting, we have added a step to check that a machine is at least alive and connected with a simple ping to the machine first. This step looks like this:
$hostname = $server.Name

Write-Host "----------------------------------------------------------------------------"
Write-Host "Trying $hostname"

$PingStatus = Gwmi Win32_PingStatus -Filter "Address = '$hostname'" | Select-Object StatusCode
if ($PingStatus.StatusCode -eq 0){
    Write-host "Server alive..."
    #Rest of script body here
}
While this script will contain the next part, checking only if the server responds, don’t forget this is supposed to be running inside a block like above, where we loop through all the available servers in the XML. The important part of the block is the connection to the WMI [Windows Management Instrumentation], using a cheeky PowerShell trick known as an 'alias' (Gwmi is an abbreviation of Get-WmiObject). On to the next part – using WMI to access metadata about installed apps…
$wmi = [string]::Format("\\{0}\ROOT\CIMV2:Win32_Product",$hostname)
Write-Host 'Checking for an installed version of Cinegy Multiviewer'
$app = Get-WmiObject -Class "Win32_Product" -ComputerName "$hostname" | where-object {$_.Name -eq "Cinegy Multiviewer"}

if ($app)
{
    $version = $app.Version
    Write-Host "Cinegy Multiviewer is already installed. Current Version is $version"
}
Again, this block uses some WMI features to query the install status, which does result in some confusing script lines. I’m not afraid to admit that this WMI stuff was located and implemented with help from the Microsoft documentation and the might of Google. The part that is worth understanding is where the result from the call to Get-WmiObject is piped into the 'Where-Object' command. This Where-Object command is designed to help you pick up just particular things that match against queries. In this line, we just have a simple query matching the name of the product we care about – but if you want to check for anything else (from us, or anyone), just change this string here. We’ve used this script internally for updating banks of test machines, and it proved very useful.
Updating Cinegy Air / Multiviewer with scripted MSI deployment to multiple machines
And so, our final script scenario – building on parts we used in the other scenarios, we’ll perform a remote update of some of our software on a list of machines. It’s very similar to scenario three, but with added elements to then remove and install an MSI we copy locally. If this does not work for you, watch out for permissions and firewall issues – by default, Windows will block access to server shares, so make sure you can access the hidden C$ share properly, as the user you execute the script as!
The steps for this script are:
-
Read a list of servers to update.
-
Check that the machine is alive/reachable.
-
Check if we need to uninstall first.
-
Copy the MSI to the target.
-
Run the install.
You might notice a pattern emerging in these scripts that we keep reusing parts. This is the core tenet when writing scripts – be lazy! Embracing that laziness, we will skip over steps 1 and 2 here, since we’ve seen it all before, and start straight at step 3 – checking if we already have the app installed, and getting it removed.
Cinegy MSIs will normally upgrade in place, but since we are automating the process, we might as well let the script remove the app first before installing it cleanly. One thing to note – scripting the MSI installation will not install any dependencies our software might require (such as .NET or C++ runtimes). These dependencies are usually found inside our "support" folder, and will likely be shared by many of our apps (and other apps made by other people) – so for now, we assume that somehow someone made sure these standard dependencies are already installed on the target machine. The same applies to Windows features, since our software usually requires things like the Desktop Experience to be installed in Windows Server. Basically, make sure you can install the MSI the normal way before wondering why it might not work automatically! Anyway – to the script:
$wmi = [string]::Format("\\{0}\ROOT\CIMV2:Win32_Product",$hostname)
# check that app is not already installed ‒ if found, uninstall for clean install
Write-Host 'Checking for an already installed version of the Cinegy Playout engine'
$app = Get-WmiObject -Class "Win32_Product" -ComputerName $hostname | where-object {$_.Name -eg "Cinegy Playout x64"}

if ($app)
{
    Write-Host "Cinegy Playout engine is already installed."
    Write-Host  "Uninstalling"
    $app.uninstall() > $null
}
else
{
    Write-Host "Cinegy Playout engine is not installed."
}
This is very similar to the check for a version – but in this case, we then use the .uninstall() method of the $app variable returned from the WMI query. Remember – the best scripts recycle others (and excellent scripts use sub-script 'modules' – but that is another topic). Anyway, with the app either missing or uninstalled, onto step 4 – copying the MSI to the target machine:
Write-Host "Start Install of the Cinegy Playout engine"
Copy-Item ($MSIPath + $MSIName) "\\$hostname\c$\windows\temp\"
That was easy – PowerShell has some pretty good built-in commands for doing things like copying things, and PowerShell also supports some pretty neat lazy string combinations (it just figures out that the $hostname string inside the path string has to be switched out). This just leaves one final step – triggering the remote install…
$product = [WMIClass]$wmi
$var = $product.Install("c:\windows\temp\" + $MSIName)

if ($var.ReturnValue -ne 0)
{
    Write-Host "Error installing MSI on $hostname"
    $exit = [string]::Format("exitcode: {0}", $var.ReturnValue)
    Write-Host $exit
}
else
{
    Write-Host "Installed successfully on $hostname"
}
This final step uses more WMI to create a $product variable that exposes a nice .Install method. You can point this method to your temp location with the MSI file copied in step 4, and then all that remains is checking if it worked! It seems right and fitting somehow that the final elements shown in these scenarios are all about error handling. We hope you found use for these scripts, and even more – we hope you copied all sorts of bits and glued them together to do even more things we never even thought of to make your life easier. Stay lazy!