Simple Automated Broadcast Setup Model
Reading time ~6 minutes
This article describes how to get your Cinegy software up and running for the Simple Broadcast scenario.
Through the course of this quick guide the following steps will be required to be completed:
Prerequisites
Make sure the machine you are using has the required Microsoft Windows operating system installed along with the latest service packs. Cinegy Air system recommendations are available here.
Make sure that you have at least local administrator rights required to install and configure applications on your computer.
Download the latest Cinegy Air installation package from either the Cinegy Partner portal or the Cinegy Customer portal, or visit the official Cinegy website to download a trial version of Cinegy Air, which you can evaluate free of charge.
Make sure the Cinegy Air license is applied as per instructions sent along the Cinegy product evaluation e-mail or directly from your sales manager.
Installation
For a simple automatic broadcasting only Cinegy Air and Cinegy Playout are required. Both Cinegy Air and Cinegy Playout should be installed on the same computer.
Cinegy Air PRO Installation
|
Important
|
This paragraph contains a quick installation guide. For complete description of Cinegy Air installation, please refer to the Cinegy Air Manual. |
Follow these steps to install the Cinegy Air PRO control application:
-
Run the Setup.exe file from the "Cinegy Air PRO" folder of your Cinegy Air installation package. The setup wizard appears. Press "Next" to proceed with the Cinegy Air PRO installation.
-
Read and accept the license agreement and proceed with installation.
-
Press the "Browse" button to select the installation folder and press "Next" to proceed.
-
Select the features to be installed - only Air PRO component is obligatory. Press "Next" to proceed.
-
Press the "Install" button to begin the installation. The wizard will inform you that the installation is complete. Press the "Finish" button to exit the setup wizard.
|
After installation, you will find the Cinegy Air PRO icon on your Windows desktop. |
Cinegy Playout Installation
|
Important
|
This paragraph contains a quick installation guide. For complete description of Cinegy Playout installation, please refer to the Cinegy Playout Manual. |
-
Run the Setup.exe file from the "Cinegy Playout" directory of your Cinegy Air installation package. The setup wizard appears. Press "Next" to proceed with the installation.
-
Read and accept the license agreement and proceed with installation.
-
Define the folder where Cinegy Playout will be installed.
-
Press the "Install" button to begin the installation. The wizard will inform you that the installation is complete. Press the "Finish" button to exit the setup wizard.
-
A message will inform you that the computer restart is required. Press "Yes" for the Cinegy Playout installation to be completed.
|
After restart, the Cinegy Playout Dashboard icon will appear in the notification area of the taskbar. |
Configuration
Cinegy Air PRO Configuration
|
Important
|
This paragraph contains a quick configuration guide. For complete description of Cinegy Air configuration, please refer to the Cinegy Air Manual. |
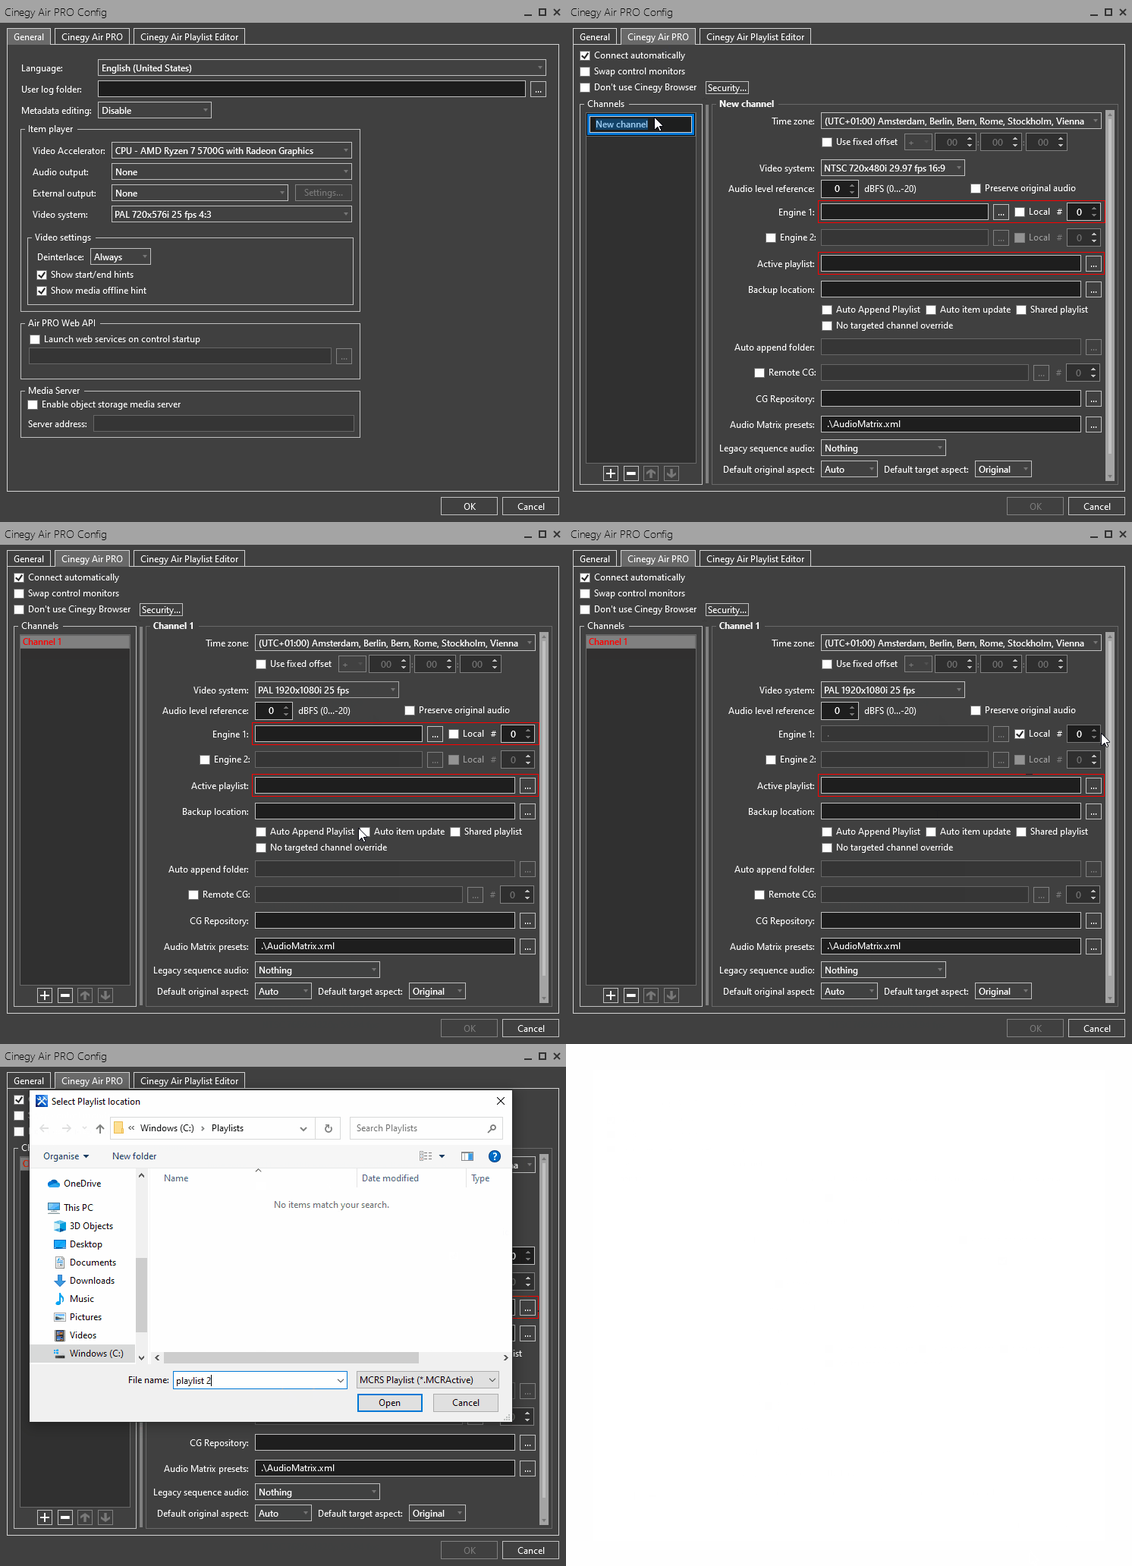
To start the Cinegy Air PRO configuration tool, go to Start > Cinegy > Cinegy Air PRO Config:
-
Switch to the "Cinegy Air PRO" tab.
-
Click the empty line underneath the list of channels and type in a channel name to add a new channel for broadcasting.
NoteFor a product demo, it is sufficient to set up just one channel. -
From the "Video system" drop-down list choose the TV format for this channel and define the aspect ratio for the video stream.
-
For "Engine 1", select the "Local" checkbox meaning that Cinegy Playout is installed and launched on the local computer. Leave the "0" value in the "#" field meaning that instance number 0 will be used for this channel playout.
-
In the "Active playlist" field press the
 button to choose the location and define the name for the active playlist.
 -
After completing all the steps, click "OK".
Cinegy Playout Configuration
|
Important
|
This paragraph contains a quick configuration guide. For complete description of Cinegy Playout configuration, please refer to the Cinegy Playout Manual. |
-
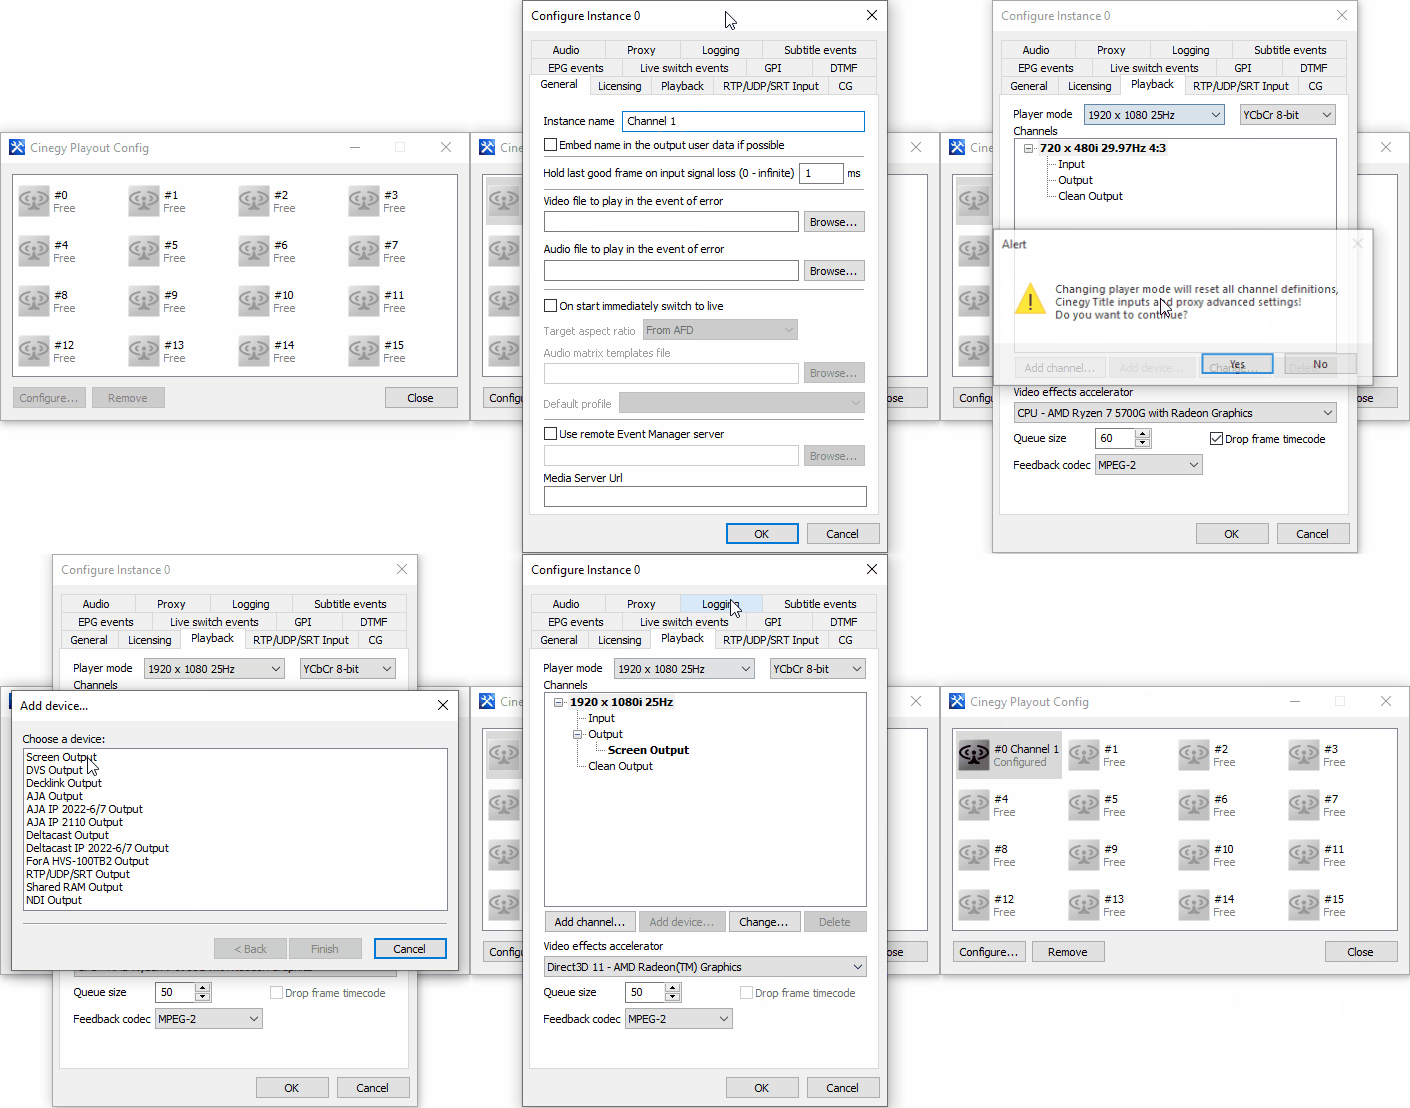
To start the Cinegy Playout configuration tool, go to Start > Cinegy > Cinegy Playout Config. It can also be accessed by right-clicking the icon in the taskbar and using the "Open configuration utility" command. By default, no instances are configured and they are all marked as "Free". Select the instance #0 (this instance number was defined during Cinegy Air channel configuration) and press the "Configure…" button. The configuration dialog of that particular instance will appear.
-
Optionally, on the "General" tab, specify the instance name.
-
In the "Licensing" tab select the "Cinegy Air PRO" connection to allow the Cinegy Air PRO client to connect to the corresponding Cinegy Playout engine. The "License usage summary" grid shows the amount and types of required licenses. Make sure all these licenses are available; otherwise, the Cinegy Playout instance will not run at all.
-
In the "Playback" tab in the "Player mode" drop-down list choose the same TV format as defined for the Cinegy Air playlist in the previous section.
CautionThe video system frame rate should match the frame rate of the content to be used in the playlist. -
To show output on screen for testing purposes, define "Screen Output" as the output device.
NoteFor information about the input and output devices configuration, refer to this article. -
In the "Video effect accelerator" drop-down list choose the video board available on your computer.
-
Optionally, on the "Logging" tab, define the log files creation settings that will simplify the support procedure and help the user in troubleshooting potential issues that may occur.
Launching Cinegy Playout
Cinegy Playout is responsible for the playlist items playback. By default, Cinegy Playout is loaded automatically on system startup and restarts automatically in case of failure.
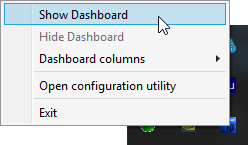
When Cinegy Playout is started, the corresponding icon is displayed in the notification area of the taskbar. To see and control the status of all instances, right-click the icon in the taskbar and select the "Show Dashboard" command:
The following Cinegy Playout Dashboard window will appear:

Here you can see the control monitors of all configured Cinegy Playout instances. In this demo guide we have set up one Cinegy Playout instance #0.
|
Press the "Start" button to start the instance broadcasting. |
Each instance can be started/stopped individually.
As "Screen output" was defined as an output device, the window with a blue frame will be opened after the Cinegy Playout instance is started. It will display video frames as soon as a media file is sent on air via Cinegy Air control application (this will be described in the next step).
|
Note
|
If you are using trial license, the "Cinegy Demo Version" sign will be imprinted in the center of the frame. |
Cinegy Air Broadcast Control
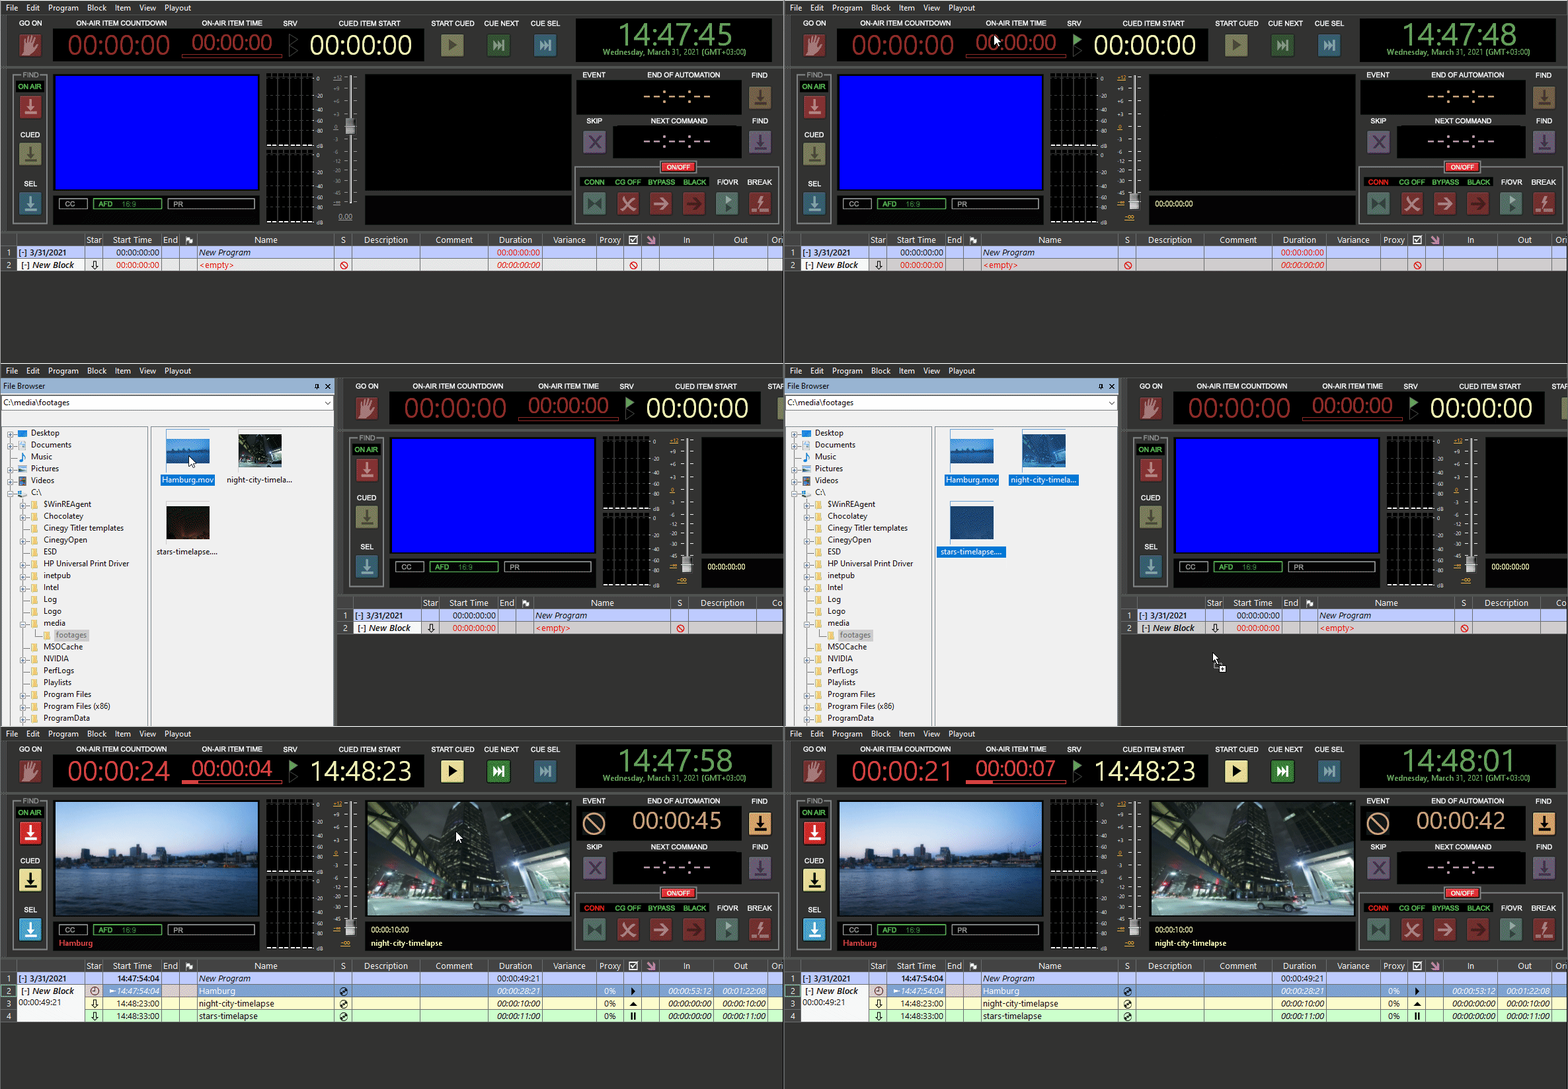
Start the Cinegy Air control application and establish connection to Cinegy Playout by activating the ON/OFF bar and pressing the "CONN" button.

If the connection is successful, all Cinegy Air functions are activated.
To fill in the playlist with the content in Cinegy Air supported formats, simply drag-and-drop the media file(s) from the Windows explorer.
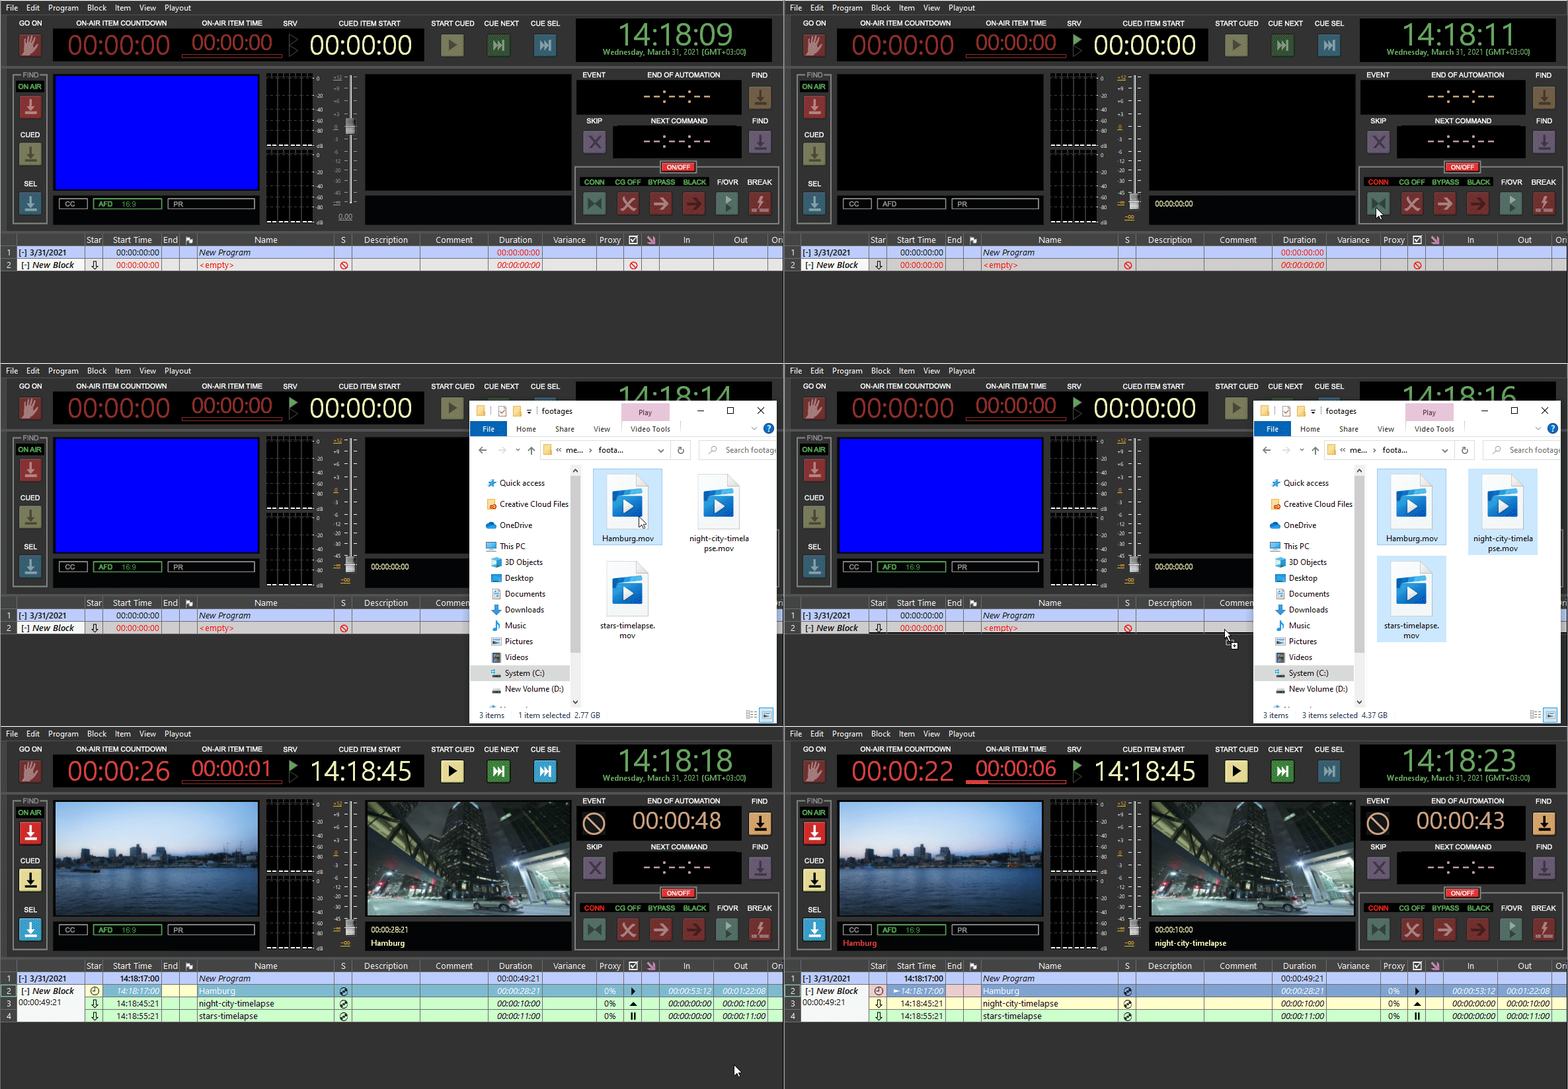
You can also add items to the playlist via the "Insert" > "Item(s)…" context menu command.
Another way to add item to the playlist is using the integrated browser. The File Browser allows browsing for video clips stored on the local computer or on a shared network location.
|
Note
|
Please mind that adding the items to the playlist is possible if the items TV format is compatible with the video system defined via the Cinegy Air Configurator. |
