Getting Started
Reading time ~3 minutes
Starting Cinegy Archive Manager
|
Note
|
Full administrator rights on your SQL Server are required to ensure proper work with Cinegy Archive Manager. |
|
Caution
|
Please mind, Cinegy Archive Manager version should be compatible with your current Cinegy Archive database version. |
|
Caution
|
The changes applied to the Cinegy Archive database via Cinegy Archive Manager will be visible in the Cinegy Desktop clients after their restart. |
|
Caution
|
It is strongly recommended that you never use any 3d party tools to modify Cinegy Archive database. Any damage caused by such actions is not covered by support official policy. For database modifications it is recommended to use only Cinegy-provided tools or Cinegy-provided APIs. |
|
In order to run the application double-click the Cinegy Archive Manager icon located on your Windows desktop. |
In a dialog box that appears, check the connection to SQL Server. You can enter the server name via the keyboard or select the required one from the drop-down list after pressing the "Browse" button:

|
Note
|
"Use trusted connection" means that Windows user account is used for authentication on the SQL Server. Corresponding user account should have enough permissions assigned to perform administrative database operations. If you deselect the "Use trusted connection" checkbox, you will need a dedicated username and password for SQL Server. |
Once the connection settings are defined, press "OK" to start working with Cinegy Archive Manager.
|
Note
|
Pressing the "Close" button will launch Cinegy Archive Manager without connecting to a server. Use the "Connect to SQL Server" command from the "File" menu on the toolbar to connect to SQL Server. |
Interface
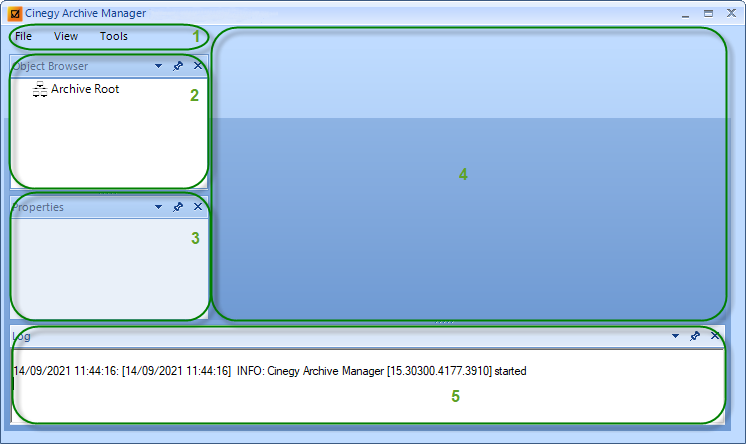
The application has a convenient adjustable interface consisting of the following components:

-
Toolbar – commands for server connection, application layout and configuration adjustment;
-
Object Browser panel – the list of Cinegy Archive databases available on the connected SQL Server(s), displayed in a tree-structured view;
-
Properties panel – properties of the database selected on the "Object Browser" panel;
-
Database management area – main panel for managing database settings;
-
Log panel – application activity log.
|
Note
|
Avoid using multiple Cinegy Archive Manager instances at the same time, at least for the same SQL Server. |
|
Caution
|
It is strongly recommended to back up the database before you start modifying its structure. Refer to the Microsoft SQL Server documentation to get more details about this procedure. |
Object Browser
All connected SQL servers are listed on the tree-structured panel. Press the  button to expand the list of all the available databases. Pressing the
  button will collapse the databases list.
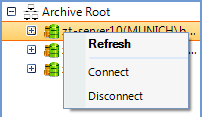
The list of databases on the server can be refreshed, and connection to the server can be established/aborted via the respective context menu commands:

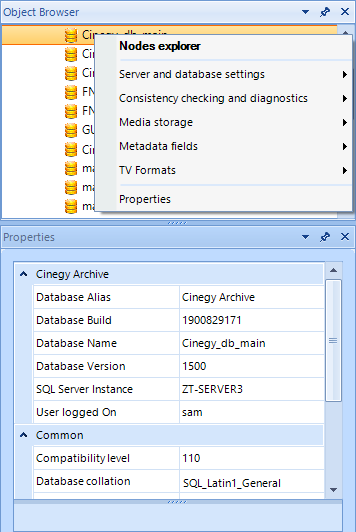
Click the required database to view its properties on the dedicated layout panel. This information is duplicated on the properties tab added via the corresponding context menu command of the selected database making it more convenient to adjust the application layout according to your needs.
Right-click the database on the Object Browser panel to start working on the selected database settings and choose the required option from the following available:

Nodes explorer – nodes management and access type configuration.
Server and database settings – general server and database settings are maintained here.
Consistency checking and diagnostics – this section covers diagnostics and tuning, providing detailed overview of the selected database.
Media storage – management of media files and locations is applied here.
Metadata fields – this section provides the means for metadata and nodes management.
TV Formats – TV formats and playout settings are maintained here.
Properties – detailed information on a current database is displayed here.
Once the required option is selected, the corresponding tabs appear on the database management area, containing the settings section name, as well as the server and database name in the tab caption, making it convenient to operate multiple instances.