Cinegy Workspace Deployment
Reading time ~11 minutes
The newest version of Cinegy Workspace (and the new back-end service referred to as MAMS) supports a plug-in free browser experience and people working in more complex cloud-based / hosted scenarios.
This guide is designed to help customers to understand how they might take the collection of elements that make up Cinegy Workspace deployment and integrate it together with other freely available tools to create a centralized point of access that is easier to secure and expose to the Internet.
We don’t discuss how you might get a DNS address pointing to your firewall, or how to forward any TCP/IP ports through a firewall to your network – we assume this is already set up before following along.
Deployment consists of the following elements:
-
HTML5 Cinegy Workspace frontend, which is open source (available on our GitHub), fully customizable and can be hosted either by Cinegy or by the customers themselves.
-
The Cinegy MAM Service, which is a backend element that serves as a gateway for Cinegy Workspace to access Cinegy MAM via the CAS (Cinegy Archive Service).
-
The Cinegy Image Service, which takes care of generating and displaying the thumbnails for your media files.
-
We recommend that the various supporting webservices that are consumed by the browser application are routed through a 'reverse proxy' that can aggregate all the different services under a single TCP port, and provide centralized encryption offloading. A high-quality, simple to install open-source tool that we have used successfully internally is Traefik. Alternative choices exist (e.g. NGINX, Microsoft IIS AAR), and customers are welcome to use such alternatives depending upon their experience or needs.
The diagram below represents the system and the way the elements interact with each other. Being a single contact point for all the queries from the Cinegy Workspace frontend in your web browser, a reverse proxy solution serves as a reception desk at a hotel protecting the premises from unwanted exposure, taking care of privacy and security and effectively routing all the inquiries to the right type of the service for them.
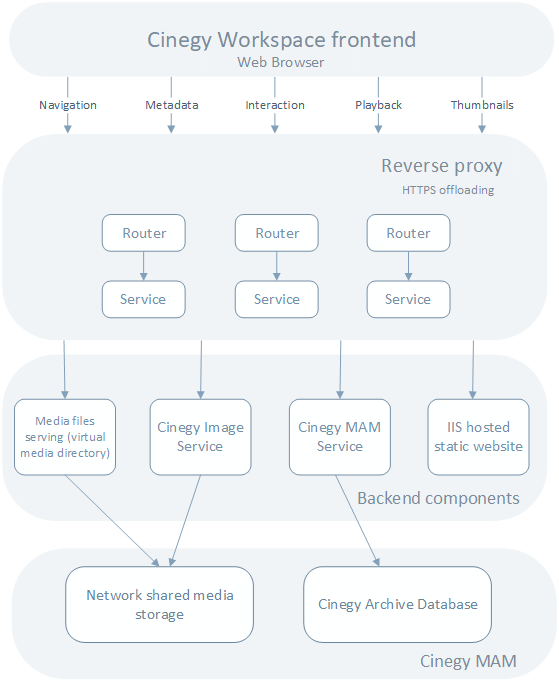
With this setup, any request you want to send to the backend ends up on a corresponding Traefik router serving as an input point in the system and linked to a correspondent Traefik service. The services then pass the queries to predefined backend components – be it the Cinegy MAM Service, the static Cinegy Workspace frontend content or an IIS virtual directory set up to serve media web qualities from your network storage.
Frontend Setup
The first step is to deploy your Cinegy Workspace frontend included in the download package from the Cinegy Partner portal or GitHub. The Cinegy Workspace static frontend can be hosted on pretty much any solution in the market. Therefore, the choice of a hosting solution is dependent on your workflow requirements, security, caching and privacy policies, skills, available solutions, and personal preferences.
In this post, we are going to cover one of the easiest ways to host a simple website based on Microsoft Internet Information Services (IIS):
-
Having downloaded the Cinegy Workspace 21 package, extract the contents of the ZIP archive into a folder. Then create a separate directory in C:\inetpub (a default folder for IIS hosted sites) called “Workspace” and copy the contents of the extracted archive into it, to keep the Cinegy Workspace content and web applications organized and secure.
-
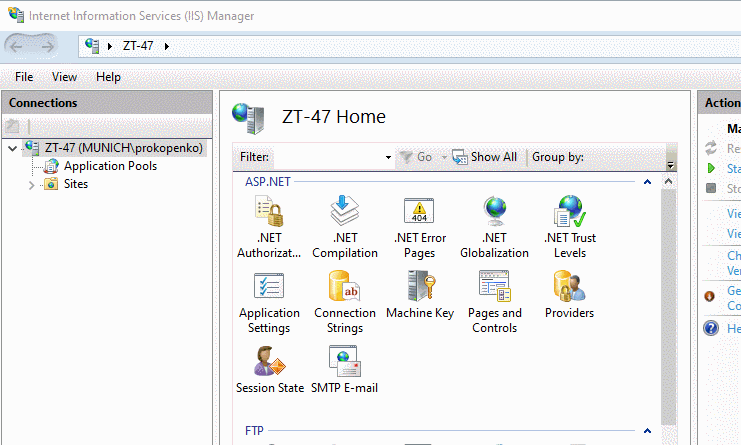
The next step is to bring up Internet Information Services (IIS) Manager and create a new site in it by hitting "Add Website" under RCM on "Sites" in the "Connections" panel.
-
In the "Add Website" form that appears on the screen resulting from the previous step, specify a site name, a physical path to site content (step 1) and defining the binding parameters for your desired connection type, IP address and ports.
Having done this, make sure your IIS website is started and proceed to the next steps in configuration.
Workspace Configuration File
Unlike the now-retired Cinegy Workspace Legacy with its complex and confusing XML config file, in Cinegy Workspace 21 we looked for ways to simplify the configuration to the bare necessities and moved it to a simple lightweight JSON configuration file, as you can see here:
{
	"domains": ["workgroup"],
	"itemsPerPage": 10,
	"mams": [{
		"casEndpoint": "http://<address-of-cas-server-here-relative-to-mams-service>:8082/ICinegyDataAccessService",
		"dbName": "CinegyDatabaseNameHere",
		"dbServer": "NameOfDatabaseServerHere",
		"mamEndpoint": "https://<address-of-mams-hosting-or-routing-server-here>/mams/1.0/api/mam/",
		"name": "CustomLabelForDatabaseNameHere",
		"thumbnailServer": "https://<address-of-images-hosting-or-routing-server-here>/image_service/1.0/api/thumbnail/"
	}],
	"remoteConfigHost":"./serviceconfig",
	"useRemoteConfig": true
}
In this simple setup, Cinegy Workspace config.json serves as a single, centralized reference to all the components and parameters the Cinegy Workspace frontend in your browser will use when functioning. In the above example, the discreet services are all proxied behind the same HTTP entry-point on the main Traefik input.
When a request is made by the frontend, Traefik routers will carefully process the requests and send them to relevant Traefik services that in turn will send them to the actual backend components. The idea is that the entire Traefik unit serves as a shield for HTTPS offloading as well as being a single secure and reliable point of contact. It also means that all communication can be carried out from a single IP address using standard HTTP or HTTPS ports, which can help make a deployment of Cinegy Workspace easier to access over more restricted networks and make the primary URL of the frontend login screen easier for users.
Cinegy Services Installation and Configuration
The next step would be to make sure your essential Cinegy Workspace backend services are installed. Installing both the Cinegy Image Service and the Cinegy MAM Service is a straightforward process well described in the Cinegy Workspace documentation – please refer to the Cinegy MAMS and the Cinegy Image Service installation and configuration guides.
Once the services are all set, one last thing you need to do before moving to reverse proxy configuration is to take care of establishing serving media from your network storage to your Cinegy Workspace website. In order to do that, you need to create a virtual directory in your IIS Manager and link it with the network shared path to your WEB-quality storage. Whilst that is done, just copy a URL to this newly created virtual directory and add it as a media URL to your network share in Cinegy Archive Manager. Here is a link to a detailed step-by-step guide on how to do this in the Cinegy Workspace documentation on Cinegy Open.
Traefik Installation and Configuration
While you are welcome to visit official Traefik Github and create a fresh configuration, to accompany this post we created a GitHub repository with some reference configurations and scripts to download the specific version we used when testing Cinegy Workspace for the initial release.
To start the Traefik installation, download the TraefikExamples-master repository from our page on GitHub. This repository contains some sample config *.toml files, self-signed certificates for remote connection and a batch file, which would download the latest version of Traefik for Windows from their GitHub and install it using the Powershell script.
Step 1
Make sure that your machine has access to the Internet and run the download-traefik.bat file.
This file will execute the Powershell script from .\TraefikExamples-master\scripts, which will download, unpack, and install Traefik on your machine.
As a result of this action, traefik.exe should become available in your .\TraefikExamples-master\ folder and you’re good to proceed to the configuration stage.
Step 2
Go to .\TraefikExamples-master\dynamic and open the workspace.toml file for editing.
The first section you’re going to face is Traefik Routers. A router is responsible for connecting incoming requests to the services that can handle them. In the process, routers may use pieces of middleware to update the request, or act before forwarding the request to the service.
##########################
# Define routers
##########################

# Add a router for mams
[http.routers.mams]
  entryPoints = ["web"]
  service = "mams"
  #use the below rule instead to enable the swagger interface
  rule = "Host(`address-of-mams-hosting-server-here`) && PathPrefix(`/mams`) || PathPrefix(`/sandbox`) || PathPrefix(`/docs`)"
  #rule = "PathPrefix(`/mams`)"

# Add a router for image service
[http.routers.image]
  entryPoints = ["web"]
  service = "image"
  rule = "Host(`address-of-images-hosting-server-here`) && PathPrefix(`/image_service`)"

# Add a router for static frontend content
[http.routers.frontend]
  entryPoints = ["web"]
  service = "frontend"
  middlewares = ["add-default-doc","rewrite-virtual-paths"]
  rule = "Host(`address-of-frontend-hosting-server-here`)"
An essential part of routers configuration is linking each of the existing routers with a corresponding target service. In the provided sample they are already linked, and you don’t really need to care about that bit, unless you’re adding extra services and routers into a chain. Make sure you specify the relevant host names for the machine(s) where services are deployed against each “rule” and you are good to go.
One final thing to note is entryPoints. For simple isolated deployments, setting this to ["web"] would be enough. However, if your Cinegy Workspace is going to face the public Internet, you might want to use HTTPS encryption and set it to ["webSecure"]. You can control these entry points, the ports used by them, and create alternative entry points in the static configuration file – but we’ll get to that a bit later.
Step 3
The "Services" are responsible for configuring how to reach the actual applications that will eventually handle the incoming requests. For a typical deployment you need to define three basic services available in your workspace.toml sample. For most scenarios, you can run Traefik along with all three of the required services on the same hosting machine.
##########################
# Define services
##########################

# Add the MAM service
[http.services.mams]
  [http.services.mams.loadBalancer]
    [[http.services.mams.loadBalancer.servers]]
      url = "http://address-of-mams-hosting-server-here:7601/"

# Add the image service
[http.services.image]
  [http.services.image.loadBalancer]
    [[http.services.image.loadBalancer.servers]]
      url = "http://address-of-images-hosting-server-here:12600/"

# Add the static frontend service
[http.services.frontend]
  [http.services.frontend.loadBalancer]
    passHostHeader = false
    [[http.services.frontend.loadBalancer.servers]]
      url = "http://address-of-frontend-hosting-server-here:8083/"
Under [http.services.mams] go to the url field and update this to point at your Cinegy MAM Service host.
Under [http.services.images] update the same field with the URL to point at your Cinegy Image Service host.
Under [http.services.frontend] again specify the URL pointing at your frontend host (see IIS hosting section of this post for reference) and port.
Extra services can be always added and configured should they be required. Refer to the Traefik documentation for more details. More complex high-availability scenarios can be configured with these tools, but this is outside the scope of this guide.
Step 4
Go to the "Middlewares" section of your workspace.toml.
Attached to the routers, pieces of middleware are means of tweaking the requests before they are sent to your service (e.g. Cinegy Workspace frontend, the Cinegy MAMS or the Cinegy Image Service) or before the answers from the services are sent back to the clients.
##########################
# Define middlewares
##########################

# Add suffix branch name into path for frontend
  [http.middlewares.add-branch.addPrefix]
    prefix = "/workspace21"

# reset anyone requesting virtual paths to index.html
  [http.middlewares.rewrite-virtual-paths.redirectRegex]
    regex = "(login|main)$"
    replacement = "index.html"
In this section you may set up one of the existing “middlewares” to redirect requests for the config to an S3 bucket containing the Cinegy Workspace config.json file, for example, or set the default document to index.html. We’ve defined a few in our samples that help with HTTPS redirection tasks, or re-routing some of the virtual URLs of the frontend back to the login page (in case someone bookmarks the application once already logged in, or hits F5).
You can also define and configure your own middlewares in accordance with the Traefik documentation depending on your deployment requirements.
Once you’re done with workspace.toml, make sure you save the changes and proceed to the next step.
Step 5
In order to finalize the configuration, open traefik.toml from the root of the repository. This file includes the previously mentioned static configuration for your Traefik instance.
While the rest of the parameters provided in a sample file may be left without changes (unless it’s necessary for your particular deployment), one thing you may want to take care of is defining the entry points for HTTP and HTTPS under queries in [entryPoints.web] and [entryPoints.webSecure] respectively.
You may specify either a port range as shown below or the set of fixed addresses.
################################################################
# Global configuration
################################################################
[global]
  checkNewVersion = true
  sendAnonymousUsage = false

################################################################
# Entrypoints configuration
################################################################

# Entrypoints definition
[entryPoints]

  [entryPoints.web]
    address = ":80"

  [entryPoints.webSecure]
    address = ":443"

################################################################
# Traefik logs configuration
################################################################

# Traefik logs
# Enabled by default and log to stdout
[log]
  level = "INFO"
To understand more about the difference between the configuration files, the Traefik documentation does a good job explaining the principles and concepts.
Remember, it is highly recommended if you expose your Cinegy Workspace installation to the Internet to secure all communications via HTTPS TLS v1.2 as a minimum. Traefik does a great job of helping centralize the configuration for this, as well as allowing easy use of a service like "Let’s Encrypt" to access free certificates. You can read here how to use this free service to encrypt your application access.
As a result of all these actions, you should have a simple Cinegy Workspace deployment up and running, with the Cinegy Workspace frontend allowing you to instantly interact with objects in your Cinegy MAM, serving media from your media shares with all the requests being neatly organized by a reverse proxy.
We do understand though that this setup might be more than some customers would like to tackle alone, so please don’t forget that if you need help or want deeper questions resolved or configurations set up, you can contact your account manager or Sales team to discuss having the Cinegy Professional Services team engaged to help you with any challenges.
|
Important
|
Refer to the Cinegy Workspace documentation for details on finalizing the Cinegy Workspace configuration and logging into your Cinegy Archive database. |