Dynamic Objects
Reading time ~14 minutes
Dynamic controls comprise player, CPU indicator, digital and analog clock objects, and HTML widget. Each dynamic control has its set of parameters, including common scaling properties.
The following dynamic controls are available:
-
Player – video channel preview.
-
Digital clock – digital clock display at a fixed position.
-
Analog clock – analog clock display at a fixed position.
-
CPU indicator – graphic visualization of the assigned player’s CPU activity.
-
HTML Widget – a container for HTML-based web pages.
All the parameters for dynamic objects are described in detail below.
Player
|
The player object is used as a preview component for the defined channel. To add this control, press the "Insert Player" button on the controls panel and drag-and-drop the object to the desired place in the editing area. |
Properties
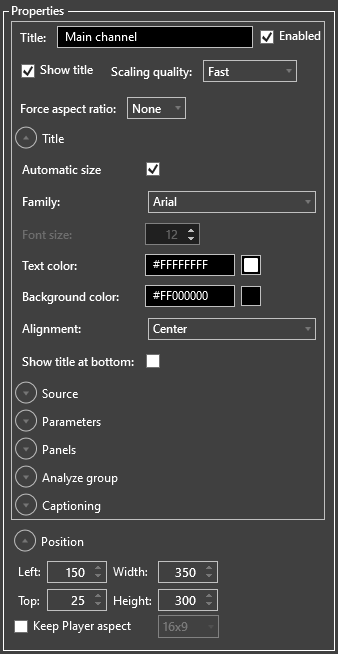
The player object properties include the following parameters:
-
Title – the stream name. Select the "Enabled" checkbox to include the selected player object in the layout display.
-
Show title – enables the "Title" field value display on top of the channel preview.
-
Scaling quality – choose desired scaling mode to be applied when processing HD and UHD signals.
-
Force aspect ratio – choose the aspect ratio to be used for display in the player or leave "None" to display the original aspect ratio of the stream. Use the half-height frame dimensions to sub-divide your CPU and GPU loads between several servers.
Further settings are split into separate configuration groups.
Title
The following properties are available in the "Title" configuration group:
-
Automatic size – enables setting the automatic font size proportionally to the player object size.
-
Family – select the font family for the stream name from the drop-down list.
-
Font size – define the font size.
NoteThe "Font size" option is available only when the "Automatic size" checkbox is not selected. -
Text color – select text color for the stream name.
-
Background color – select the color for the stream title caption on top of the player.
-
Alignment – select the text alignment (left, right or center) within the title caption.
-
Show title at bottom – select this checkbox to show the title at the bottom of the channel preview.
Source
The "Source" configuration group contains a number of settings that depend on player mode chosen.
MPEG-TS Player Mode
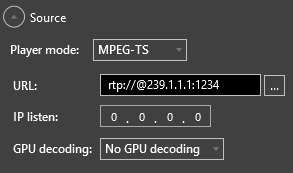
When MPEG-TS player mode is selected, the following properties can be configured:
-
URL – the URL for this stream.
ImportantRefer to the RTP/UDP/SRT URL Format article for more information about the URLs' format. -
IP listen – the IP address of the local network adapter to be used to get the RTP/UDP stream. This option is useful in multicast mode, when you need to divide the multicasting subnet from the working subnet.
NoteSet the "IP listen" parameter to 0.0.0.0 to use all the adapters. -
GPU decoding – select the required video card from the drop-down list to be used for GPU acceleration or choose "No GPU decoding" to use only CPU resources for encoding and decoding.
SDI Player Mode
When SDI player mode is selected, further settings depend on the input device chosen from the "Device" drop-down list.
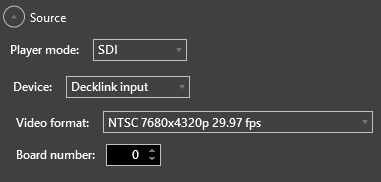
DeckLink Input Device
For DeckLink input device, the following settings are available:
-
Video format – choose the necessary video format from the drop-down list.
-
Board number – define the board number using the up/down arrow button or entering the desired value via the keyboard.
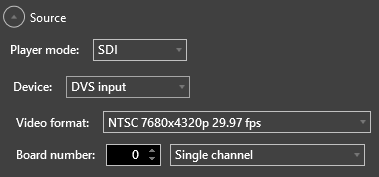
DVS Input Device
For DVS input device, the following settings are available:
-
Video format – choose the necessary video format from the drop-down list.
-
Board number – define the board number using the up/down arrow button or entering the desired value via the keyboard. Use the drop-down list on the right to define channel mode.
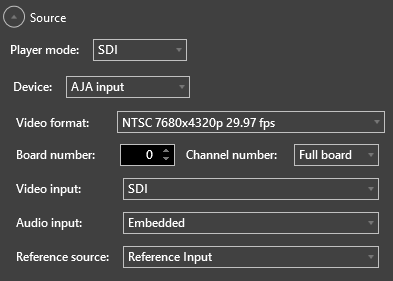
AJA Input Device
For AJA input device the following settings are available:
-
Video format – choose the necessary video format from the drop-down list.
-
Board number – define the board number using the up/down arrow button or entering the desired value via the keyboard.
-
Channel number – use the drop-down list to define the channel number.
-
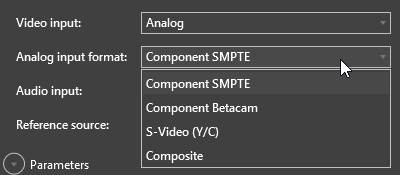
Video input – define the video input type by selecting SDI, Analog or HDMI from the drop-down list. If the Analog video input is selected, it is also necessary to use the "Analog input format" drop-down list to select the necessary format:
-
Audio input – define the audio input type by selecting Embedded, AES, Analog or HDMI from the drop-down list.
-
Reference source – define the reference source for the AJA input device selecting Reference Input, Video Input or Free Run from the drop-down list.
Deltacast Input Device
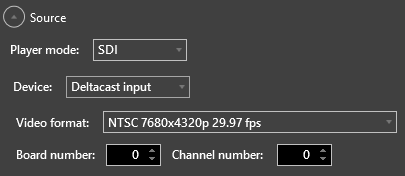
For Deltacast input device the following settings are available:
-
Video format – choose the necessary video format from the drop-down list.
-
Board number – define the board number using the up/down arrow button or entering the desired value via the keyboard.
-
Channel number – define the channel number using the up/down arrow button or entering the desired value via the keyboard.
NDI Player Mode
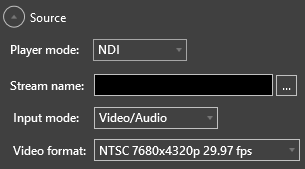
Selected NDI player mode allows you to define the following settings:
-
Stream name – specify the stream name.
-
Input mode – select Video/Audio, Video only or Audio only.
-
Video format – choose the desired video format from the drop-down list.
Shared RAM Player Mode
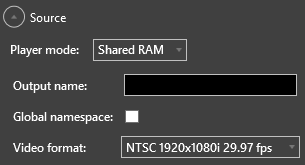
When Shared RAM player mode is selected, the following settings should be configured:
-
Output name – define the name for your output device via the keyboard.
-
Global namespace – check this option to enable sharing between several users on the machine, or between applications and services.
-
Video format – choose the desired video format from the drop-down list.
Web Cam Player Mode
To use a Web camera as an input source, you need to have a Web camera connected. Once the camera is found, the following parameters should be configured:

-
Video format – choose the required video format from the drop-down list.
-
Video device – choose the appropriate video device from the drop-down list.
-
Audio device – choose the appropriate audio device from the drop-down list.
|
Note
|
The "Video device" and "Audio device" lists depend on the hardware installed on the current PC. |
WDM Player Mode
WDM (Windows Driver Model) input can be used for receiving a signal from a semi-professional capture boards which support the interlace signal and can have several inputs.
|
Note
|
WDM player mode is provided strictly for experimental purposes, i.e. very intensive testing is required prior to any live application. |
When WDM player mode is selected, the following properties should be configured:

-
Video Format – choose the required video format from the drop-down list.
CautionThe capture board supports some set of TV formats. Cinegy Multiviewer doesn’t process the input stream if the requested stream TV format is not supported by the capture card. -
Video device – choose the appropriate video device from the drop-down list.
-
Audio device – choose the appropriate audio device from the drop-down list or select the "Same as video" option.
IP 2022-6/7 Player Mode
When IP 2022-6/7 player mode is selected, the following settings should be configured:
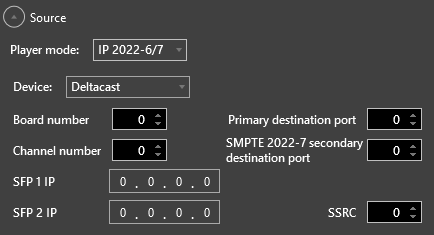
Cinegy Multiviewer supports SMPTE 2022-6/7 for transporting uncompressed video (SDI) over IP. AJA or Deltacast input devices can be used.
AJA Input Settings
The configuration settings for AJA device are split into two tabs: Input and Filter.
Input Settings
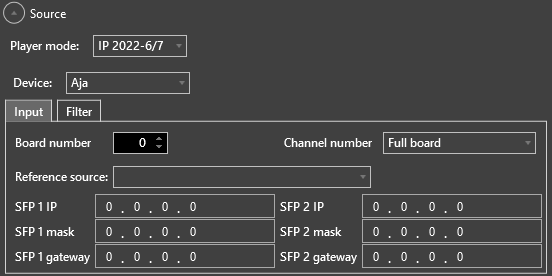
-
Board number – define the board number using the up/down arrow button or entering the desired value via the keyboard.
-
Channel number – choose the channel number from the drop-down list.
-
Reference source – choose the reference source for the AJA input device from the drop-down list.
-
SFP 1 IP – define the appropriate SFP 1 IP address in the address field.
-
SFP 1 mask – enter the appropriate SFP 1 subnet mask.
-
SFP 1 gateway – specify your gateway SFP 1 address.
-
SFP 2 IP – define the appropriate SFP 2 IP address in the address field.
-
SFP 2 mask – enter the appropriate SFP 2 subnet mask.
-
SFP 2 gateway – specify your gateway SFP 2 address.
Filter Settings
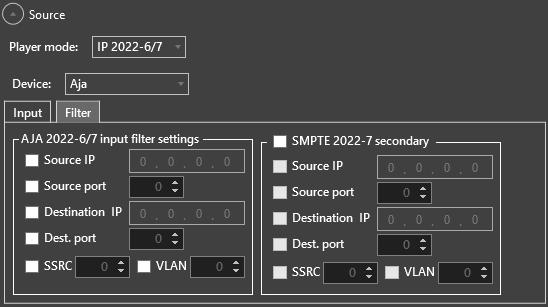
Here define the AJA 2022-6/7 input filter settings and SMPTE 2022-7 secondary settings.
|
Note
|
These settings are similar. |
Select the corresponding checkbox to define the required parameter.
-
Source IP – define the source IP address.
-
Source port – define the source port number.
-
Destination IP – enter the destination IP address.
-
Dest. port – enter the destination port number.
-
SSRC – define the unique synchronization source.
-
VLAN – define the VLAN interface number.
Deltacast Input Settings
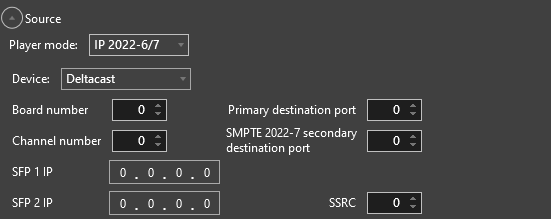
-
Board number – define the board number using the up/down arrow button or entering the desired value via the keyboard.
-
Channel number – define the channel number using the up/down arrow button or entering the desired value via the keyboard.
-
Primary destination port – enter the primary destination port number.
-
SMPTE 2022-7 secondary destination port – enter the secondary destination port number.
-
SFP 1 IP – define the appropriate SFP 1 IP address in the address field.
-
SFP 2 IP – define the appropriate SFP 2 IP address in the address field.
-
SSRC – define the unique synchronization source.
Parameters
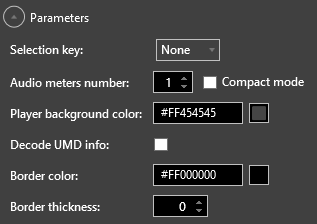
The following player display properties are available in the "Parameters" configuration group:
-
Selection key – a keyboard key to be used to select this stream. If you choose a key that is already assigned to a different stream, you will be informed with a corresponding error message.
-
Audio meters number – a number of audio meters (up to 8) shown for this channel preview. Select the "Compact mode" option for audio meters to be displayed as thin vertical lines taking less space.
-
Player background color – a custom background color for a player.
-
Decode UMD info – select the checkbox to enable the display of special metadata that will be taken from the defined stream. This metadata will be shown at the top of the player window instead of the stream title.
NoteIn MPEG-TS players the UMD info is displayed instead of the player title on top of the channel preview. In SDI player mode the "Decode UMD info" is not available; the player title is always displayed. -
Border color – a custom color of the player borders.
-
Border thickness – the player borders width.
Panels
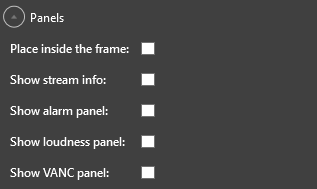
To render the monitored stream in full-screen mode with other edge panels and indicators being overlaid, select the "Place inside the frame" checkbox.
When the "Show stream info" option is enabled, the following additional indicators are displayed on the player screen:
-
Stream encoding (MPEG2/H.264/SDI)
-
Stream format (SD/HD/UHD)
-
Resolution
-
Frame rate (in frames per second)
To enable the display of the alarm panel in players, select the "Show alarm panel" checkbox. This panel will be displayed at the bottom of the player window.

To enable the display of the panel showing the calculated loudness value and the dialnorm parameter, select the "Show loudness panel" checkbox.

To enable the display of the VANC (Vertical Ancillary Data Space) information panel that includes CC presence indication, along with AFD and PR data, select the "Show VANC panel" checkbox. This panel will be displayed at the bottom of the player window next to the alarm panel.

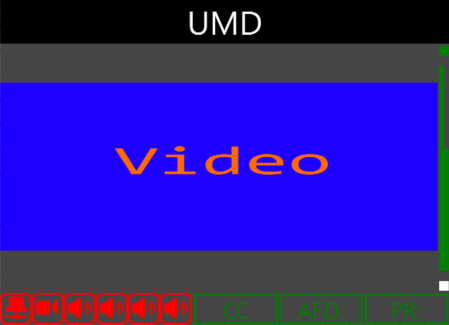
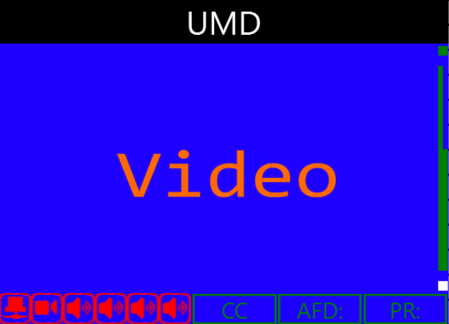
Below is a graphic illustration of the difference between player objects with the "Place inside the frame" checkbox selected / deselected.
|
|
"Place inside the frame" is disabled |
"Place inside the frame" is enabled |
Analyze Group
The following properties are available in the "Analyze group" configuration group:

This configuration section allows to define whether the video and/or audio track(s), VANC (Vertical Ancillary Data Space) information will be analyzed during streaming and whether the corresponding alerts will be created.
Captioning
In the "Captioning" configuration group select captioning mode from the drop-down list:
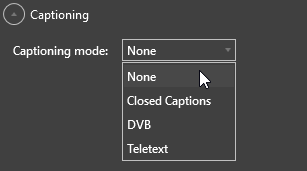
Closed Captions
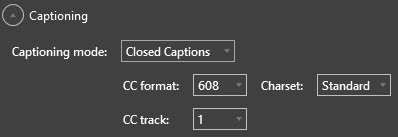
For closed captions define the required CC format and select the track from which closed captions will be decoded, using the corresponding drop-down lists:
|
Note
|
If the stream contains the CC-608 format for the closed captions in the Korean language, select "Korean" in the "Charset" drop-down list; otherwise, leave default "Standard". |
DVB Subtitles
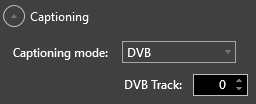
For DVB subtitles define the subtitle track to be decoded and displayed:
|
Note
|
DVB subtitles are supported only for the MPEG-TS stream source. |
Teletext
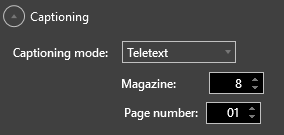
For teletext-based subtitles define the Magazine value and Page numbers within the transport stream that should contain the subtitle track to be decoded and displayed:
|
Note
|
Teletext subtitles are supported only for the MPEG-TS stream source. |
Position
The "Position" configuration group contains the following parameters:
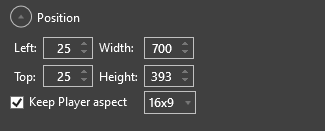
Besides defining the "Left"/"Top" moving parameters and "Width"/"Height" scaling settings, it is possible to enable player aspect preservation by ticking off the "Keep Player aspect" checkbox and choosing the desired aspect ratio from the drop-down list.
|
Important
|
Refer to the Transforming section to learn how to move and scale player objects. |
All the performed changes are visible in real time in the layout editing area.
Digital Clock
|
The digital clock object allows you to add current PC local time display in digits to your layout template and configure it according to your needs. To add this control, press the "Insert Digital Clock" button on the controls panel and drag-and-drop the object to the desired place in the editing area. |
Properties
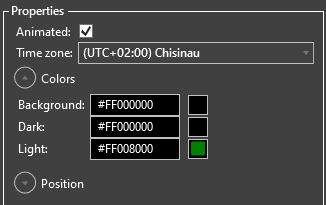
The following digital clock properties are available:
-
Animated – select this checkbox to enable the time update while editing. Leave this option deselected for the time to remain static.
NoteThis option affects the time display on the canvas only. In the Cinegy Multiviewer window, the time update is always shown in format hh:mm:ss. -
Time zone – defines the time zone used for the time display on the clock.
Colors
The following color settings can be configured in the "Colors" configuration group:
-
Background – the digital clock background color.
-
Dark – the non-active clock elements color.
-
Light – the active clock elements color.
All the performed changes are visible in real time in the layout editing area.
Analog Clock
|
The analog clock object allows you to add current PC local time display in clock dial to your layout template and configure it according to your needs. To add this control, press the "Insert Analog Clock" button on the controls panel and drag-and-drop the object to the desired place in the editing area. |
Properties
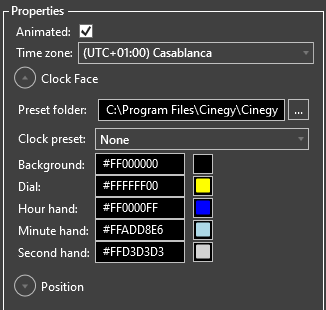
The following analog clock properties are available:
-
Animated – select this checkbox to enable the time update while editing. Leave this option deselected for the time to remain static.
NoteThis option affects the time display on the canvas only. In the Cinegy Multiviewer window, the clock element is always shown updating. -
Time Zone – defines the time zone used for the time display on the clock.
Clock Face
-
Preset folder – the folder where the clock skin presets are stored.
-
Clock preset – defines the clock appearance.
The default clock presets are available in the following directory: C:\Program Files\Cinegy\Cinegy Multiviewer\Clocks. You can create custom presets using files with analogous name and format for the analog clock object elements.
|
Note
|
The colors for all elements of the analog clock object can be changed only with no clock preset selected. |
The following color settings can be configured:
-
Background – color of the analog clock background.
-
Dial – color of the clock dial.
-
Hour hand – color of the clock’s hour hand.
-
Minute hand – color of the clock’s minute hand.
-
Second hand – color of the clock’s second hand.
All the performed changes are visible in real time in the layout editing area.
CPU Indicator
Other Cinegy software generating streams can embed custom metadata into streams. One such value is the CPU load of the machine generating the stream – which can be assigned to a CPU widget onscreen.
|
The CPU meter object represents graphic visualization of CPU activity, with the data source determined by the player object associated with the meter instance. To add this control, press the "Insert CPU Meter" button on the controls panel and drag-and-drop the object to the desired place in the editing area. Not all streams embed this data, in which case the value will remain 0. |
|
Note
|
If the widget is not assigned to a player, it will display the CPU load of the Multiviewer host machine. |
Properties
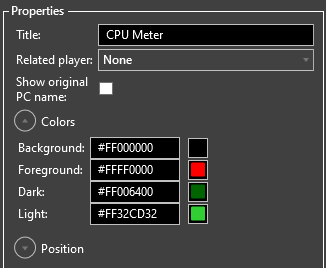
You can configure the following CPU meter properties:
-
Title – the player name that will be displayed on top of the CPU meter. Leave the name of the assigned player or enter a different one via the keyboard.
-
Related player – specify the player that will be used as a source for the CPU meter. The list contains all players available on the current layout.
Select the "Show original PC name" checkbox to enable the display of the PC name, on which the defined stream is generated. The name of the PC will be shown instead of the title.
Colors
The following color settings are available in the "Colors" configuration group:
-
Background – the background color of the CPU meter.
-
Foreground – color of the text displayed on the CPU meter.
-
Dark – color of the non-active elements of the CPU meter.
-
Light – color of the active elements of the CPU meter.
All the performed changes are visible in real time in the layout editing area.
HTML Widget
|
The HTML widget object can render any HTML-based web pages, which can be useful for embedding third-party information into Cinegy Multiviewer. |
Properties
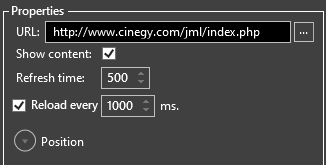
The following HTML widget properties are available:
-
URL – the link to a website from which the content will be loaded to the widget.
-
Show content – enables the display of the website content inside the widget frame.
NoteThe content of the website is displayed starting from the upper left corner. -
Refresh time – time of loading a fresh screenshot from the HTML web control in milliseconds (higher values can increase the performance load on Cinegy Multiviewer).
-
Reload every – enables page reloading with the defined time interval in milliseconds, to refresh static web pages regularly.

