Descriptors, Presets
Reading time ~13 minutes
|
Caution
|
It is recommended to shut down all the Cinegy Desktop clients and do not use them until the changes made in the "Descriptors and presets" configuration are applied to the Cinegy Archive database. Set the "Set Halt Flag" option to "True" on the "Global parameters" tab to automatically close already launched Cinegy Desktop clients and prevent further connections for the new ones. |
|
Caution
|
It is highly recommended to have the identical set of descriptors for the master and slave databases, which means that the internal names, types of descriptors and presets values in both databases must be the same. Data will be lost when copying between databases if their descriptors have the same internal names but differ in types. Or, if the default descriptors match, but only one database has additional descriptors, then when copying data from this database, the metadata from additional descriptors will be lost. And vice versa, when copying data to a database with additional descriptors, without having them in the source database, they will remain empty. To prevent such problems, use the compatibility check feature, which compares the metadata model of the master and slave databases. |
Descriptors and presets are managed on the corresponding panel launched via the "Descriptors, Presets" command from the "Metadata fields" submenu of the database context menu:
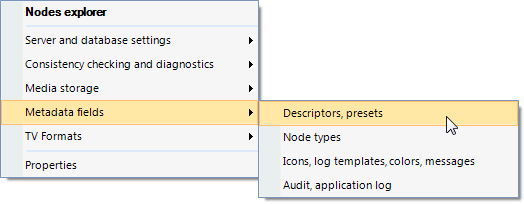
Descriptors, Presets
You can customize the structure of the database using the "Descriptors, Presets" tab – create new metadata fields and new tabs, move the fields to another tab (group) and rename any object.
The main interface shows the structure of the entire Cinegy Archive:
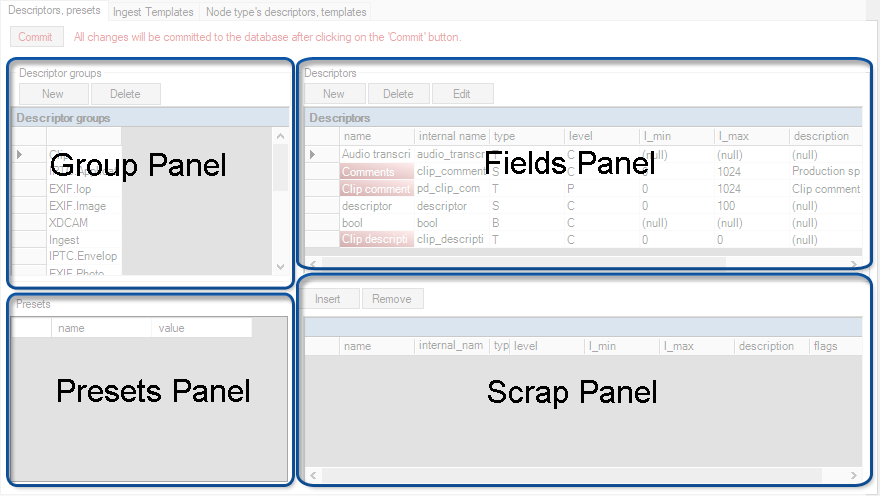
The interface allows you to:
-
create a new group;
-
delete a group;
-
create a new metadata field;
-
delete an existing field;
-
rename an existing field;
-
change the type of an existing field;
-
change the set of values for the present field types.
Creating a New Group
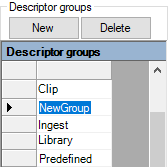
To create a new group, press the "New" button on the group panel. Change the group name according to your requirements.
|
Note
|
When the group is associated with the Bin, the group name will be displayed in the Bin view; therefore use a short, distinct and unique name. |
|
|
|
Deleting a Group
To delete a group, select it on the group panel and press the "Delete" button.
|
Caution
|
The group deletion is a permanent action and cannot be undone! |
Creating a New Metadata Field
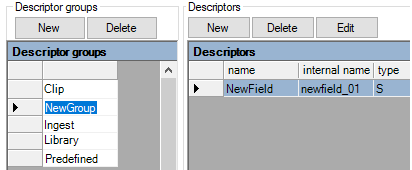
Select the group, in which you want to create the new metadata field and press the "New" button on the fields panel.
The following dialog box appears:
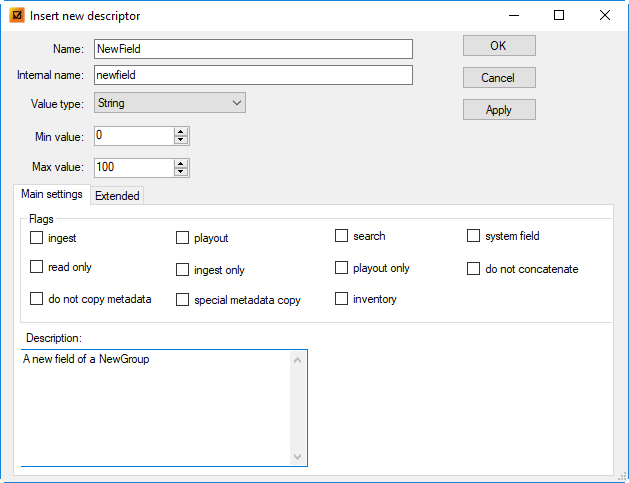
In this dialog, fill in the description of the new field.
Description of Fields
Name
Enter the new field name.
|
Note
|
When the group is associated with the Bin, the field name will be displayed in the Bin view. Therefore use a short, distinct and unique name. |

Internal Name
The internal name is used for the internal addressing of the field. This name is created automatically.
|
Caution
|
Never change the internal name of the existing fields for a currently active database! |
Value Type
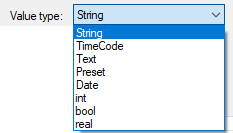
| Field Type | Description |
|---|---|
String |
For strings, up to 4000 characters long |
TimeCode |
The timecode |
Text |
For text fields, longer than 4000 characters |
A set of name constants |
|
Date |
The date |
Integer |
An integer value of 32 bit (min/max settings are required) |
Bool |
True/False value |
Real |
A floating point value of 64 bit (min/max settings are required) |
|
Note
|
Do not use the "Text" type for short strings, as this may slow down the database performance. |
Min Value / Max Value
For numeric fields define the valid range of values. For the text and string types, the max value defines the maximum allowed length of text.
|
Caution
|
Inconsistent settings of the values will cause a serious malfunction of the system. |
Main Settings
Flags
| Flags | Description | ||
|---|---|---|---|
Ingest |
The descriptor marked with "ingest" flag appears in the "Ingest template" dialog in Import Tool and "Metadata settings" dialog in Cinegy Capture Control.
|
||
Ingest only |
The field appears in the "Ingest Roll info" dialog and will not be shown in the bin grid |
||
Playout |
This field is used in the "Schedule Playout" table (out of date) |
||
Playout only |
The field appears in the "Schedule Playout" table, but will not appear in the bin grid (out of date) |
||
Search |
This option makes this field searchable for the "Search" plug-in of Cinegy Desktop or other application using CBA (Common Bus Architecture)
|
||
Do not concatenate |
This option controls the behavior of the text fields during the "Join" operation in a Roll. For the fields like a text description, enable concatenation; for some text fields like "Make up artist" this would make less sense. |
||
System field |
System feature, for internal use only.
|
||
Special metadata copy |
This option makes this field available in the "Paste metadata" dialog box when copying metadata between nodes of the same type in Cinegy Desktop |
||
Read only |
This option marks this field as "read only" in Cinegy Desktop. |
||
Do not copy metadata |
This option disables metadata copying between nodes of the same type in Cinegy Desktop. |
||
Inventory |
The descriptor marked with this flag will be exported to MCRItem as a custom metadata field.
|
Description
Here write a small and clear description for the new field.
Extended

On the "Extended" tab, you can create extended properties for the descriptors in XML format.
Creating Fields of the Type "Preset"
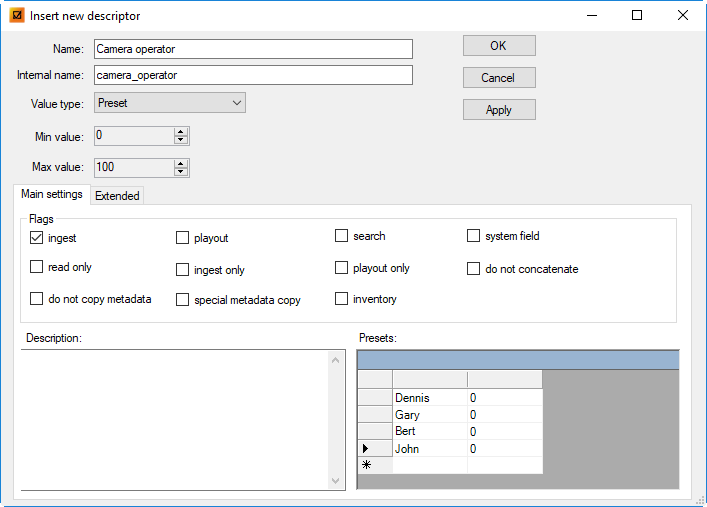
Selecting the "Preset" type from the "Value type" drop-down list shows a new area called "Presets" in the bottom right corner of the dialog. Here you can create a set of values for the new field:
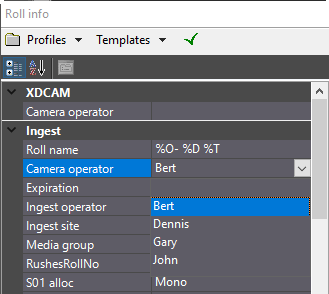
This example shows the "Preset" field in Roll info of the Camera operator:
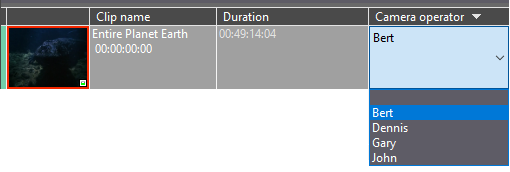
The "Preset" field in the Roll grid:
You will also see the presets on the preset panel.
Description
Use this field to describe the metadata. Write a small and clear description of the new field. If you cannot describe the field in a few words, it could be better not to introduce the field into Cinegy Archive.
Modifying a Metadata Field
To modify a metadata field, select the field and press the "Edit" button on the fields panel. The process of the metadata field editing is similar to its creating with the difference that the "Value Type" option is disabled.
Deleting a Metadata Field
To delete a metadata field, select it on the field panel and press the "Delete" button. The deleted field will be moved to the scrap panel.
System Metadata Fields
There is a special metadata fields set in Cinegy Archive required for internal processing – system fields. They are displayed on the red background.

|
Caution
|
It is strongly recommended not to delete the system metadata field(s) as it may lead to the incorrect work of Cinegy Archive Manager. |
Working with the Scrap Panel
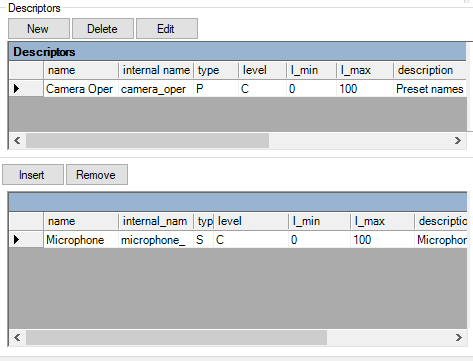
All the deleted fields are moved to the scrap panel located in the bottom right section of the window. This means it is always possible to move the field back to the selected group. To do this, simply press the "Insert" button. If you want to delete the field permanently, press the "Remove" button.
Committing Changes to the SQL Server
Your changes are not immediately applied to the database. If there is a need to undo the deletion of a field, you will have to do this manually. To apply your current changes to the SQL Server, press the "Commit" button:

|
Note
|
When you exit Cinegy Archive Manager, the data will be committed automatically. |
Ingest Templates
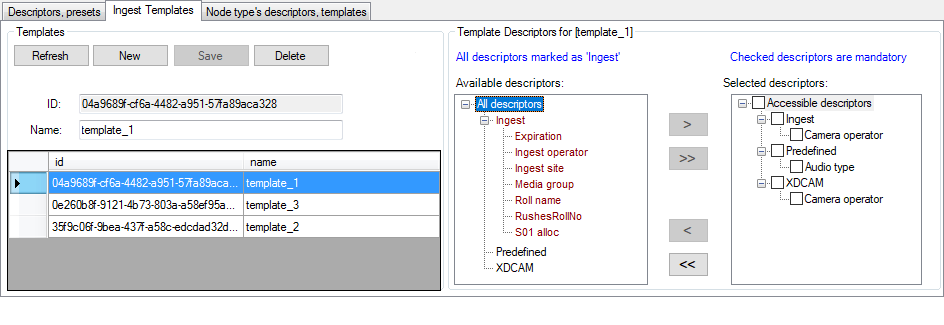
An ingest template contains a set of assigned fields available in the Import Tool "Ingest template" dialog box for the operator:

On the "Ingest Templates" tab, you can create and customize as many ingest templates as you need for your purposes.
|
Important
|
Refer to the Main Settings paragraph for more details about descriptor flags and their meanings. |
|
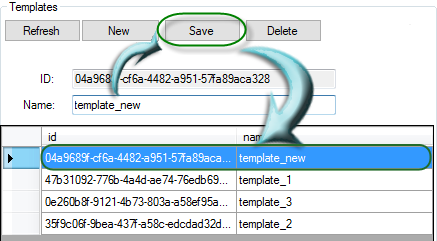
Press the "New" button to create a new template. Fill in the "Name" field and press the "Save" button to save your template. It will be displayed in the table below: |
|
Press the "Delete" button to remove the selected template. |
|
The "Refresh" button renews the list of ingest templates existing in the current database. |
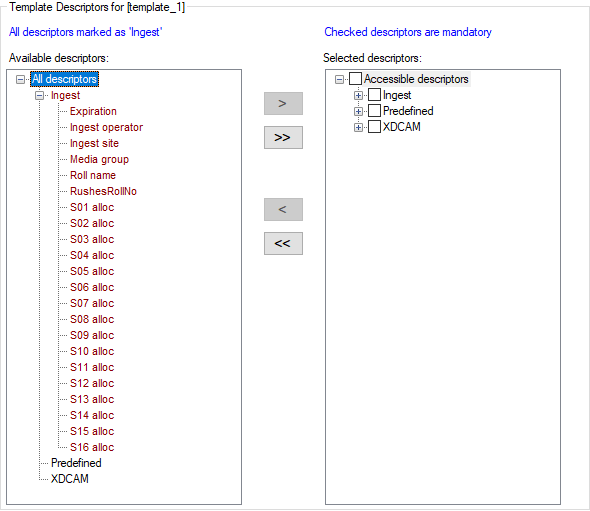
To assign descriptors to a selected template, select the descriptor type from the "Available descriptors" list and add it to the "Selected descriptors" list via the  button. To add all available descriptors to the "Selected descriptors" list, press the
  button.
To remove a descriptor from the "Selected descriptors" list, press the  button for the selected descriptor or use the
  button to clear the whole list.
|
Note
|
The descriptors marked as "Ingest" are displayed on the right of the dialog. |
|
Caution
|
The descriptors highlighted in red are system and for internal use only. |
Node Type’s Descriptors, Templates
Basic Settings
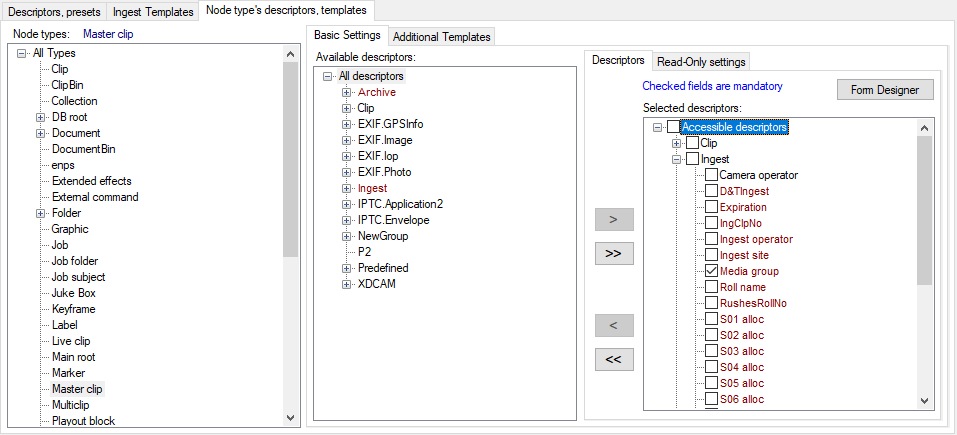
On the "Basic Settings" tab, you can assign descriptors for each node type. To do this, select the node type from the "Node types" list and add it to the "Selected descriptors" list via the  button. To add all available descriptors to the selected descriptors list, press the
  button.
To remove descriptor(s) from the selected descriptors list, press the  button or use the
  button to clear the whole list.
|
Caution
|
When removing the node type descriptors from the selected descriptors list, all the corresponding field values will be erased. |
Descriptors
All node subtypes will have the same set of descriptors as their parent node type. To assign descriptors for just a particular node type, select it and specify the descriptors as described above.
All assigned descriptors have the corresponding fields in the "Metadata" dialog, available from the node "Show metadata" context menu for the node in the Cinegy Desktop explorer tree.
|
Important
|
Refer to the Node Metadata article in the Cinegy Desktop Manual for details. |
Select specific descriptors in the "Selected descriptors" list to make them mandatory within Cinegy Desktop. These fields cannot be left empty; if they are, you will be informed about it with an error message.
Read-Only Settings
On the "Read-Only settings" tab, you can assign read-only permission to specific descriptors for certain user roles. To do this, select the required descriptor in the "Selected descriptors" box of the "Descriptors" tab, then go to the "Read-Only settings" tab and choose the required user role from the list and press the "Add" button:
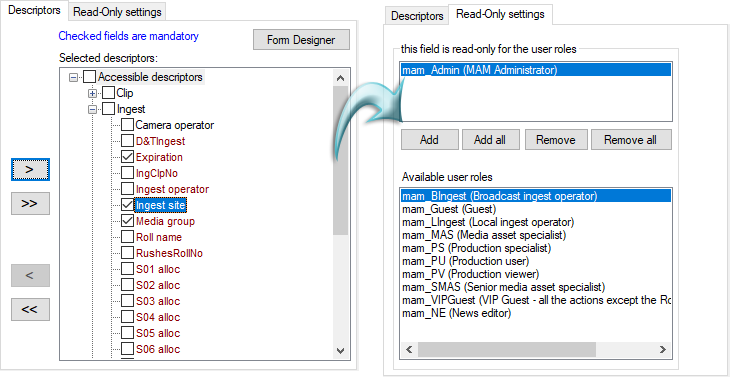
The corresponding descriptor will be read-only for the selected role. To assign the read-only permission to all the available roles, press the "Add all" button.
In the example below, the "Expiration" and "Ingest site" fields cannot be edited in Cinegy Desktop because they are read-only:

To remove the read-only status for the selected user role, use the "Remove" button or press "Remove all" to remove the read-only status for all the user roles.
Additional Templates
|
Note
|
This functionality is obsolete and should not be used for the new installations. |
On the "Additional Templates" tab, you can create and customize as many additional templates as you need for your purposes.
|
Select a node type from the "Node types" list and press the "New" button to create a new additional template. |
|
Fill in the "Name" field and press the "Save" button to save your template. It will be displayed in the table below: |
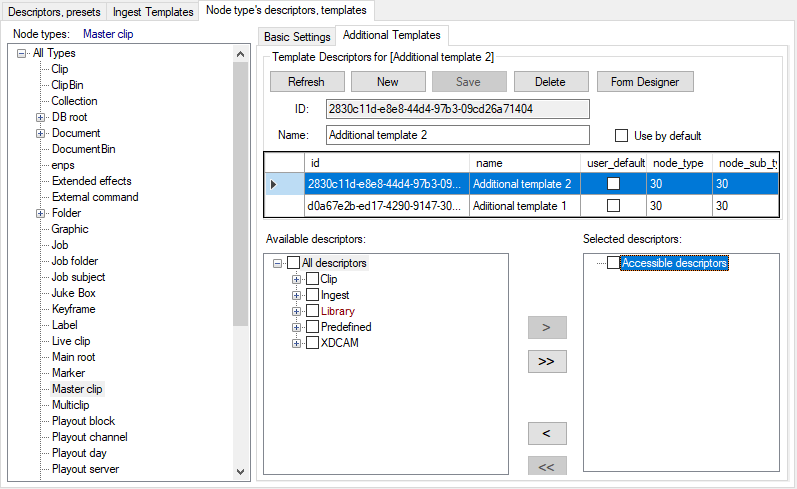
|
Press the "Delete" button to remove the selected additional template. |
To use a selected template as your default template, select the "Use by default" checkbox. Press the "Save" button to apply this setting:

To assign the descriptors for a selected template, select the descriptor type from the "Available descriptors" list and add it to the "Selected descriptors" list via the  button:
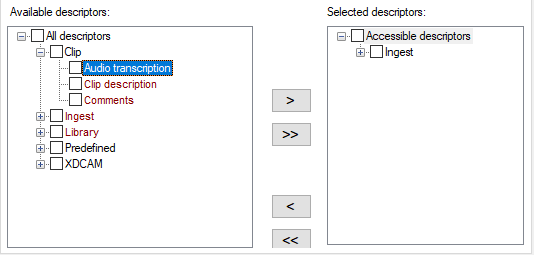
To add all available descriptors to the "Selected descriptors" list, press the  button.
To remove the selected descriptor(s) from the "Selected descriptors" list, press the  button or use the
  button to clear the whole list.
The default template defines a set of metadata for the node in Cinegy Desktop.
Form Designer
|
Note
|
This functionality is obsolete and should not be used for the new installations. |
The form designer provides the ability to create a custom metadata form for each node type.
|
To create a metadata form for the currently selected node type, press the "Form Designer" button; the following dialog box appears: |
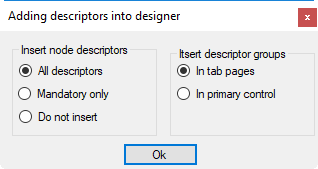
In the "Insert node descriptors" field, you can choose one of the following:
-
All descriptors – to insert all the selected node descriptors to the designer surface;
-
Mandatory only – to insert only mandatory node descriptors to the designer surface;
-
Do not insert – not to insert node descriptors to the designer surface.
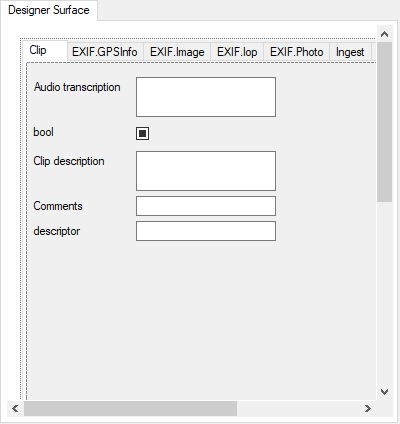
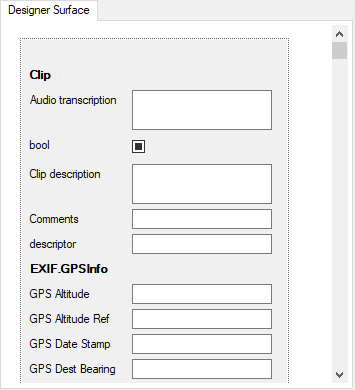
In the "Insert descriptor groups" field define the metadata arrangement in the designer surface: either each group can be located on a separate tab or all the groups can be gathered into a single form:
In tab pages |
In primary control |
|
|
The Interface
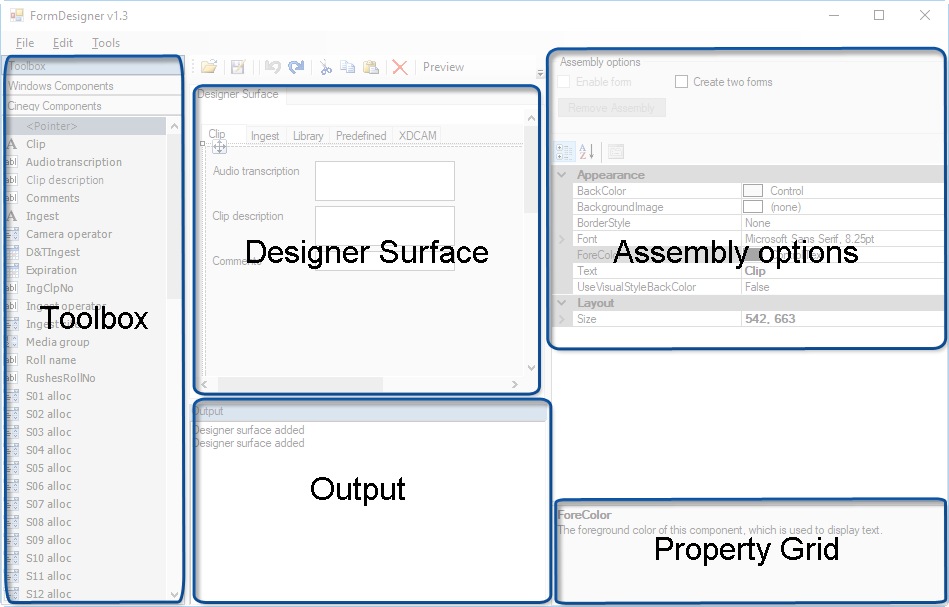
The form designer interface consists of the following parts:
-
Toolbox – displays available descriptors for the current node type. This toolbox contains the following two tabs: "Windows Components", which includes a set of default Windows controls, and "Cinegy Components", which includes all the descriptor controls for the current node type.
-
Designer Surface – is used to create and edit various controls in the metadata form. To add a new control to the designer surface, select the required one from the "Toolbox" and drag-and-drop it to the desired position in the form; horizontal and vertical guides appear helping you to align the control. Each element can be selected with the mouse and relocated within the form, if needed.
The control type depends on the descriptor type and typically consists of two elements: label with the descriptor name and custom control that allows user to view and edit the descriptor value.
NoteAll mandatory descriptor labels are shown in bold. -
Output – logs output events. Use the Ctrl+Insert keyboard shortcut to copy the selected text from the "Output" window to the clipboard.
-
Assembly options – defines the type of the assembly being created:
-
Enable form – select this checkbox to enable the current assembly;
-
Create two forms – select this checkbox to create two different assembly forms: the first form to be used during the particular node creation and the second one to be used for particular node’s metadata editing. Otherwise, a single assembly form will be created to be used both when creating a new node of a particular type or editing metadata of this node.
Use the "Remove Assembly" button to delete the current assembly from the database.
-
-
Property Grid – provides access to the parameters of the currently selected controls in the "Designer Surface".
Main Menu

The main menu bar is located in the top left corner of the "Form Designer" window and consists of the following submenu items:
-
File – provides the ability to create a new assembly, save an existing one in XML format, build the assembly or exit the form designer.
-
Edit – provides access to the editing commands such as "Undo"/"Redo", "Copy", "Paste", "Delete", "Select all".
-
Tools – allows user to customize the controls tab order and alignment.
Main Toolbar

| Button | Action |
|---|---|
|
Opens the existing assembly (in XML format) |
|
Builds the assembly form |
|
Undoing/redoing one or more actions |
|
Cuts the selected control |
|
Copies the selected control |
|
Pastes the copied control |
|
Deletes the selected control |
|
Previews the assembly form on a separate tab (if more than one assembly form is created, for each of them a separate preview will be created on a separate tab) |
|
Customizes the controls tab order |
