Node Metadata
Reading time ~4 minutes
Every node type in Cinegy Archive can be assigned a separate set of metadata fields according to the user needs. Metadata fields can be mandatory; these fields cannot be left empty.
When you create a new node with mandatory metadata fields assigned, a properties dialog box will be shown for this node as in the example below:
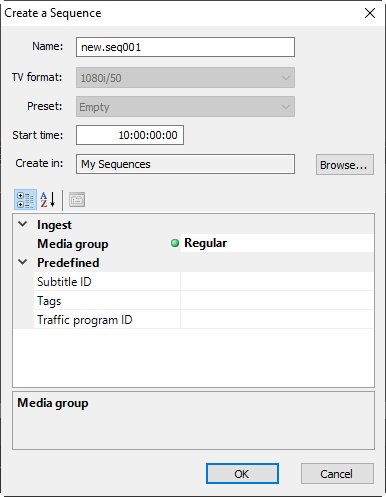
The read-only fields are shown as disabled and cannot be edited by the user.
The read-only mandatory fields can be filled in once, when the node is being created, and cannot be changed later.
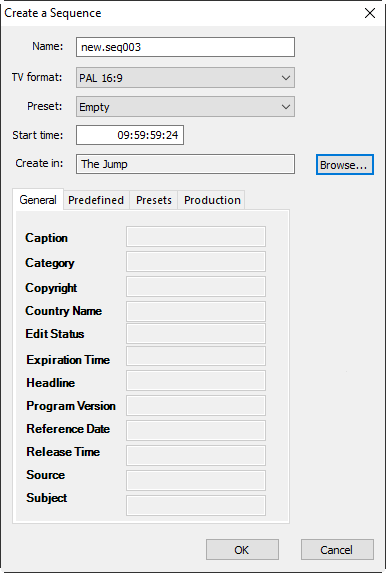
A custom metadata form with its own set of metadata fields can be created individually for each node type using "Form Designer" in Cinegy Archive Manager:
|
Important
|
Refer to the Descriptors, Presets article in the Cinegy Archive Manager Manual for more details on metadata forms creation. |
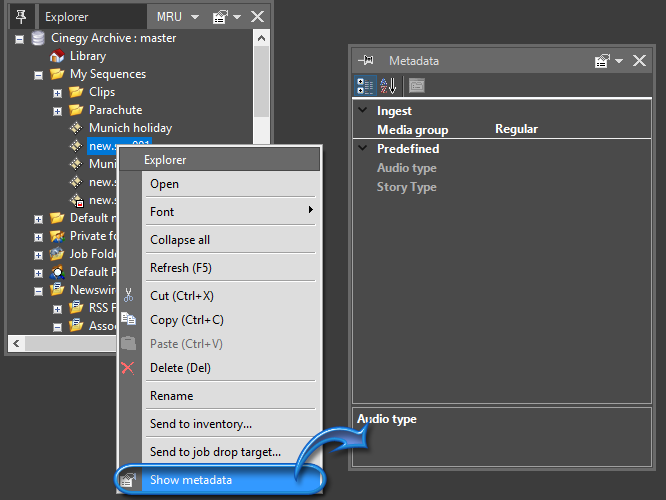
To view and edit the metadata for a node, do the following:
-
Select the desired node in the explorer tree.
-
Right-click the node and select the "Show metadata" option from the context menu.
-
Fill in the fields in the "Metadata" dialog box:
Copying Metadata
Node metadata can be copied to another node of the same type via the copy and paste commands. To do this, follow the steps:
-
Select a source node and use the "Copy" command from the context menu.
-
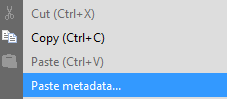
Select the target node and use the "Paste metadata…" command from the context menu:
The "Paste metadata" dialog box appears:
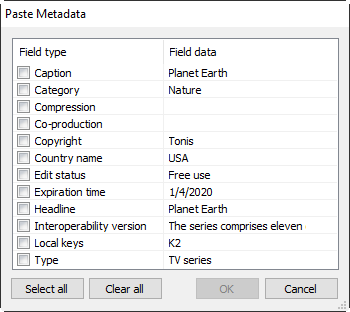
Here check the metadata fields you wish to be copied to the target node.
|
Important
|
In the "Paste metadata" dialog box only descriptors marked with the "Special metadata copy" flag are available. Refer to the Descriptors, Presets article in the Cinegy Archive Manager Manual for details about setting up the metadata fields for descriptors. |
|
Note
|
The read-only metadata fields are not shown in the "Paste metadata" dialog box. |
Propagating Metadata
Cinegy Desktop provides you with the ability to propagate the master clip metadata fields to other master and/or user clips within one Roll.
To do this, follow the steps:
-
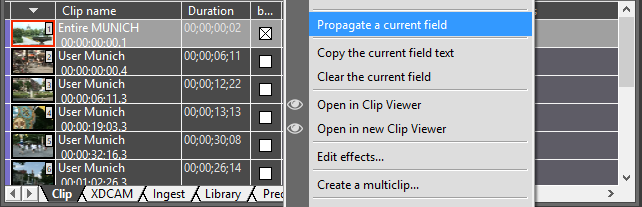
Right-click a metadata field that you would like to propagate.
-
Select the "Propagate a current field" command from the metadata field context menu:
|
Caution
|
The metadata propagating is permanent and cannot be undone. |
The selected value will be entered in all fields of the corresponding metadata column:

Metadata Transferring to an SD Card
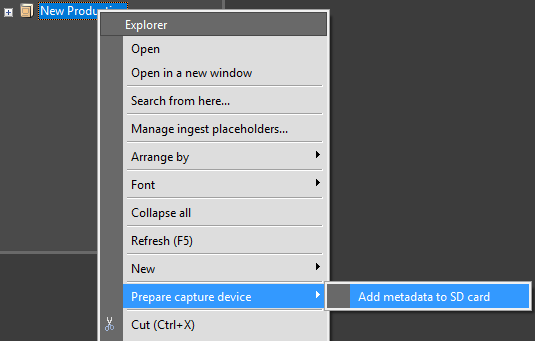
Cinegy Desktop supports the ability to add metadata to SD cards for the subsequent transfer to the camera P2 card(s). To do so, right-click a Production folder and select the "Prepare capture device" > "Add metadata to SD card" command from the explorer submenu:
The following dialog box appears:
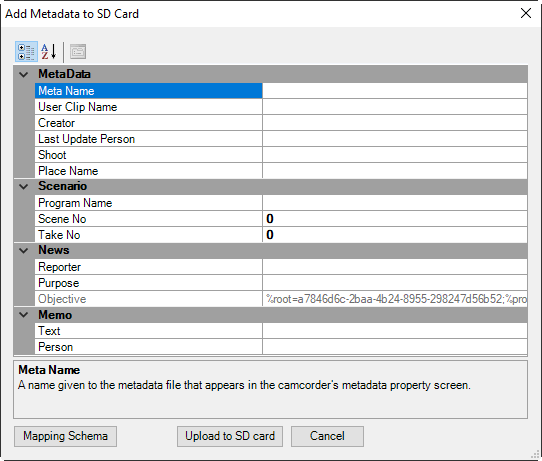
MetaData
Meta Name – the metadata file name displayed in the camcorder’s metadata property screen;
User Clip Name – the clip name;
Creator – the clip creator name;
Last Update Person – the user name who accessed the clip last;
Shoot – the camera operator name;
Place Name – the filming location.
|
Note
|
The "Meta Name", "User Clip Name" and "Place Name" fields are limited to 100 characters; the "Creator", "Last Update Person" and "Shoot" fields are limited to 30 characters. |
Scenario
Program Name – the program name with details;
|
Note
|
The "Program Name" field is limited to 100 characters. |
Scene No – the scene number;
Take No – the take number.
|
Note
|
The numeric characters from 1 to 4294967295 are supported for the "Scene No" and "Take No" metadata fields. |
News
Reporter – the reporter name;
Purpose – the clip creation purpose;
Objective – the clip creation objective definition.
|
Note
|
The "Reporter" field is limited to 30 characters; the "Purpose" and "Objective" fields are limited to 100 characters. |
Memo
Text – the additional information on the clip;
Person – the creator or manager of the text memo.
|
Note
|
The "Text" field is limited to 100 characters and the "Person" field is limited to 30 characters. |
|
To use the existing metadata mapping export schema created via the Cinegy Data Mapper, press the "Mapping Schema" button. |
|
Important
|
Refer to the Metadata Mapping Schemas article in the Cinegy Archive Manager Manual for details about the metadata mapper editor. |
|
Having added metadata, press the "Upload to SD card"; the following dialog box appears: |
Here select a target SD card drive from the drop-down list and press "OK". The MTDTXX.p2 metadata file will be automatically created onto the SD card in the selected target drive. Here XX is any number in the range from 00 to 99 inclusively. The number for each newly created file will automatically be increased by 1.
The P2 files will be created in the PRIVATE\MEIGROUP\PAVCN\SBG\P2SD folder for the selected target drive. It is a standardized P2 folder structure.
|
Note
|
If the standardized P2 folder structure is not on the SD card, Cinegy Desktop will create it automatically. |
|
Note
|
Only files in the MTDTXX.p2 format are acceptable for the metadata uploading. |