Configuration
Reading time ~7 minutes
|
To launch the Cinegy EAS Gateway Configurator, go to Start > All Programs > Cinegy > Cinegy EAS Gateway > Cinegy EAS Gateway Config or use the corresponding shortcut on your desktop. |
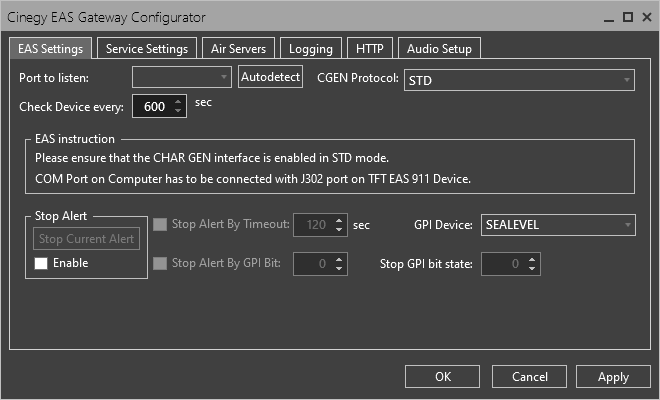
The following configuration window will be open:
EAS Settings
In the "EAS Settings" tab define the following EAS receiver(s) settings:
-
Port to listen – choose the serial port to be listened to for emergency alert messages from connected EAS receiver(s).
-
Autodetect – press this button to automatically detect a connected TFT EAS 911 device.
-
Check Device every – define the time interval in seconds for the port to be checked for a connected TFT EAS 911 device.
NoteThe "Autodetect" and "Check Device every" features are only available for the standard CGEN protocol. -
CGEN Protocol – choose the CGEN protocol type: standard, generic or HTTP.
NotePlease note that HTTP CGEN protocol type is currently under development. NoteWhen the standard CGEN protocol is used for retrieving EAS messages, the port autodetection and automatic check for connected device become available. -
EAS instruction – short technical EAS configuration instruction.
-
Stop Alert – the "Stop Current Alert" button is used to stop retrieving the current emergency alert message from a connected EAS receiver. To activate this button, select the "Enable" option, which protects this button from accidental clicking.
-
Stop Alert By Timeout – an optional timeout value, used to stop alert broadcasts that have not stopped by other means before the defined period.
-
GPI Device – select the available GPI device from the drop-down list.
-
Stop Alert By GPI Bit – optional GPI Bit to use as a stop signal to indicate to the EAS service that an alert has stopped.
-
Stop GPI Bit state – define the GPI Bit state to indicate a stop message.
NoteThe "Stop Alert By Timeout", "Stop Alert By GPI Bit" and "Stop GPI Bit state" options are topical only when generic CGEN protocol is used for retrieving EAS messages.
Service Settings
In this tab EAS Gateway service authentication and management are performed.
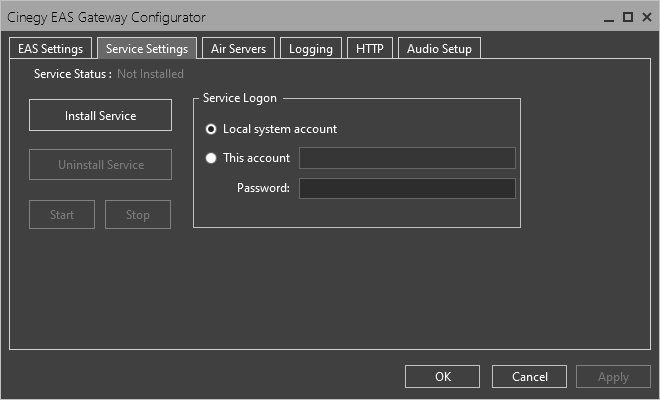
In the "Service Logon" settings section you can specify the account under which the service logs on. You can use the local system account or a specific account with sufficient permissions (including the "log on as a service" privilege). Use of an account without sufficient permissions or rights will cause outright failure or faults, which will be tracked in the diagnostic logs. You need to enter the login name and password for this specific account in the corresponding fields.
|
Note
|
Service logon changes will be applied only after the service restart. |
The "Service Status" field indicates whether the Cinegy EAS Gateway service is installed, running or stopped.
|
Press the "Install Service" button to install the Cinegy EAS Gateway service. The service can be uninstalled by pressing the corresponding "Uninstall Service" button. |
Once the service is installed, it should be started manually by pressing the "Start" button.
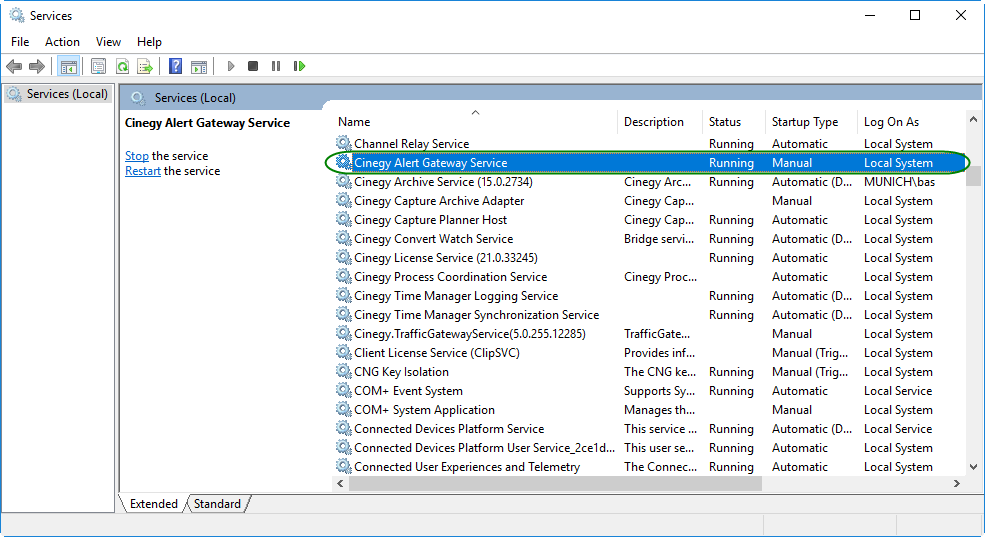
Cinegy EAS Gateway can also be monitored as a standard Windows service:
Air Servers
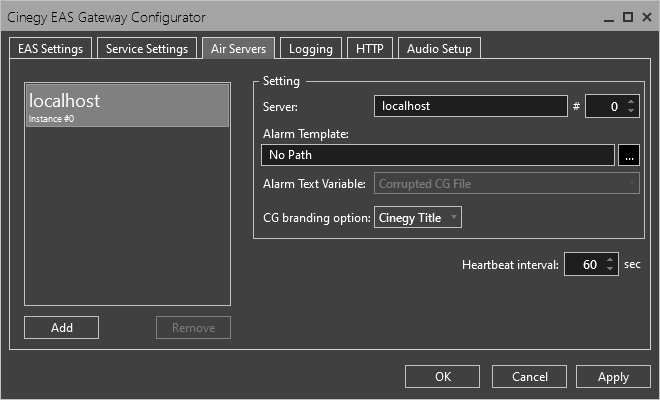
Here you can specify the alarm notification settings individually for each specified Cinegy Air server instance.
|
Press the "Add" button to add a new Cinegy Air server instance that will receive EAS alarm messages. Press the "Remove" button to delete the currently selected Cinegy Air server instance. |
Within the "Settings" configuration group set up the following parameters:
-
Server – enter the Cinegy Air server name or its IP address and port and define what engine instance will be used for processing.
-
Alarm Template – used to define an alert template, in *.cintitle format. Pressing the "…" button will start a dialog for browsing to select an appropriate Cinegy Title template.
-
Alarm Text Variable – used to define the specific variable name which is related to whatever text elements in the template are required to receive the actual alert message body.
-
CG branding option – Cinegy Title templates are used as alarm templates.
-
Heartbeat interval – define the time interval in seconds before Cinegy EAS Gateway is put in a warning state.
Logging
Here you can define Cinegy EAS Gateway logging settings:
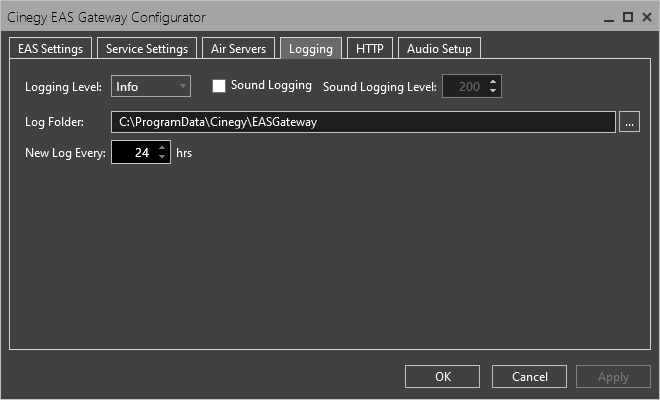
Define the following logging parameters:
-
Logging Level – specify the level of errors to be reported; you can choose an "Info", "Warning" or "Error" level type.
-
Sound Logging – check the "Sound Logging" option to enable the sound logging level for debugging purposes.
-
Sound Logging Level – the minimal sound level (other than the background noise) to be reflected in the log. Here enter the value from 0 to 32767.
NoteThis is useful in debugging purposes to ensure the service is successfully accepting the sound from the selected device. -
Log Folder – define the location of the log file where the sequence of operations is recorded. Press the "…" button to locate the folder where the debug log file in the text format will be stored or simply enter the file path via the keyboard.
-
New Log Every – define the frequency of a new log file creation (in hours).
HTTP
In this tab the HTTP server settings should be defined.
|
Note
|
To enable HTTP server settings CGEN Protocol should be set to HTTP. |
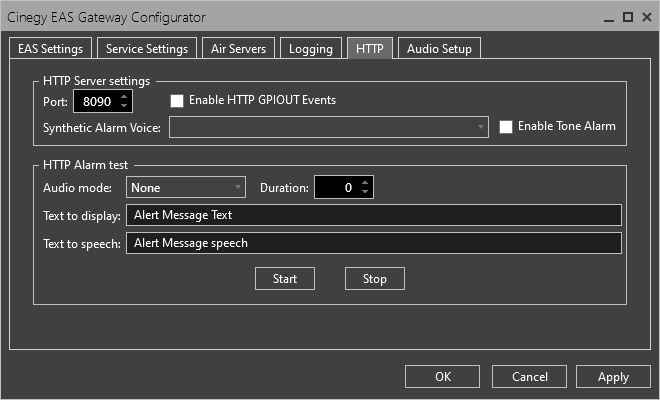
HTTP Server Settings
Select the "Enable HTTP GPIOUT Events" option and define the port number of the HTTP server to receive alerts.
Synthetic Alarm Voice – synthesized system voice to be used for announcing the alert message on condition that "Synthetic" audio mode is enabled in the HTTP alert script.
|
Important
|
Refer to the HTTP Alert Sample Scripts article to get information on the HTTP alert script format. |
Enable Tone Alarm – select this option to initiate audio notice attention signals before the alert message is announced.
|
Note
|
The voice availability depends on the system "Speech" settings. |
HTTP Alarm Test
Here you can define the HTTP alarm test settings to check your system if a physical EAS device is not available:
-
Audio mode – alarm audio mode: "synthetic", "bypass" or none.
-
Duration – duration of the alarm test.
-
Text to display – text of the alert message on the display.
-
Text to speech – text of the voice alert message.
|
Press the "Start" button to start the alarm test. |
|
Press the "Stop" button to stop the alarm test. |
Audio Setup
Here the audio settings can be configured.
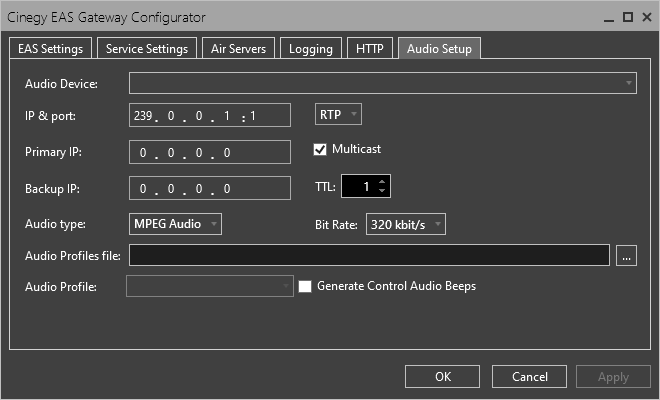
Define the following parameters:
-
Audio Device – choose the corresponding audio input device from the drop-down list, which should be connected to audio output from the physical EAS device.
-
IP and port – enter a destination multicast address and port, which will be used to re-stream the EAS audio output to the network. Define the stream protocol type by choosing either RTP or UDP from the drop-down list (RTP is recommended).
-
Multicast – define the broadcast transmission method (unicast or multicast). Multicast is enabled when this option is selected.
-
Primary IP – enter the IP address of the primary local network adapter that will be used for multicasting.
-
Backup IP – optionally enter the IP address of a secondary local network adapter that will be used for multicasting as well as the primary IP.
NoteIt is recommended to set up a static IP address for these local adapters. The "Primary IP" and "Backup IP" parameters affect multicast mode only. -
TTL – define the number of routers (hops) that multicast traffic is permitted to pass through before expiring on the network.
NoteThe "TTL" parameter affects multicast mode only. ImportantRefer to this documentation for more information on the TTL option. -
Audio type – define the audio type and its associated audio bitrate by choosing the desired options from the corresponding drop-down lists.
NoteThe "Bit Rate" option is available only for MPEG and AAC audio types. -
Audio Profiles file – select an XML audio profile file, that has been previously created in the Cinegy Air audio matrix editor. Press "…" to browse for the needed file using the common "Open" dialog.
-
Audio Profile – select the audio profile from the drop-down list:
 Important
Refer to the Audio Profile Editor article in the Cinegy Air Manual to get more information on creating audio profiles. -
Generate Control Audio Beeps – select this option to produce the corresponding sounds in case of audio failure.
Once the settings are configured, press the "Apply" button for the changes to take effect.


