Scheduled Media Cleaner
Reading time ~5 minutes
The scheduled media cleaning process is performed automatically for each item in the list according to the individual cleaning time plans.
To launch this tool, select the "Scheduled media cleaner" command from the "Modules" > "Management" drop-down list in Cinegy Desktop. The "Scheduled Media Cleaner" window appears.
Interface
The scheduled Cinegy Media Cleaner interface consists of two panels: the task table (at the top) and the "Log" window (at the bottom).
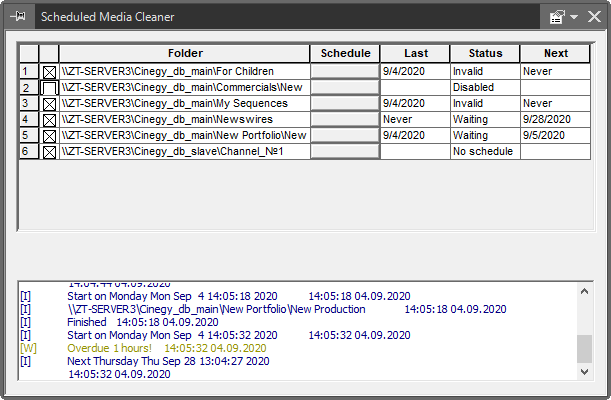
The task table has the following columns:
-
Order numbering – the item number;
-
Check/Uncheck – the enabled/disabled status of the item;
-
Folder – specifies the folder and which content is scheduled for cleaning;
-
Schedule – specifies the media cleaning schedule and options;
-
Last – the last cleaning session date;
-
Status – the item’s current session status;
-
Next – the scheduled date for the next cleaning session.
Status Modes Explanation
There are several possible status modes:
-
Disabled – the item is not checked in the schedule;
-
No schedule – no schedule for the next media cleaning session is defined;
-
Waiting – waiting for processing;
-
Invalid – incorrect item settings;
-
Finished – the cleaning session has been completed successfully and the next run is not scheduled;
-
Running – the cleaning session is in progress.
The log window displays information about the media cleaning sessions.
Context Menu
Right-click on the task table to display the context menu:
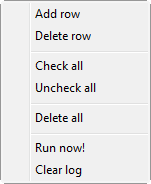
This menu contains the following commands:
-
Add row – adds a new row below the currently selected row;
-
Delete row – removes the selected row from the task table;
-
Check all – enables all items in the task table;
-
Uncheck all – disables all items in the task table;
-
Delete all – removes all rows and their contents from the task table;
-
Run now! – runs the cleaning session for the selected item immediately, ignoring the specified schedule;
-
Clear log – clears the contents of the log window.
Schedule Managing
By default, the scheduler window contains a single empty row:

Folder Setup
To select a folder for the scheduled media cleaning, press the <…> button in the "Folder" column. The "Choosing a folder" dialog box appears:
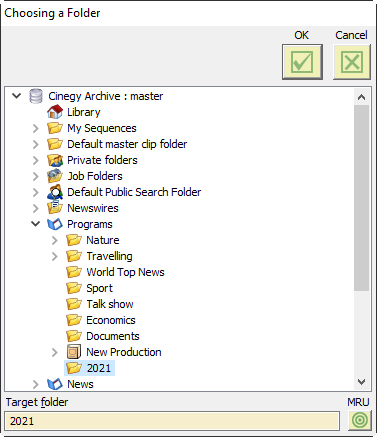
Choose the desired folder. You can also use the "MRU" button located at the bottom of the dialog box to get the list of the most recently used folders.
Schedule Setting
Press the button in the "Schedule" column for the desired item to define its schedule. The "Media cleaner settings" dialog box appears.
Scheduler Tab
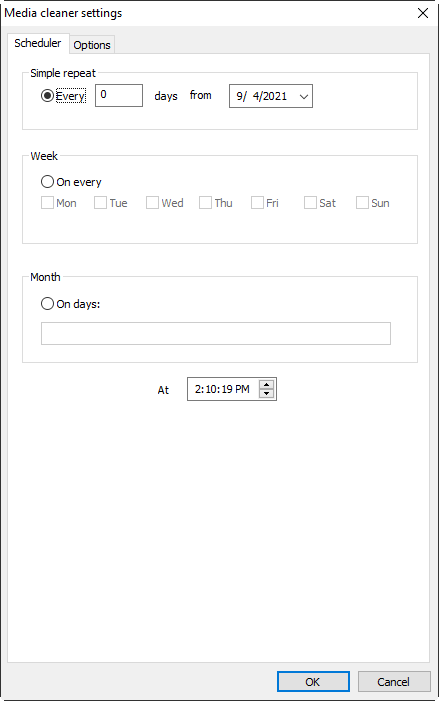
Here you can specify the cleaning schedule for the current item. Choose one of the following schemes:
-
Simple repeat – the cleaning session should be started every defined number of days starting with the specified date;
-
Week – the cleaning session should be started every week on specified days;
-
Month – the cleaning session should be started every month on specified days.
To assign the desired scheme, set the corresponding radio button.
The specified session will start at the next occurrence of the time displayed in the "At" cell (24-hour format).
Options Tab
Additional options for media cleaning can be set up in the "Options" tab:
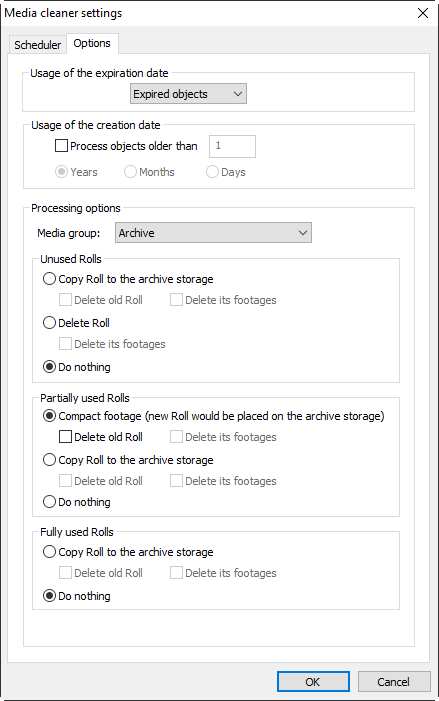
Usage of the Expiration Date
The "Usage of the expiration date" option controls how the expiration date metadata is used in the process:
-
Set "Expired objects" to process only Rolls with expired dates;
-
Set "Do not use" to ignore expiration dates.
Usage of the Creation Date
The "Usage of the creation date" option allows you to use the creation date information during a cleaning session. Check the "Process object older than" checkbox to enable this feature. Set the amount and the time scale (years, months, or days). Only Roll(s) created before the specified time will be processed.
Processing Options
The "Processing options" configuration allows the user to specify the media cleaning parameters individually for unused, partially used, and fully used Rolls. The following processing options are available:
-
Media group – defines the media group on the network share where the footages to be processed will be eventually placed. From the drop-down list select Archive or Regular media group;
-
Copy Rolls to the archive storage – automatically creates a new Roll and copies footages from the old one to the archive storage when the cleaning session is performed. Select the "Delete old Roll" checkbox to automatically delete the old Roll after it has been copied and "Delete its footages" to delete the old Roll footages as well. The deletion of the footages is only available when the "Delete old Roll" option is enabled;
-
Delete Roll – deletes any unused Roll when the cleaning session is performed. Select the "Delete its footages" checkbox to delete the Roll footages as well;
NoteThe "Delete Roll" option is only available for the unused Rolls processing. -
Compact footage – automatically creates a new Roll and copies the used parts of the old Roll footages to the archive storage. This function is used for cleaning unused essence data from the partially used Rolls. Select the "Delete old Roll" checkbox to automatically delete the old Roll after it has been compacted and "Delete its footages" to delete also the old Roll footages. Deletion of the footages is only available when the "Delete old Roll" option is enabled;
NoteThe "Compact footage" option is only available for the partially used Rolls processing. -
Do nothing – ignores the corresponding Rolls during media cleaning.
|
Note
|
The archived Rolls are skipped during the media cleaning process. |