Editing Master Clips
Reading time ~4 minutes
You can at any time adjust the boundaries of master clips that are not entire master clips. Nevertheless, it is a good idea to make the adjustments before you let users start working on the material.
Splitting a Master Clip
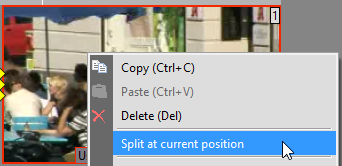
You can split a non-entire master clip in a Roll at a specified position:
-
Double-click the desired master clip to launch the Clip Viewer plug-in.
-
Put the time slider at the desired position.
-
Close the Clip Viewer window.
-
Choose the "Split at current position" command from the right-click menu. You will be asked to confirm splitting the master clip by pressing "OK".
|
Note
|
You cannot split the master clip if it is already in use (e.g., published in a ClipBin, used in a Sequence, etc.); an appropriate error message appears informing you about this. |
|
Important
|
Refer to the Viewing Video Material article to learn more about using the Clip Viewer plug-in. |
You can easily recognize if the original timecode (OTC) in the two consecutive non-entire master clips in the Roll is continuous. In this case, yellow triangle markers are displayed between the master clips, which ensures that the playback is seamless.

Joining Master Clips
To join two consecutive non-entire master clips, do the following:
-
Select the two master clips next to each other.
NoteMake sure there are yellow triangle markers between those master clips: -
Choose the "Join" command from the clip context menu:
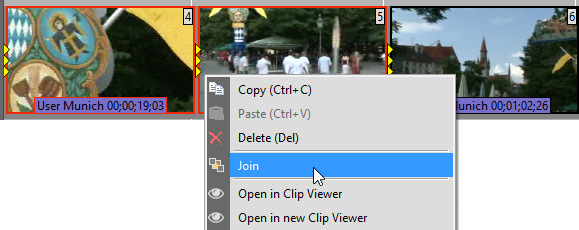
Now you have one longer master clip instead of two shorter ones.
|
Note
|
You cannot join master clips if they are already in use (e.g., published in a ClipBin, used in a Sequence, etc.); an appropriate error message appears informing you about this. |
Rearrangement of Master Clips
It is possible to change the order of master clips within a Roll according to your needs using a regular drag-and-drop action. The new master clip order is permanent and shared among all Cinegy Archive users. To prevent accidental reordering, the "Disable reordering master clips" user action can be activated in Cinegy Archive Manager.
Changing In and Out Points
|
Important
|
The editing of In and Out points is disabled by default. Refer to the Global Settings article in the Cinegy Archive Manager Manual to find out how to configure global settings in Cinegy Archive Manager. |
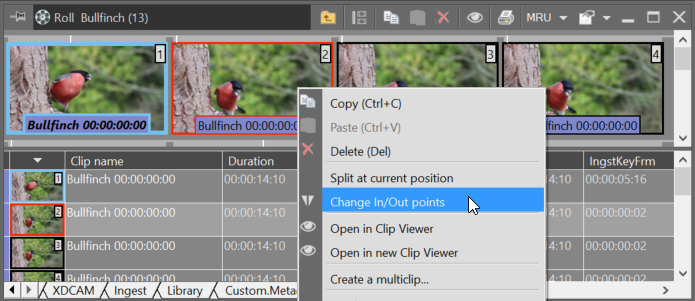
It is possible to change the In and Out points of the non-entire master clips (which are not yet used in ClipBins or Sequences). To do this, select the master clip and use the "Change In/Out points" context menu command:
Having selected this command, Clip Viewer with the master clip will be open:
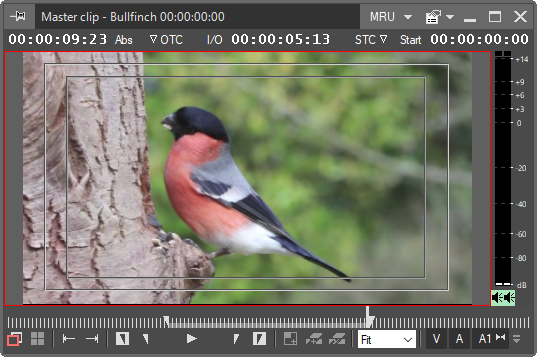
Here, define new In and/or Out points and close the Clip Viewer window. You will be prompted to apply your changes with the following message:
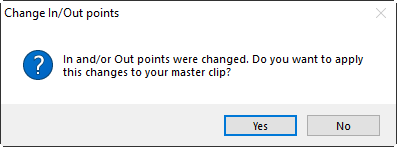
Press "Yes" to apply the newly defined In and/or Out points. The master clip of the defined duration will be created.
Correcting Metadata
You can correct the metadata field content at any time. All the changes will be propagated immediately.
|
Caution
|
Be very careful when editing metadata on the "Predefined" tab. The fields contain system data and should not be changed unless there is a very serious reason. |
|
Important
|
Refer to the Table View article in the Cinegy Desktop Manual to learn how to edit the metadata. |
Propagating a Value to All Clips
Sometimes you need to enter the same new content into the metadata field for all the master clips in the Roll. Do the following:
-
Correct the value for one of the master clips.
-
Choose the "Propagate a current field" command from the right-click menu of the corresponding metadata field.
|
Note
|
This command does not apply to the fields on the "Predefined" tab. |
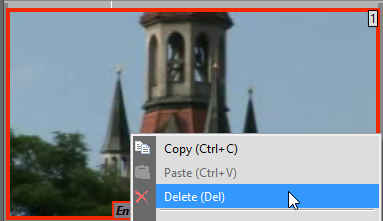
Deleting a Master Clip
To delete a master clip, follow the steps:
-
Choose the "Delete" context menu command or hit the Delete key.
-
A dialog box appears asking you to confirm the action. Press "OK".
-
You can use the "Undo" command to restore the deleted Roll.
|
Note
|
You cannot delete the master clip if it is already in use (e.g., published in a ClipBin, used in a Sequence, etc.); an appropriate error message appears informing you about this. |
|
Note
|
Master clips are not physically deleted, but are just marked as deleted. Thus, the operation does not affect the ClipBins and Sequences that already refer to them. |
Deleting a Roll
If any technical problems are encountered during the capture session, you may want to delete the entire Roll and try to re-ingest the material. To do this, select the "Delete" command from the Roll context menu in the Explorer window.