Creating Story in Bin
Reading time ~3 minutes
Playing the Clips in Sequence
|
You can switch the bin to sequence mode by pressing the "Sequence mode" button. The content of the entire bin appears in Sequence Viewer. |

This mode allows you to rough-cut a story directly in the bin.
|
Caution
|
This operation locks the content of the bin. Other users will not be able to access the bin while sequence mode is active. It is not possible to switch to sequence mode if the bin contains clips with different aspects and/or frame rates (you will be informed that this mode is unavailable). |
If several bins are open in sequence mode (or if Timeline is on the screen), Sequence Viewer will reflect the content of the active window.
During the playback in Sequence Viewer, the clip being played is marked with the red frame, and the red progress bar appears indicating the current position of the playback.
When you select a clip in sequence mode, Sequence Viewer shows the In point of the clip.
Creating a Subclip
When you mark the footage with the In and Out points, you can either save the clip along with the new boundaries, or you can create a subclip based on the In and Out points you set to break longer clips into smaller segments.
|
Press the "Make subclip" button in the Clip Viewer toolbar. The new subclip will be placed in the bin where the current clip originates from, next to the original one. |

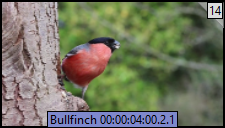
Clips in ClipBins that are created with the subclip function are marked with a translucent triangle in the upper right corner of the thumbnail:
|
Important
|
You can also use the subclip function to create and log a new master clip in a Roll. Refer to the Logging article for more details. |
Rearranging Clips in the ClipBin
Simply drag the clips to the desired position in the ClipBin. Cinegy Desktop shows the insertion point as a vertical yellow line. To add a clip, drag it from another ClipBin or a Roll:
You can easily recognize if the original timecode (OTC) in the two consecutive clips in the ClipBin is continuous. In this case, yellow triangle markers are displayed between the clips, which ensures that the playback is seamless.
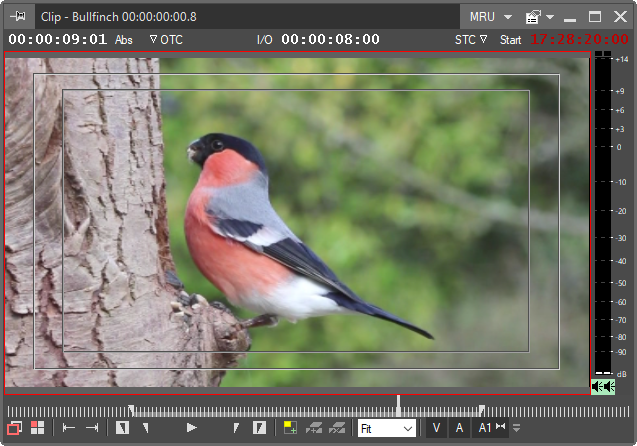
Trimming a Clip
Clip Viewer provides the means to trim the clip.
|
Note
|
The In point represents the beginning of the In frame, and the Out point represents the end of the Out frame (or the beginning of the next frame). |
|
Press the "In" button or hit the I or E key to trim your clip from the left. To delete the In point, press the "Delete In" button (inverse In). |
|
Press the "Out" button or hit the O or R key to trim your clip from the right. To delete the Out point, press the "Delete Out" button (inverse Out). |


|
Note
|
You can hit the 6 key to play from In to Out. |
Clips Editing
It is possible to set In and Out points manually for a certain clip in ClipBin.
|
Important
|
Editing of In and Out points is disabled by default. Refer to the Global Settings article in the Cinegy Archive Manager Manual to find out how to configure global settings in Cinegy Archive Manager. |
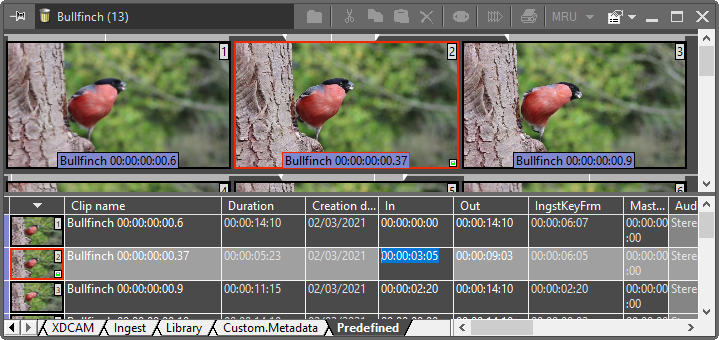
To do this, select the clip, right-click it, and use the "Show metadata" context menu command:
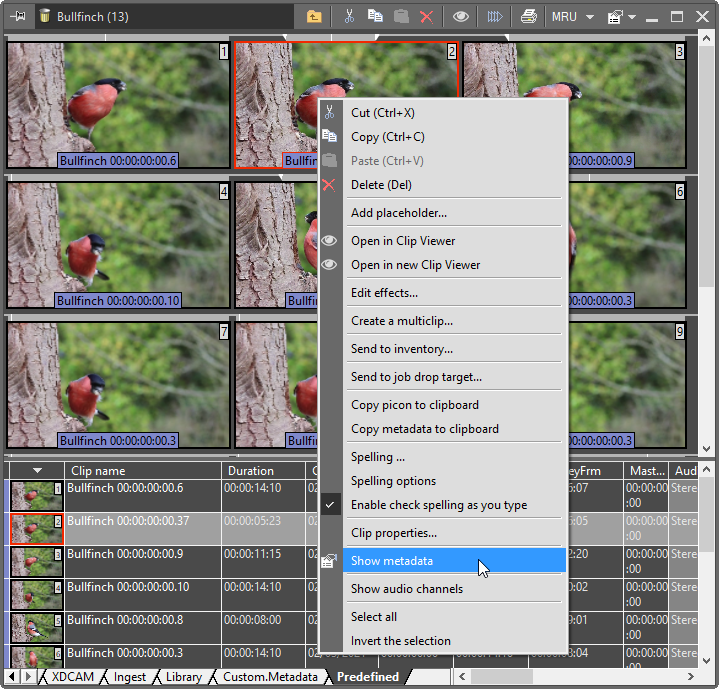
In the appeared window, navigate to the "Predefined" field and manually change the values for In and Out points:
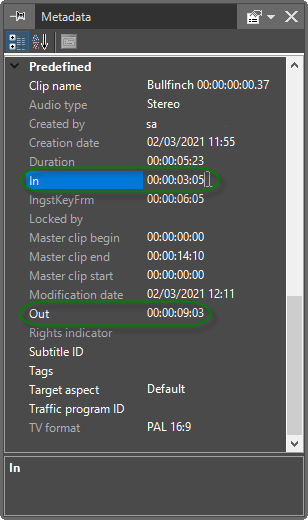
If a new In or Out value is out of range, the value just remains unchanged.
Alternatively, the In and Out points can be changed directly from the ClipBin grid by editing the corresponding metadata fields on the "Predefined" tab: