Audio Balance Adjustment
Reading time ~2 minutes
You can change the audio balance by changing keyframe mode on Timeline.

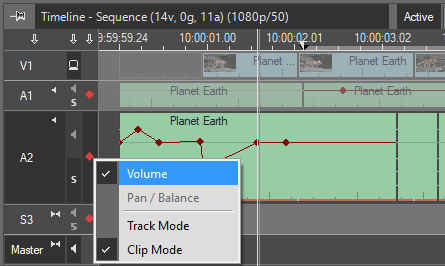
Switch to track mode and choose the "Pan/Balance" command from the right-click menu as shown above. The keyframe diamond color then changes from red to blue. The term "Pan" is used for stereo and the term "Balance" is used for mono.
To start working with the balance rubber banding, do the following:
1. Enable the "Rubber band" command in the main Timeline menu. The rubber band line appears on the audio objects. |
|
2. Position the time slider where you want to change the balance. |
|
|
3. Press the blue "Add/Remove a keyframe" button or use the N shortcut. The new keyframe appears on all the selected objects. Without the selection, the keyframe will be created in all the audio objects at the current position. |
4. Drag the key to obtain the desired effect. The pan/balance will be shown in dB as a tooltip when dragging. |
The pan/balance is measured in %, from "100% L" to "Center" to "100% R"; the left channel is above the middle line:

Every audio track can use different mode, e.g., track S1 could use volume adjustment mode, while track S2 could use pan/balance mode.
Editing Pan/Balance Keyframes
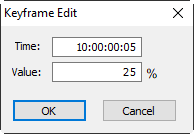
In addition to dragging the keyframe to the desired position, you can also use the "Keyframe Edit" dialog to change the position and the pan/balance value of the keyframe. Double-click the keyframe; the "Keyframe Edit" dialog box opens:

Now you can enter the timecode to change the position of the keyframe. To change the pan/balance level, you need to enter a % value into the text box. Enter a positive value to shift the pan/balance to the right channel or a negative value to shift the pan/balance to the left channel.
Dual Rubber Band Display
The inactive rubber band (volume or balance) is displayed in a paler color on Timeline and thus is not editable.

Use the diamond button on the left-hand side of the audio track on Timeline to switch between the volume and balance rubber band modes.
