Trimming on Timeline
Reading time ~7 minutes
Simple Trimming
The simple way to trim a clip is to use Clip Viewer. Do the following:
-
Double-click the desired clip on Timeline.
-
Clip Viewer opens, containing the clip.
-
Change the In and/or Out point and close the viewer.
-
Your changes will be shown on Timeline. The result depends on current insert/overwrite mode enabled.
Insert mode will have the following effect: the clip is cut at the set In and Out points; the beginning of the clip is defined to the new In point and shortened to the new Out point.
|
The Sequence remains seamless after trimming in insert mode |

Overwrite mode will trim the clip to a new size defined by the In and Out points; however, if the trim is done in the middle of a clip, this will create a hole in the Sequence.
|
The hole in the Sequence after trimming in overwrite mode |

|
Important
|
Refer to the Insert and Overwrite Modes article for further information about insert and overwrite modes. |
Cutting in Clip Viewer
To cut an item at the specified point,
-
Double-click the desired clip on Timeline.
-
Clip Viewer opens, containing the clip.
-
Shuttle to the desired cut point.
NoteYou are only allowed to cut the clip inside the current In and Out points. If the time is set to the In or Out points or outside the range, the "Razor" button is grayed out. -
Press the "Razor" button.
-
The clip will be cut at the specified point on Timeline. Clip Viewer closes.
|
Note
|
To exclude certain tracks from the operation, deactivate them with the track selector. |
Two-Point Trimming
To start trimming, click the beginning or the end of the clip you want to trim. If you have two clips one after another, click between the clips. Timeline and Sequence Viewer will switch to trim mode.
You can also hit the [ key to start trimming the cut nearest to the current time position. Hit the ] to close trim mode.
|
Note
|
We will refer to the "Sequence Viewer in trim mode" simply as the "Trim" window. |
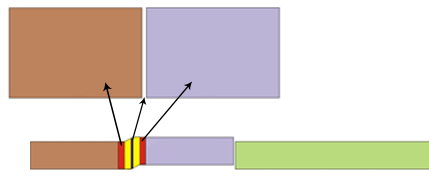
If you hover the mouse over a cut on Timeline, it will display three transparent, colored hotspot areas:
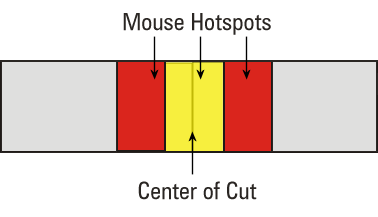
There are two different modes of two-point trimming. Every colored hotspot corresponds to one of the modes, this depends on whether insert or overwrite mode is active. When insert mode is active the colored hotspots are yellow and dark gray; if overwrite mode is active, the colors are red and dark gray.
|
|
Insert mode colors |
Overwrite mode colors |


Trim Center
Select only the center of the cut.
Moving the cut to the left will shorten the outgoing clip and extend the incoming clip. Moving the cut to the right will extend the incoming clip and shorten the outgoing clip. This trim mode is non-destructive.
Trim Right
Select a clip on the right side of the cut.
The incoming clip will not move while the outgoing clip will be lengthened or shortened. This trim mode is destructive.
Trim Left
Select a clip on the left side of the cut.
The outgoing clip will not move while the incoming clip will be lengthened or shortened. This trim mode is destructive.
Two-Point Trimming in the "Trim" Window
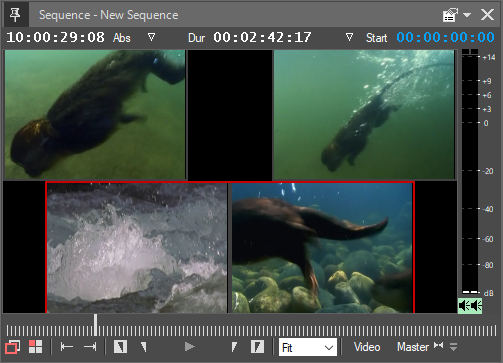
When you start two-point trimming, Sequence Viewer turns into the "Trim" window and enters two-clip mode. You can trim in the "Trim" window with the mouse, the keyboard, or the jog-shuttle.
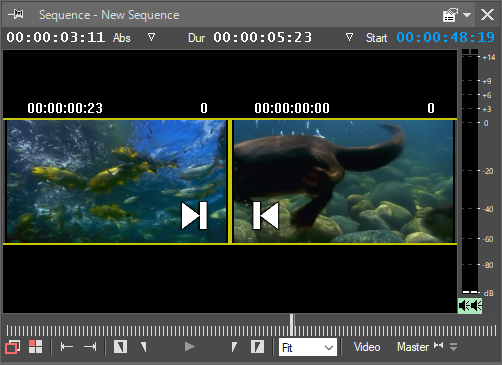
Depending on which mode is currently active (insert or overwrite mode), the active cuts will be highlighted with a yellow border indicating insert mode or a red border indicating overwrite mode. Near each frame, you can see the corresponding In or Out timecodes.
The number of cut frames will be displayed on top of the frames.
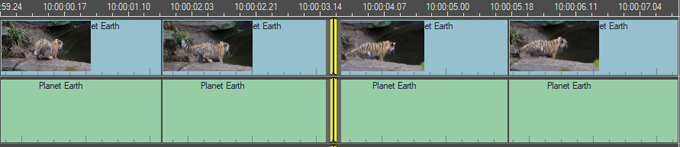
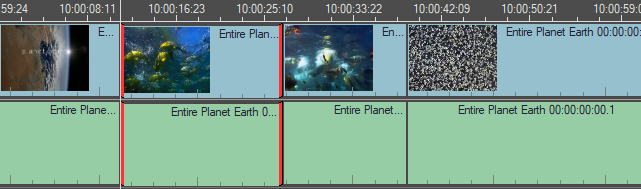
The two frames in the windows correspond to the two clips being trimmed, so you can always see the cut. In the illustration below, you can see how the two frames in the viewer correspond to the trimmed clips on Timeline.
Using the Mouse in the "Trim" Window
The two frames and the space between them in the "Trim" window represent the mouse hotspot structure on Timeline.
-
left trim – to activate and drag the left frame;
-
right trim – to activate and drag the right frame;
-
trim center – to drag between the two frames.
The mouse pointer always changes to the appropriate icon to indicate the result of the current operation:
|
Trimming In |
|
Trimming Out |
|
Trimming In and Out |


Four-Point Trimming
To start four-point trimming:
-
click between the clips to start the two-point mode;
-
Ctrl+click again on the other side of one of the two clips to add the second cut to the trim.
Timeline and Sequence Viewer enter the four-point trim mode.
Roll Trim
Drag one of the hotspots inside the four-point selection.
This trim mode will allow a clip to maintain its length but be moved either up or down a Sequence. Both the In and Out points of the clip will be adjusted synchronously.
This trim mode is non-destructive.
Slide Trim
Drag one of the red hotspots outside the four-point selection.
This trim mode will allow the clips to be adjusted simultaneously without affecting the Out point of the outgoing clip or the In point of the incoming clip. This trim mode is non-destructive.
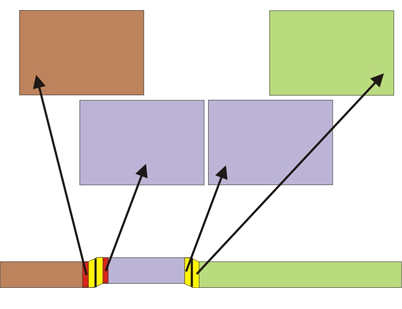
Four-Point Trimming in the "Trim" Window
When you start the four-point trimming, Sequence Viewer turns into the "Trim" window and enters four-clip mode. You can trim in the "Trim" window with the mouse, the keyboard or, the jog-shuttle.
The active cuts will be highlighted with a red or yellow border depending on whether the insert or overwrite mode is active. Near each frame, you can see the corresponding In or Out timecodes.
The number of cut frames will be displayed at the top of the frames.
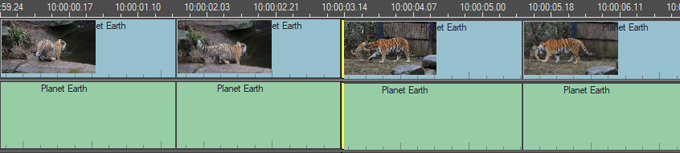
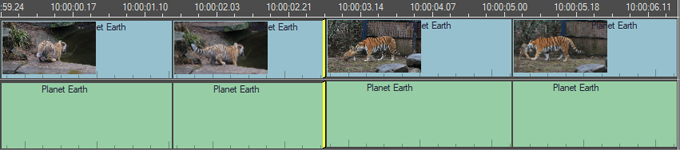
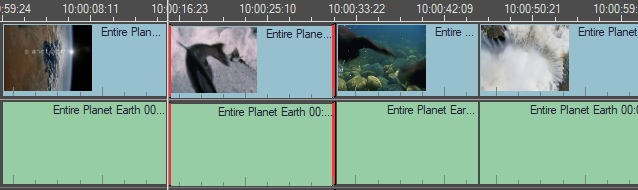
The four frames in the window correspond to the In and Out points of the three clips being trimmed, so you can always see the two cuts. In the illustration below, you can see how the four frames in the trim viewer correspond to the trimmed clips on Timeline.
Using Mouse in the "Trim" Window
Four frames in the "Trim" window represent the mouse hotspot structure of the four-point trim on Timeline. The mouse pointer will help you determine which operation is taking place.
-
To roll, drag the bottom frames.
-
To slide, drag the top frames.
The mouse pointer always changes to the appropriate icon to indicate the result of the current 4-point operation:
|
Roll |
|
Slide |


Things to Note when Trimming
-
It is not possible to switch from insert to overwrite mode or vice versa when Clip Viewer has already been launched from Timeline.
-
It is only possible to change the set of edits for the current trim before you start trimming; otherwise, the new edit selection will open.
Using Insert Mode
-
The In point always stays at its original position.
-
There are no limitations on the trim positions.
Using Overwrite Mode
-
It is not possible to remove trimming beyond a clip’s end.
-
The timecode of the clip in relation to Timeline will stay as it is, i.e., the clip will not be moved.
Trimming with Convenience
There are some additional features to control your trimming in Cinegy Desktop:
-
Trimming with the keyboard – you can use all the time position buttons to move your current trim point.
|
Important
|
Refer to the Viewing Video Material section to learn more about the navigation keys. |
-
Trimming with the jog-shuttle – the way your jog-shuttle controls the trimming depends on the settings in its driver.
|
Important
|
Refer to the documentation of your jog-shuttle device to learn how to set up the desired shortcuts. |
-
TV Output during trimming – one of the frames in the "Trim" window (of 2 or 4, depending on the mode) will be displayed on your TV monitor if you have the proper TV out equipment. The changing trim point will be displayed. If there are two changing points, the left one will be displayed.
|
Important
|
Refer to the TV Output paragraph to learn about the output device setting. |