Timeline
Reading time ~4 minutes
At the bottom of the Story Editor window the timeline is located. It shows various Story components placed over time.
It supports adding the following objects:
-
master clips;
-
clips;
-
Sequences;
-
Cinegy Titler templates;
-
Live Input items.
As soon as the object is added, its duration is automatically calculated. The black vertical line marks the overall duration of materials in the Story. The calculated value is displayed in the "Calculated Duration" field on the data panel. If the calculated duration is longer or shorter than the "Target Duration" value, it will be displayed in red. You can set the desired Story duration in the "Target Duration" field. This value is shown with a red line on the timeline:
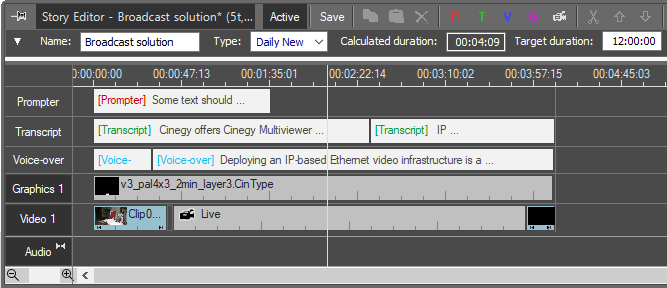
Timeline Tracks
The timeline can contain the following tracks:
-
prompter
-
transcript
-
voice-over
-
graphics 1…5
-
video 1…3
-
audio
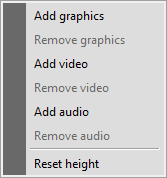
Only one video track and one graphics track are enabled by default. It is possible to enable two additional video tracks and four additional layers of graphics. It is convenient to use these tracks in order to have several video clips and graphics templates that can be played independently – on a second video server or several studio displays.
|
Note
|
To play items from each Story Editor timeline video track, a separate Cinegy Playout Engine instance should be configured. |
To enable or disable additional tracks, right-click the track title column and select the desired command:
The added tracks are numbered sequentially, the track numbers are displayed in their titles. To add an object to the additional track, drag-and-drop it directly to the desired position on the track.
If several video clips are placed on the same position, only the clip from the selected active video track will be displayed in the preview. Click a different track title to preview the video clip placed on it.
A copied video clip or Sequence will be pasted to the selected video track on the position of the time slider. A copied Cinegy Titler template or several templates (even from different graphics layers) will be pasted to the first of the selected layers on the position of the time slider.
Additional video tracks and graphics layers can be removed starting from the latest ones. If the latest video track or graphics layer contains any objects, it cannot be removed and the respective context menu commands will be disabled.
Scripts on Timeline
The timeline text track consists of all the script blocks defined on the script panel. At the beginning of each text block its type is specified with the corresponding color in square brackets. The duration of blocks on the timeline is calculated according to the reading speed of the specified presenter and/or author.
|
Important
|
Refer to the Working with Scripts article for more information on the script block duration. |
Grouping
The segments on the timeline can be grouped to ensure their synchronization. Moving a group means that all the segments in the group will be moved on the timeline. This is useful for preventing text getting out of sync with video.
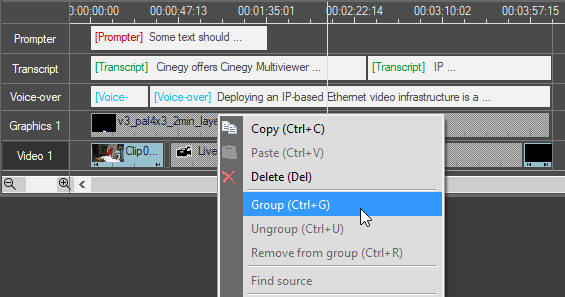
Select the required segments by clicking them with the Ctrl key pressed and use the "Group" command or the Ctrl+G shortcut to combine them into a group. The "Group" command also works when selecting an existing group plus other segments.
The "Ungroup" command releases all segments from a group. Use the "Remove from group" command to release just the selected segment from the group.
You can also group objects on the assets panel by selecting the required objects with the Ctrl or Shift key pressed and choosing the "Group" command from the right-click menu.
|
Note
|
When selected on the assets panel, all segments inside the group will be highlighted. |
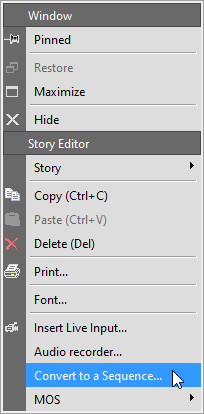
Converting to a Sequence
All the objects on the video and graphics tracks can be converted into a Sequence by using the corresponding command from the timeline context menu:
|
Note
|
Please note that sequence-to-sequence conversion is also possible using the "Convert to Sequence…" command. |
The "Convert to Sequence" dialog will appear:
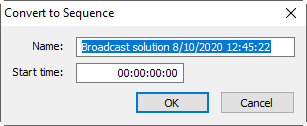
The following parameters can be specified here:
-
Name – enter a name for the new Sequence. The suggested name contains the Story name and the current date and time.
-
Start time – define the start timecode for the new Sequence.
A separate Sequence will replace all the objects located on the selected video track and active graphics layers.
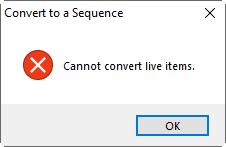
It is not possible to perform conversion to sequence for Live items. If the selected track contains live input, the corresponding error message will appear: