Working with Scripts
Reading time ~15 minutes
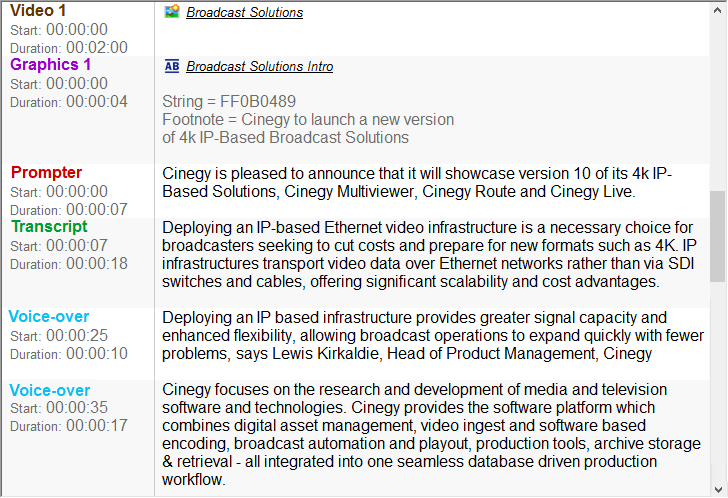
The script panel contains the entered information about the Story material: words of the narrator, dialogues, titles, commentaries, etc. It is divided into two columns, where the first one displays the block caption in the following order:
<block type>
<block start time>
<block duration>
The duration of each block is calculated automatically as described below.
The second column contains the text of the blocks as well as the information about video and Cinegy Titler templates.
Script Blocks
All the information is contained in the corresponding text blocks. Each block of a particular type has its own color. The description of the following available block types is given below:
Prompter Block
Prompter block contains narration intended to be read by an anchorperson.

|
Important
|
This text will be automatically sent to Cinegy Prompter to be displayed on the teleprompter device. See the Cinegy Prompter Manual for detailed information about Cinegy Prompter. |
The duration of this block depends on the presenter’s reading speed.
|
Note
|
If the prompter is not defined or the reading rate for the selected prompter is set to 0 words per minute in Cinegy Archive Manager, the block duration will be calculated according to the default reading rate. |
|
Important
|
The default reading rate value is used for calculating the duration of Transcript blocks, as well as Presenter and Voice-over blocks with no Prompter/Voice-over selected. This value can be changed. Refer to the Global Settings article in the Cinegy Archive Manager Manual to learn how to set the default reading rate value. |
|
Important
|
The reading speed is set for each presenter individually. Refer to the News Options article in the Cinegy Archive Manager Manual to learn how to manage the list of presenters. |
Transcript Block
Transcript is a block containing spoken words of those appearing on screen.

This block is included to a newly created Story by default. Its duration is calculated according to the default reading speed value.
You can also add a new Transcript block to the Story by drag-and-drop a news items from Cinegy Newswire Browser.
|
Important
|
Refer to the Global Settings article in the Cinegy Archive Manager Manual to learn how to set the default reading rate value. |
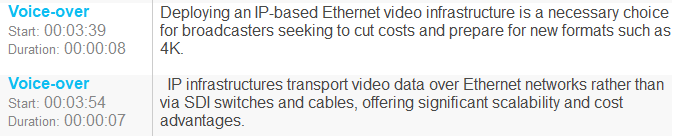
Voice-over
Voice-over is a block with commentary (usually off-screen) recorded on top of the video material.

The duration of this block is calculated automatically depending on the narrator’s reading speed.
|
Important
|
If the voice-over is not defined or the reading rate for the selected presenter is set to 0 words per minute in Cinegy Archive Manager, the block duration will be calculated according to the default reading rate. Refer to the Global Settings article in the Cinegy Archive Manager Manual to learn how to set the default reading rate value. |
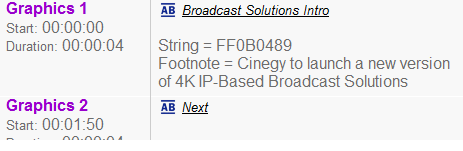
Graphics Block
This block can be used in the Story script in two ways: it can contain either simple text (Graphics text) or a Cinegy Titler template (Graphics 1…5), created via the Cinegy Titler application.
The block with text has zero duration. Its type cannot be changed.

The title of the block with a Cinegy Titler template corresponds to the Graphics track on the Story Editor timeline where this template is placed:
|
Important
|
For information on the Story Editor timeline tracks, refer to the Timeline Tracks paragraph. |
The duration of the block is equal to the template duration.
Adding Graphics Objects
To add a Cinegy Titler template, open a DocumentBin containing it and drag-and-drop the template to the desired position on the Story Editor timeline graphics track. The position will be highlighted while dragging.
A Cinegy Titler template can also be dragged-and-dropped to the assets or script panel. If the template is dragged-and-dropped to the assets panel, its position in the list of objects will be highlighted with a horizontal marker.
You can edit the Cinegy Titler templates added to the Story directly from Story Editor. This will not affect the original Cinegy Titler object in the DocumentBin. The full featured Cinegy Titler editor will be launched allowing you to modify any parameter of your Cinegy Titler template according to your needs.
The template editing window can also be launched by double-clicking the Graphics object on the corresponding track in Story Editor.
|
Important
|
Refer to the Cinegy Titler Manual for details on how to work with the Cinegy Titler application. |
Video Block
This block cannot be created manually, it is created when video is dragged-and-dropped to the Story; once the video is removed, the block is automatically deleted. The title of the block corresponds to the Video track on the Story Editor timeline where the video is placed (Video 1…3):

|
Important
|
For information on the Story Editor timeline tracks, refer to the Timeline Tracks paragraph. |
The block contains the object icon and the name of the video material. The duration of the block equals the video object duration. A video clip can be dragged-and-dropped to any position on the timeline. The position will be highlighted while dragging:
It is also possible to drag-and-drop the video material to the assets panel. In this case the position in the list of other objects will be highlighted with a horizontal marker.
On both timeline and script panel, if a video file is dragged-and-dropped to the position where a different video object has already been placed, it will be replaced with the new one.
On the script panel this block contains an object icon (clip, master clip, Sequence) and its name. It cannot be edited, its type cannot be changed. To view a clip, double-click it on the assets panel or timeline; it will open in Clip Viewer. It is also possible to view or edit the Sequence – double-click it directly in Story Editor and it will open in Cinegy Desktop Timeline for editing. To replace one video with another, drag-and-drop the necessary file to the Video block on the script panel or timeline.
Adding Video Materials
|
Note
|
The duration of video material to be added cannot be less than 2 seconds. |
Adding Clips
To add a clip (master-clip) to your Story, locate the desired object in the ClipBin (Roll) and drag-and-drop it to the desired position on the timeline video track, to the script panel or assets panel. The position will be highlighted while dragging.
The Roll may contain the "Audio transcription" descriptor for the clip. This descriptor presents the clip text entered via the keyboard in Cinegy Desktop. If there is the "Audio transcription" descriptor for the clip, you will be suggested to use it as a separate Transcript block:
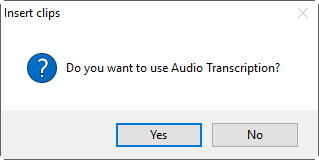
If you press "Yes", a new Transcript block will be created. It will be grouped with the inserted clip and have the same duration and timecode as the clip.
It is also very convenient to add a clip to the Story via drag-and-drop directly from the Clip Viewer window or using the "Insert" button:
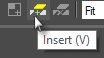
You can either insert the whole clip, or set In and Out points and then insert the fragment between them. The clip will be added to the selected video track in the activated Story.
|
Note
|
Please note, in case when there are nodes active for editing in both Cinegy Desktop Timeline and Story Editor, the clip will be inserted to the editor most recently used. |
Adding Sequences
To add a Sequence, locate it in the explorer tree and drag-and-drop it to the desired position on the timeline video track, to the script panel or assets panel.
|
If the Sequence is being edited when you add it to the Story, it will be marked with the green lock sign on the timeline. |
|
If the Sequence is locked for editing by other user, it will be marked with the red lock sign on the timeline. |
|
A clock sign indicates that the original Sequence is changed after it has been added to a Story. |


|
Note
|
Objects from the timeline and assets panel can be copied directly from Story Editor to Cinegy Desktop Timeline, for example for editing or adding effects. A new Sequence will be created without applying changes to the original Story material. This Sequence can then be added to the Story. |
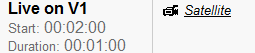
Live Block
This block is created when a Live Input item is added to the Story. Once it is removed, the block is automatically deleted. The title of the block corresponds to the Video track on the Story Editor timeline where the Live Input is placed (Live on 1…3):
|
Important
|
For information on the Story Editor timeline tracks, refer to the Timeline Tracks paragraph. |
When a Live Input item is added to the Story, the "Live Input" preferences dialog appears:
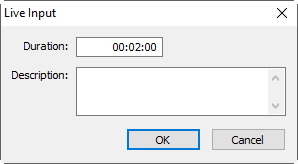
In the "Live Input" dialog the following parameters can be specified:
-
Duration – set the duration value of the Live Input item in the hh:mm:ss format if necessary. The default duration value of a Live Input item is 00:02:00.
|
Note
|
The Live Input item duration cannot be less than 1 second. |
-
Description – enter the item name or comment; it is displayed in the right column of the script panel.
The "Live Input" dialog can also be launched by double-clicking either the left column of the live block on the script panel, or the timeline, or the assets panel.
A Live Input item is placed at the time slider position. It is possible to move it or place on a different video track on the timeline via drag-and-drop. The position will be highlighted while dragging.
On the script panel, the block contains the object icon and description.
Depending on your Cinegy Studio playback configuration, a live signal goes from the defined input device or from IP (if the "Use RTP/UDP input" option is enabled) to output without being affected by Cinegy Studio.
|
Important
|
Refer to the Cinegy Playout Manual for details about setting up the input and output devices. |
When a Live Input item is played back in the viewer, the camera icon is displayed against the black background. The Live Input item can be copied and pasted with the corresponding context menu commands or the standard Ctrl+C and Ctrl+V shortcuts. If the timeline is used to perform these actions, the item is pasted to the time slider position of the selected video track. Alternatively, it can be pasted after a certain script block, if it is selected on the script panel. If the item is deleted, a gap of the corresponding duration appears between the previous and the following object on this track.
Creating Blocks
There are two ways to add a new script block.
-
Using the buttons on the toolbar:

-
Right-clicking the left column of the script panel and choosing the desired block type: from the context menu that appears:
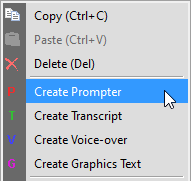
A Live Input item is created by selecting the "Insert Live Input…" command from the context menu.
|
Note
|
An empty Presenter, Voice-Over, Transcript blocks can be created by double-clicking the end of the script track in vertical view of Story Editor. Note that in the vertical view the empty blocks of zero duration value are not displayed. To start filling in the newly created block, it is necessary to switch to the horizontal view. |
|
Important
|
The reading speed is set for each presenter individually. Refer to the News Options in the Cinegy Archive Manager Manual to learn how to manage the list of presenters. |
Fill in the necessary text blocks of your script:
It is possible to create several block of each type. When created or copied, they are placed in particular order on timeline and script panel. The insertion position of a newly created block depends on several factors: block type, if currently selected block is on the same or different track and whether another block is placed in the insertion point. If no block is currently selected, the playhead position will be taken as a new block start. If a text block is currently selected, the new text block will be inserted after it, but a Live item will be inserted with the same start timecode.
|
You can use "Copy", "Paste" and "Delete" commands either from the Story Editor menu or the toolbar to perform the corresponding operations. |

A new script block can be created with the information already present in one of the existing blocks. To do this, highlight the needed text and press the corresponding script block button. The highlighted data will be automatically inserted into a new block.
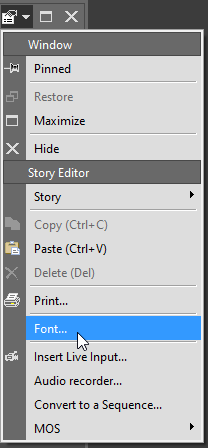
Changing Font
The default font (Arial, regular, size 12) can be changed according to your requirements. To do this, use the "Font" Story menu command:
The following dialog appears allowing you to adjust the font settings:
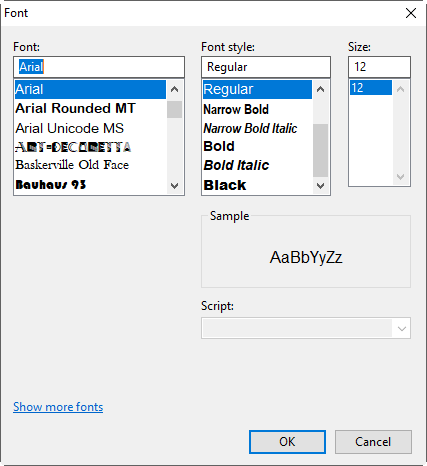
Define the font family and style using the corresponding drop-down lists. Specify the font size via the keyboard. The selected font preview is displayed in the "Sample" field.
|
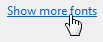
Clicking the "Show more fonts" reference opens the default fonts storage folder on your machine. |
Press "OK" to save the changes and exit the "Font" dialog.
Formatting
|
The text on the script panel can be formatted using the corresponding buttons on the main toolbar. |

The formatting can be performed by using these commands separately or in any combination.
Adding Comments
|
The text can be marked as a comment using the "Mark as comments" button on the main toolbar: |

Thus, it will not be included in the time calculation:

When the text is enclosed in braces, it will also be marked as a comment. The comment color is the same as the color of the name of the text block containing it.
|
To convert a comment back into the regular text, select it and choose the "Mark as normal" command from the toolbar or simply remove the braces. |

If you need to add comments for author’s personal use – to keep drafts, make self notes, etc. – put the text either inside double slashes or between double slashes and the end of the text block:

The text will be displayed in dark gray color. It is not included in the time calculation, it will not be printed or sent to Cinegy Prompter. If the comment in braces is placed inside the comment in double slashes, it becomes a part of it:

To convert a comment back into the regular text, simply remove the slashes.
Spell Checking
The spell checking option enables user to check spelling in the script blocks. By default, the spell check is active, indicating misspelt or unknown words with a red wavy underline.
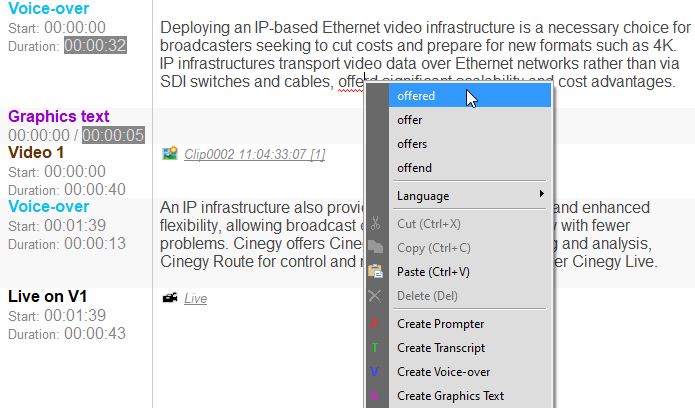
To correct the spelling, right-click the underlined word in the script block and choose the appropriate variant from the suggestions list:
In the "Language" menu you can define the text language. Choose one of the suggested variants or press "All languages" to choose from the full languages list. If the "Detect language automatically" option is selected, the system defines the text language.
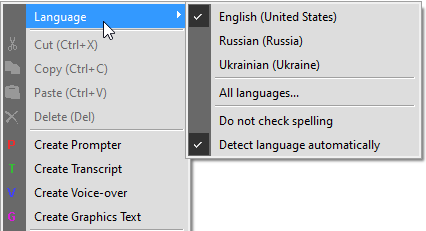
Select the "Do not check spelling" option to disable check spelling in the script blocks.
Splitting and Merging Blocks
|
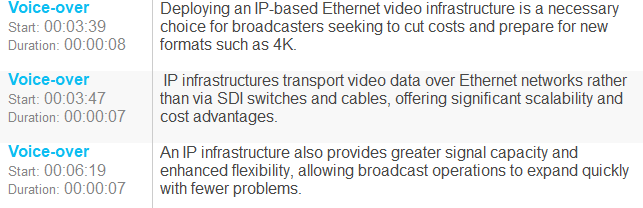
The text block can be split into two blocks of the same type starting from the current cursor position. To do this, place the cursor at the desired position and press the "Split" button on the toolbar: |

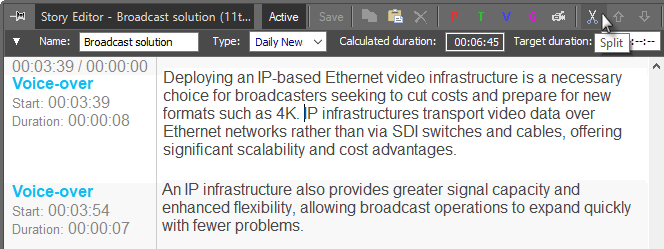
In the example above, the split block will look as follows:
It is also possible to merge adjacent blocks of the similar type. To do this, simply place the cursor at the beginning of the second block to be merged and hit the "Backspace" key.
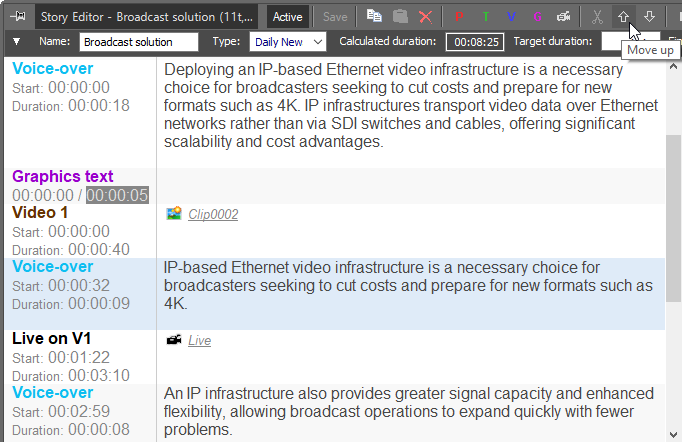
Moving Blocks
|
It is possible to swap script blocks of the same type on the script panel. To do this, select a block on the script panel and press the "Move up" / "Move down" buttons on the toolbar: |

|
Note
|
The Video blocks cannot be moved as they are placed on the script panel according to their position on the timeline. |
|
Tip
|
The other possible way to perform these actions is to right-click the left column of the text block on the script panel and select the necessary command from the context menu. |
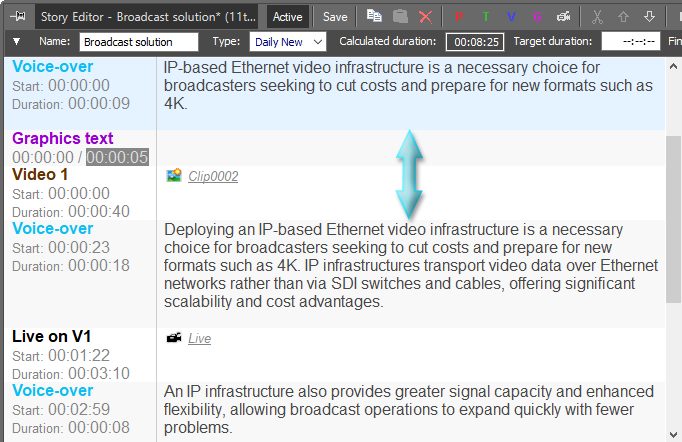
As a result, the block will change places to the previous / next one depending on the selected command:
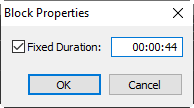
Block Duration
It is possible to change the fixed duration of a block if necessary. Double-click a block in the left column on the script panel or timeline to launch the "Block Properties" dialog and specify the desired duration value in the "Fixed Duration" field:
|
Note
|
There are no properties for Graphics and Video blocks. |
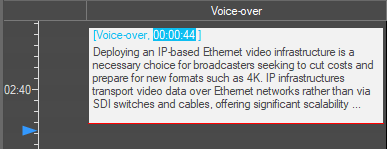
As a result, the automatically calculated duration of the text block is replaced by the specified value, and the reading rate of the person reading the text is recalculated according to the time indicated in this field. The changed time is highlighted with grey:

To reset automatically calculated duration of the text block right-click the left column of the blocks and select the "Clear Fixed Duration" command:

Alternatively, the fixed duration can be changed by trimming text blocks on the Story Editor timeline. A mouse pointer hovered over the edge of a block turns to a trimming tool.
|
Drag the left trim tool to trim a block from the start. |
|
Drag the right trim tool to trim a block from the end. |


|
Note
|
The blocks can be extended only to the empty track space. |
|
Important
|
Refer to the Timeline article for details on the Story Editor timeline. |
The calculated duration on the data panel is refreshed automatically.
As the Cinegy Prompter engine scrolls the text with speed respective to the reading rate from 10 to 2000 words per minute, if the recalculation due to the change of fixed duration brings the reading rate beyond these limits, the text scrolling during playback automatically becomes equal to this min/max value correspondingly.
|
Important
|
Refer to the Spell Checking in the Cinegy Desktop Manual to learn about speed of text scrolling in Cinegy Prompter. |
In vertical view of Story Editor the text block with modified fixed duration will be marked with a red bottom line of the block; the changed time value is displayed in italics:
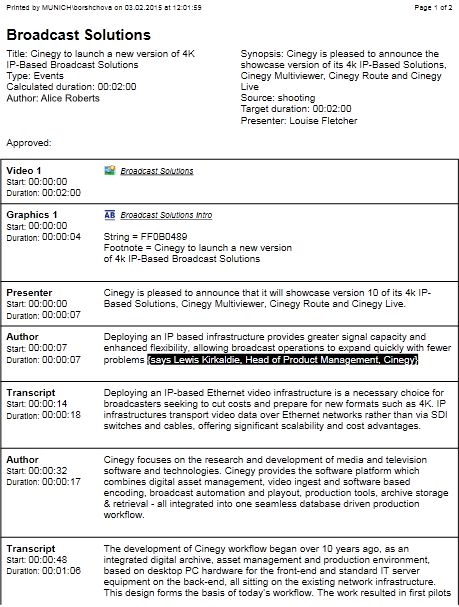
Printing Scripts
|
For your convenience you can print your script text using the "Print…" command from the main Story Editor menu. This command is also available from the context menu of the timeline and assets panel. |

A "Print" dialog will be launched allowing you to set up the script printing options along with other common print settings:
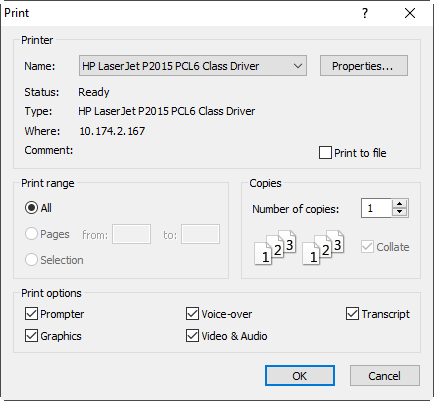
In the "Print options" group all the block types are selected by default. If you do not need to print any of them, remove the selection of the corresponding checkbox(es).
The printed document looks as follows: