Logging
Reading time ~7 minutes
Basic Logging Functionality
The basic way of logging is to create new subclips in a Roll and then add metadata to the new clips.
-
Open an "entire" master clip in a Roll.
-
Set an In point and an Out point.
-
Press the "Make subclip" button to create a new master clip in the Roll.
-
Edit the necessary fields in the new master clip.
|
Note
|
You need to have appropriate rights to edit the Roll, in order to create a new master clip. |
Logging Plug-in
More advanced logging is done with the Logging plug-in, using dedicated logging templates customized for the specific task and material type.
For example, a set of players' portraits can be used for soccer logging, making it possible to choose the players visually instead of typing the names. This approach works especially well with a touchscreen.
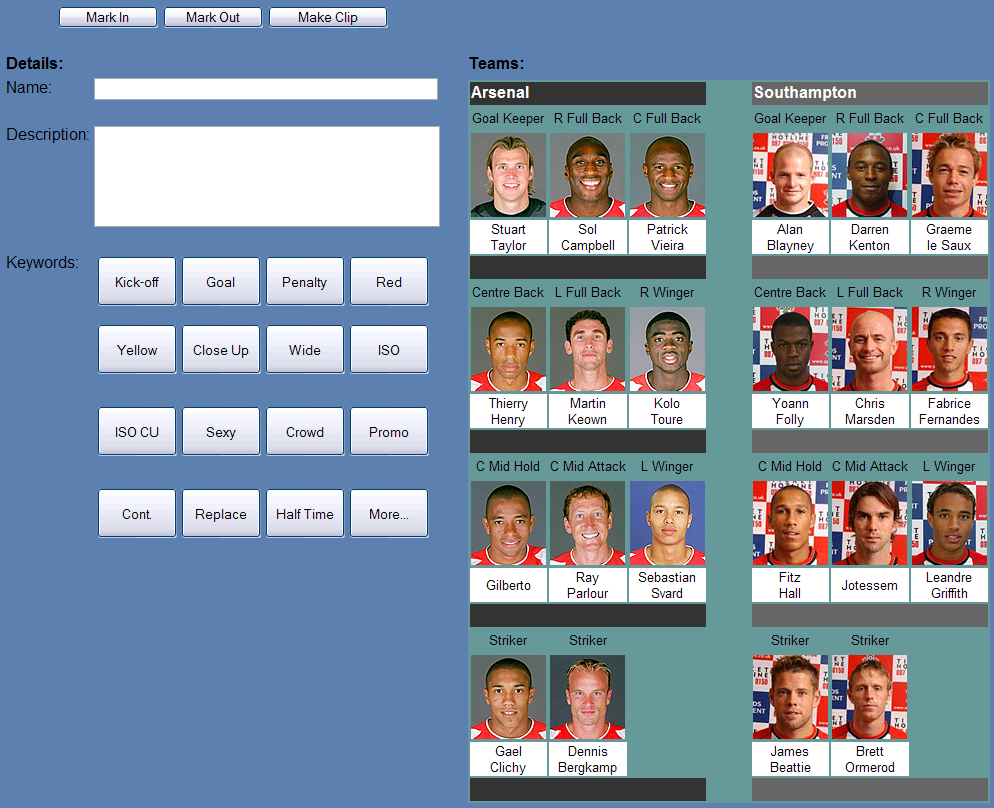
The Logging Procedure
To start logging an "Entire…" master clip in a Roll:
-
Right-click the "Entire…" master clip.
-
Choose the "Start logging" command from the menu.
-
The "Logging" window appears:
A sample logging template in the logging window
|
Note
|
The layout of the "Logging" window is completely driven by the selected logging template. |
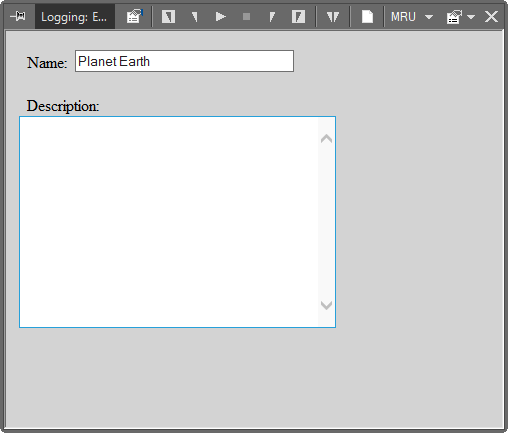
The Logging Window
Many of the controls in the "Logging" toolbar duplicate the functions from Sequence Viewer, which is used together with the "Logging" window to view the material selected for logging.

The controls are (from left to right):
-
Setup
-
Clear the In mark
-
Set the In mark
-
Play
-
Stop
-
Set the Out mark
-
Clear the Out mark
-
Mark event
-
Create a new clip
-
MRU (Most Recently Used)
-
The main menu of the plug-in
Selecting a Logging Template
Before you start the logging process, you will need to choose the logging template you would like to use for the logging session. The logging templates are HTML files, registered in the system. A designated HTML programmer creates and registers the templates according to the needs of your organization.
To start working with a logging template, perform the following:
-
Select the "Setup" command from the main menu of the logging plug-in or press the "Setup" button in the window toolbar.
-
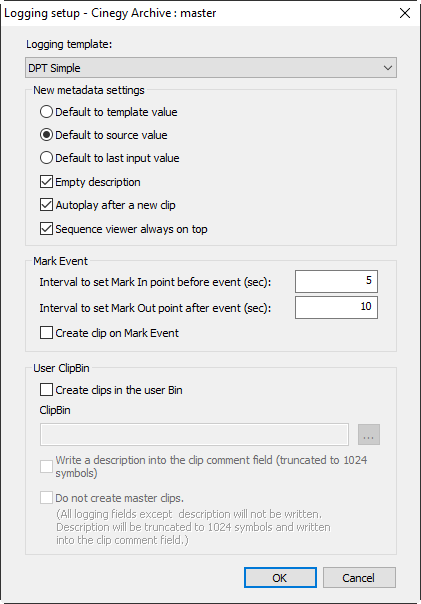
The "Logging setup" dialog box appears:
-
Select your template from the drop-down list of the available templates.
-
Choose the behavior of the edit boxes when creating a new clip in the "New metadata settings" section of the template setup:
-
Default to template value – the default value from the template will be used.
-
Default to source value – the value from the master clip that is being logged will be used.
-
Default to last input value – the value from the previous clip will be used.
-
Empty description – if the option is enabled, the main description field will be cleared when you define the new master clip.
-
Autoplay after a new clip – enable this option to apply automatic video material playing after a new clip has been created. Playing will be started from the first frame after the Out point of the newly created clip.
-
Sequence viewer always on top – if this option is enabled, the "Sequence Viewer" window will always be displayed at the top of any other open windows.
-
-
In the "Mark Event" section define the intervals before and after the playhead position to set the In and Out points. Set the "Create clip on Mark Event" option to enable clip creating right after pressing the "Mark Event" button.
-
Select the "Create clips in the user Bin" checkbox to create an additional copy of the master clip in the selected ClipBin. The location for the ClipBin is defined in the "ClipBin" field. You can specify the following options as described below:
-
Write description into the clip comment field – enable this option to apply the writing of the description into the comment field of the clip only, instead of into the master clip description field. All other metadata goes into the master clip fields.
NoteDescription will be truncated to 1024 symbols. -
Do not create master clips – enable this option to only create clips in the selected ClipBin. Master clips will not be created. Data from all logging fields except description will be ignored.
NoteDescription will be truncated to 1024 symbols and written into the clip comment field.
-
-
Press "OK". Now you can start logging.
Logging Workflow
The main logging workflow depends on how your logging template is programmed. The main steps are as follows:
-
You play and shuttle the content of the master clip in Sequence Viewer.
-
You define the In and Out points of the new clips.
-
You describe the new clips with your template.
-
You create the new clips. They are placed in the same Roll.
These procedures are described in the following paragraphs.
Viewing the Material
|
The material selected for Logging is shown in Sequence Viewer. You can use the standard viewer controls to navigate the clip and to define the In-Out range. In addition, you can use the "Play" and "Stop" buttons from the "Logging" toolbar. |

Your logging template can be programmed to provide playback control functions in its interface, if necessary.
If you are logging material while it is still being captured/imported, you can have access to the frames as soon as they are in the system. The length of the main object you are working on will grow automatically. You can shuttle to any available frame and play from that position.
|
Note
|
Some of the playback shortcuts are used in the "Logging" window, so these are not available for control. For example, the Space bar is used to type the descriptions, and not to toggle playback. |
Setting the New Clip Boundaries
Before you define a new clip in the selected Roll, you have to define its boundaries (i.e. the In and Out points).
|
Use the "Set the In mark" and "Set the Out mark" buttons in the logging toolbar or in Sequence Viewer to set up the new boundaries. Use the "Clear the In mark" and "Clear the Out mark" buttons to remove the points. |


Marking Events
|
When the playhead is located in the desired position on the clip timeline, press the "Mark Events" button to automatically set the In and Out points according to predefined intervals before and after the event. |

If the "Mark Event" button is pressed with less than the defined time available in front of the playhead, no Out point is created. If the "Mark Event" button is pressed with less than the defined time available behind the playhead, no In point is created. If both conditions are met, no action is taken. By default the intervals are 5 seconds before and 10 seconds after the playhead position. You can change these values in the "Logging setup" dialog.
If the "Create clip on Mark Event" option is enabled and there is not enough time available in front or behind (or both) the playhead, the warning prompt will be displayed and clip will not be created.
The shortcut for this button is F9.
Describing the New Clip
The look and feel of the interface you use to enter the metadata for your logging depends only on how the HTML template is programmed.
For sports, for example, this can be a list of the players or typical game situations. For documentary, it could be lists of weather conditions and Latin names of certain animals as well as the camera shot sizes, etc.
Defining the New Clip
|
When you have defined the new clip In and Out marks and entered a description, press the "Create a new clip" button. |

Depending on the logging settings, the new clip will be created in one or both locations:
-
in the same Roll where you have selected the main master clip for logging;
-
in the selected ClipBin.
Creating Logging Templates
The logging templates are used in the Cinegy Desktop logging window to provide a customized look and feel for the logging interface.
|
Important
|
Refer to the Logging Template article to learn more about Cinegy logging templates. |