Working with Job Folders
Reading time ~5 minutes
The Cinegy Convert job folder is a special type of folder in the Cinegy Archive database structure. Cinegy Convert uses different types of job folders for automated exporting, importing and other specialized tasks.
Each job folder contains a number of job drop targets created and configured via Cinegy Convert. Cinegy Convert enables the server-based transcode and batch processing for repetitive export and conversion jobs allowing you to "print" to pre-defined formats and destinations.
Generally, export job drop targets are used to automatically export material into different formats. Each export job drop target can be set up to perform specific repetitive actions with the objects inserted in that target.
Task Creation
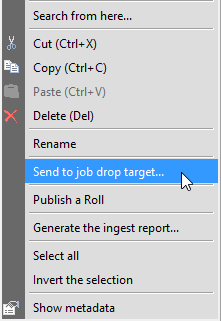
The export Cinegy Convert tasks can be assigned via drag-and-drop of clips, Rolls, ClipBins and Sequences into the job drop targets or using the "Send to job drop folder" command:
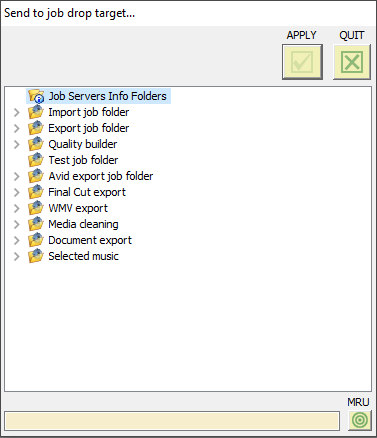
The following dialog box appears:
|
Select the required job drop target from the list and press the "Apply" button. |

|
Note
|
If the selected job drop target cannot process the object intended for export, the "Apply" button remains grayed out. |
|
To access the list of most recently used job drop targets, press the "MRU" button and select the desired item from the list. |
|
To leave the dialog without any changes, press the "Quit" button. |


Once the required job drop target is selected and the "Apply" button is pressed, the following "Create a Job" dialog appears:
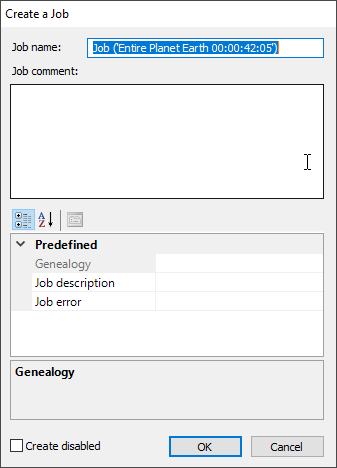
The "Job name" is generated automatically according to the name of the object sent to job drop target, but you can edit it in this dialog via the keyboard as well as add a comment and metadata to the job being created.
|
Note
|
A set of metadata fields may vary for different jobs; they are assigned by means of the Descriptors, Presets configuration group in Cinegy Archive Manager. |
By default, job processing by Cinegy Convert is performed automatically once the job is created. Select the "Create disabled" option to disable autoprocessing of the newly created job. In this case, job processing should be enabled manually by selecting the checkbox next to the corresponding job name in the job drop target window.
|
Note
|
If audio and/or video parameters of the object meant for export do not match the parameter(s) of the job drop target, you will be informed about this with the corresponding error message and the job will not be created. |
Tasks Management
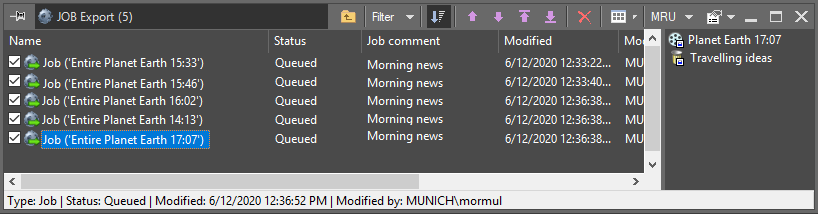
Double-click a job drop target to open the window, in which you can view and manage the relevant tasks:
Cinegy Convert job drop target window
|
Note
|
The nodes that have been inserted to the Cinegy Convert job drop targets are read-only and cannot be edited or deleted until they are completely processed. |
The job drop target window consists of two parts:
-
Job list (on the left) – displays all the tasks created in this target. You can manage the tasks and see their current status (queued, processing or completed).
-
Object list (on the right) – shows all the objects (clips or ClipBins) included in the task, which is currently highlighted in the job list.
All the queued tasks that have been checked in the job list are now ready to be processed. The tasks will automatically be performed by means of Cinegy Convert.
Job Metadata
To view the metadata of a job, right-click the corresponding job and choose the "Show metadata" command from the context menu; the "Metadata" dialog box appears:
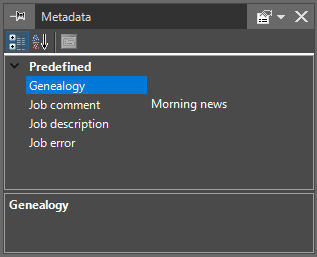
The metadata fields are filled in automatically during the job processing. You can also edit them in this dialog via the keyboard, when needed.
The process parameters are taken from the job drop target settings stored in the database and set up via Cinegy Convert. Each job drop target type has its individual settings configured independently.
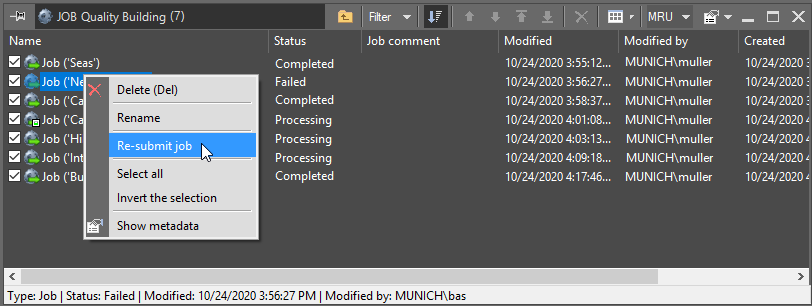
Job Re-Submitting
Cinegy Desktop supports the ability of re-submitting a job with any status but queued. To re-send the job to Cinegy Convert, right-click it in the job list of the job drop target window and choose the "Re-submit job" context menu command:
The "Create a Job" dialog appears allowing you to edit the available metadata fields, if necessary.
The re-submitted job will have the "Queued" status and will be automatically processed by Cinegy Convert according to the predefined settings.
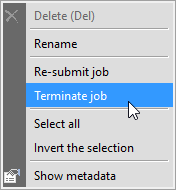
Job Terminating
You can terminate the job that is being processed. For this select the "Terminate job" command from the job context menu:
You will be asked to confirm your decision:
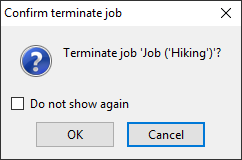
Press "OK" to terminate the job processing. The job status will change to "cancelled".
Multiple Jobs Submitting
It is possible to create multiple jobs simultaneously via drag-and-drop of several items into a job drop target. To do this, open the related folder; by holding the Ctrl key select several Rolls and drag them directly to the corresponding job drop target. Once the items are added, the relevant number of jobs are created – one per each item. By default, the "Create a Job" dialog appears for each source individually.
Once metadata settings for the first item are confirmed by user and the "OK" button is pressed, a new job is created for the corresponding item. A separate "Create a Job" dialog appears for the next item.
|
Note
|
If the "Cancel" button is pressed at any stage of the process of multiple jobs creation, the jobs having been already created remain in the queue. |
When multiple jobs are created per one operation, the regular "Create a Job" dialog is complemented with the following additional options:
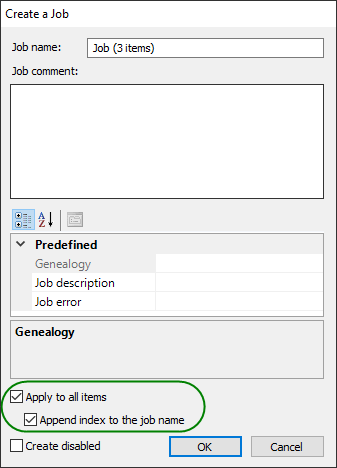
-
Apply to all items – check this option to create all jobs for the added items using one common "Create a Job" dialog. All the jobs created in this session will have identical name specified in the "Job name" field and the same metadata set.
-
Append index to the job name – with this option selected, the item index is added to the job name as follows:
 Note
NoteThis option is available only with the "Apply to all items" function enabled.