Working With DocumentBin
Reading time ~4 minutes
DocumentBins is a container for different files, documents, pictures to work with inside Cinegy Desktop.
Creating a New DocumentBin
In order to create a new DocumentBin:
-
Right-click in the explorer window the folder in which you want to create the new DocumentBin. In the menu, select the "New" > "New DocumentBin" command.
ImportantThe "New DocumentBin" metadata dialog box appears if mandatory metadata fields have been assigned for the DocumentBin. The view of this dialog box may vary depending on the set of metadata fields assigned to the node. Please refer to the Node Metadata article to learn more about node metadata. -
The new DocumentBin
 appears in the explorer.
 -
Rename the new DocumentBin.
-
Double-click the DocumentBin to open it.
Show Metadata
To view metadata of the object added to the DocumentBin, do the following:
-
Select the desired object.
-
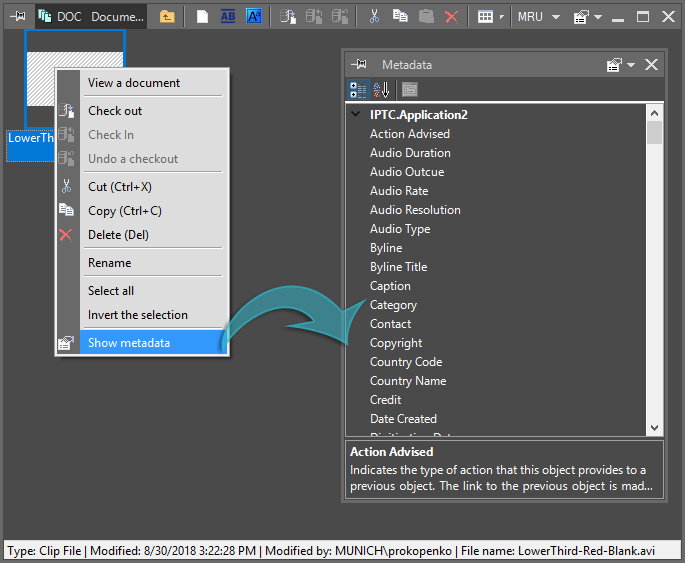
Select the "Show metadata" command from the object’s context menu.
-
Fill in the fields in the "Metadata" dialog that appears:

|
Note
|
Each document type can be associated with its own list of fields in the "Metadata". |
|
Important
|
Refer to the Metadata Fields article within the Cinegy Archive Manager Manual for details about the object metadata setup. |
Registering a Document
To register a document in the DocumentBin, do the following:
|
1. Select the "Add" command in the DocumentBin menu or press the "Add" button. A standard file dialog box appears. |
2. Choose your file and press "OK"; the document appears in your DocumentBin. |
The document you have added will be copied to the Cinegy Archive document server and registered in the Cinegy Archive content server.
Selecting a View for the DocumentBin
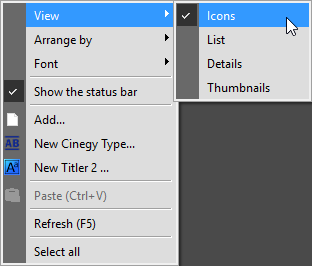
In the main DocumentBin menu, choose the "View" command; it offers several options: icons, list, details and thumbnails:

Locking a Document
Before you start editing your document, you have to lock it (or "Check out" the document). The locked document will be available for editing to you only. All other users will have read-only access, preventing potential damage to the document and the creation of multiple inconsistent parallel versions of the document.
|
To lock a document, select it and choose the "Check out" command from the right-click menu or press this button in the menu bar of the DocumentBin. The locked document will be displayed with the green lock. |
|
Note
|
If the document is already locked, to determine who has locked the document, switch the DocumentBin to the details view. |
|
Note
|
You can use Cinegy Messenger to communicate with the person holding the document you need to edit. |
Editing a Document
During the locking process, the document will be copied to your local disk. When the document is locked, double-click it to initiate the standard associated editor.
Unlocking a Document
After you have finished editing a document, you can unlock it ("check in" the document) to make it available to other users for editing.
|
To unlock the document, select it and choose the "Check in" command from the right-click menu or press this button in the menu bar of the DocumentBin. The document will be copied back to the Cinegy Archive document server as the new version and then released for all other users. |
|
The "Undo a checkout" command releases the file for all other users without saving changes to the master file in the database. |
Deleting a Document
|
To delete a document, select it and choose the "Delete" command from the right-click menu or hit the Delete button. |
|
Note
|
You are not allowed to delete the documents locked by other users. |
Document Thumbnails
The document thumbnail availability and the way the document is presented depend on the installed thumbnail plug-ins.
The basic plug-in comes with Windows, some of them may come with Cinegy Desktop, and some of them may be available as third-party commercial products.
Searching for Documents
The documents search is performed with the general search procedure, in parallel to the video assets.
