Inserting Clips into Timeline
Reading time ~6 minutes
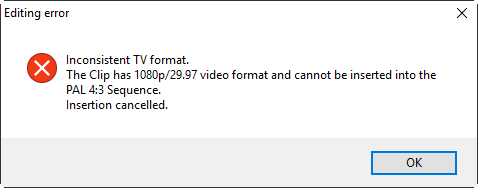
Cinegy Desktop supports insertion of the clips in different resolutions (SD and HD) and aspect ratios within the Timeline project, but not a mixture of frame rates. The system automatically converts the source clips you are adding to the Timeline project to the format determined by the Sequence. If the frame rate of the clip you are adding is inconsistent with the format of the Sequence, the error appears and the clip insertion is cancelled:
You can use various ways to add new material into the Timeline project.
Inserting Directly from ClipBins
Open the ClipBin where you have your clips or multiclips prepared for further editing. Now you can insert your clips and/or multiclips into the new Sequence.
-
Select one or more clips and/or multiclips in the ClipBin. Make sure the aspect ratio and the video system of the clip(s) and multiclip(s) are all the same.
-
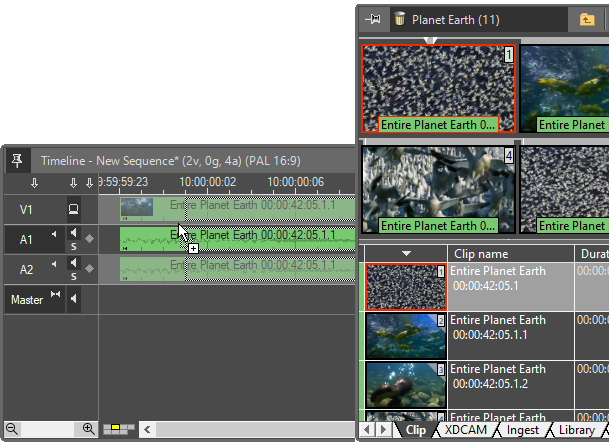
Drag the clip(s) and/or multiclip(s) from the ClipBin to the Timeline editing area.
-
Drop the clip(s) and/or multiclip(s) on the upper (video) track of Timeline.

-
The clips and/or multiclip(s) appear on Timeline. You can see the video and audio tracks of the clips.
-
The Sequence settings (the aspect ratio and the video system) are automatically set to that of the clip(s) inserted into the empty Timeline.
You can also drag master clips directly from a Roll or you can even drag-and-drop clips from a search result bin to Timeline. The color of the bars representing the clips is defined during capture/import. Every capture/import session has its own color to provide easier navigation through the projects.
|
Note
|
The "Use clip color" option in the "Timeline Preferences" dialog does not affect multiclip coloring. Multiclip bars are always colored in gray. |
The gray vertical lines on Timeline mark the boundary of the project. Video and audio layers are separated by a white horizontal line.
|
Note
|
The result of your drag-and-drop depends on the Insert and Overwrite Modes enabled on Timeline. |
The  hints indicate that the clip starts from its first frame and ends with the last frame respectively. Once the clip is trimmed from either side, the corresponding hint display is removed.
Adding a Clip to Defined Tracks
You can add a clip directly to the defined tracks. To do this, select only that track or those tracks you want your clip to be added to. Drag-and-drop the selected clip(s) from the Roll or ClipBin into Timeline as shown below:
|
In the example above, only A1 track is available for adding a clip |
|
Note
|
The audio tracks should be of the corresponding type (mono, stereo or 5.1 Surround). |
The behavior differs for clips with audio channels of different type. If you are adding a clip containing audio channels of a different type than audio tracks already present on Timeline, the track(s) of the corresponding type will be created automatically. For example, if a clip that contains mono audio channels is dragged-and-dropped to Timeline with only stereo tracks, the mono tracks will be automatically created on Timeline. If a clip with stereo audio channels is dragged-and-dropped into Timeline with stereo tracks, the audio will be placed to the available stereo audio tracks or you need to manually add the destination stereo track.
Adding a clip into empty Timeline (with no Timeline presets applied) will always cause the automatic adding of the audio tracks of the corresponding type.
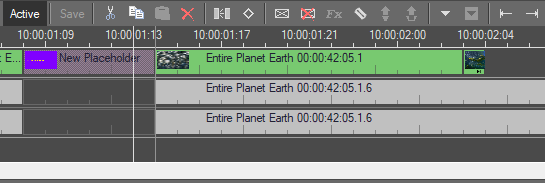
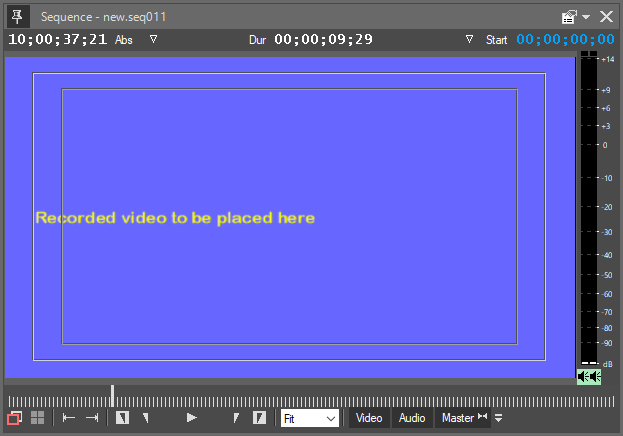
Creating a Placeholder Clip
You can add a placeholder clip into the Timeline project. A placeholder clip is a temporary blank clip with a predefined TV format, start timecode and duration used to reserve the place within a Sequence for a source clip that has not been captured/imported yet.
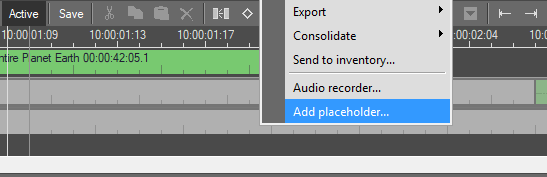
To add a placeholder clip, activate the desired Sequence on Timeline and drag-and-drop an existing placeholder clip from the ClipBin or use the "Add placeholder…" command from the right-click menu to create a new one:
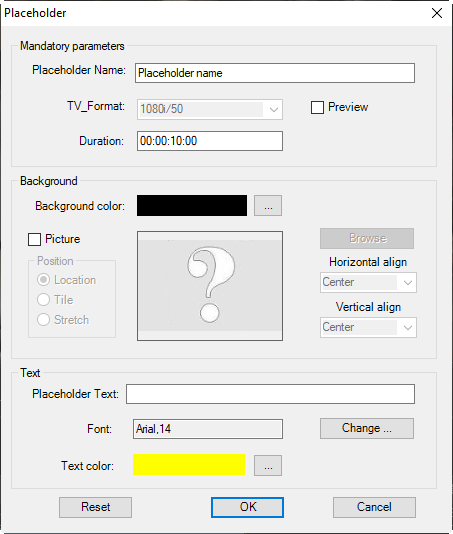
A new placeholder clip will be created in your Sequence starting from the position of the time slider.
|
Important
|
Refer to the Placeholder Clips article for details about setting up the placeholder clips configuration. |
Working with placeholder clips on Timeline is similar to managing the common clips. When a placeholder clip is played back in the viewer, the corresponding text, graphics and background color defined for the placeholder are displayed:
To change the settings of the existing placeholder clip, select it in your Sequence and use the "Edit placeholder…" command from the right-click menu.
Using Clip Viewer to Insert into Timeline
You can use Clip Viewer to insert your clips or multiclips in the Timeline project in several different ways.
Insert
|
Use the "Insert" button to insert the currently open clip or multiclip into Timeline. The keyboard shortcut for this operation is V. |

|
Note
|
The "Insert" button always inserts the clip to the current position, regardless of which Timeline mode is set. |
It is also possible to insert multiple clips. For this select multiple clips in ClipBin or Roll and open them in Clip Viewer using the "Open in a clip viewer" or "Open in a new clip viewer" context menu command. All the clips can be previewed in the sequence mode. Press the "Insert" button to insert the clips into Timeline.
If In and Out point are set for the clip, the In-Out interval will be inserted into Timeline. For the clips in sequence mode inserting the In-Out period results in the first clip involved to be inserted starting at the In point, any completely contained clips in the middle, and then the last clip trimmed to stop at the Out point.
|
Important
|
Please note that the "Insert" button is also used for inserting clips into the Story Editor timeline. If Story Editor has been in use later than Cinegy Desktop Timeline, the clip will be inserted into a currently opened Story. Refer to the Story article for more information about Story Editor. |
Overwrite
|
Use the "Overwrite" button to overwrite the current project on Timeline, according to the In and Out points of the currently open clip or multiclip. The keyboard shortcut for this operation is B. |

|
Note
|
The "Overwrite" button always overwrites the space under the clip being inserted, regardless of which Timeline mode is set. |
Handling clips with In-Out points set is the same as described in the previous section.
Drag-and-Drop
Drag the clip directly from Clip Viewer into Timeline. Drop it on the desired place. This is the same procedure as drag-and-drop from ClipBins, as described previously.
|
Note
|
Adding a multiclip to Timeline directly from Clip Viewer via drag-and-drop is not possible. |
Copy and Paste
Select video and/or audio tracks on Timeline and use the "Copy" and "Paste" commands either from the right-click menu, the main Timeline menu or simply use the usual key combinations Ctrl+C to copy and Ctrl+V to paste the copied track into Timeline. Use the Ctrl+ click command to do multiple selections and copy them to Timeline as described above.
|
Note
|
Copying among Sequences is also possible as long as the frame rate and aspect ratio are the same. |