Audio Volume Adjustment
Reading time ~3 minutes
The audio volume rubber banding feature allows you to change the volume of a segment by adding or manipulating keyframes (KF) on Timeline. To start working with the volume rubber banding, enable the "Rubber band" command in the main Timeline menu. The rubber band line appears on the audio objects.
|
Note
|
The rubber band line can be edited only when the clip mode is enabled in Audio Mixer. |
|
Position the time slider where you want to change the volume and press the "Add/Remove keyframe" button or use the N shortcut. The new keyframe appears on all the selected objects. Without the selection, the keyframe will be created in all audio objects at the current position. |

Drag the key to obtain the desired effect. The volume gain will be shown in dB as a tool-tip during dragging.
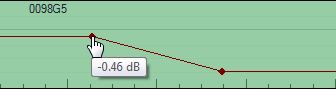
The volume change will be immediately reflected in Sequence Viewer. While dragging the keyframe, a dB value is displayed next to it.
To facilitate audio adjustment on Timeline, the dB grid is drawn on the clips.
-
The grid is shown in the rubber band mode only.
-
The grid values are +9, +3, 0, -3, -12, -30 dB.
-
The number of lines shown depends on the width of the track. 0 is always shown.
|
Note
|
The grid scale is nonlinear, the greatest "magnification" is in the -3 to +3 area. That is why the newly created node is not always positioned on the line between the two nearest keys. |
|
Note
|
You can use the track selector to exclude certain audio tracks from creating the keyframe. |
Editing Volume Keyframes
In addition to dragging the keyframe to the desired position, you can also use the "Keyframe Edit" dialog to change the position and the volume of the keyframe. Double-click on the keyframe and the "Keyframe Edit" dialog box appears:
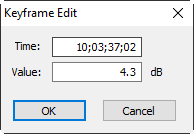
Now you can enter the timecode to change the position of the keyframe. To change the volume level, you need to enter a dB value into the text box. Enter a positive value to increase the volume or a negative value to decrease the volume.
Deleting Keyframes
To remove the keyframe, drag the keyframe down below the object, it will disappear; or
|
Position the current time slider over the desired keyframe and then press the "Add/Remove keyframe" button to remove the keyframe in the selected audio object. |
|
Note
|
The rubber band must be enabled in order to see and remove the keyframe. |
Create Fades with Keyframes
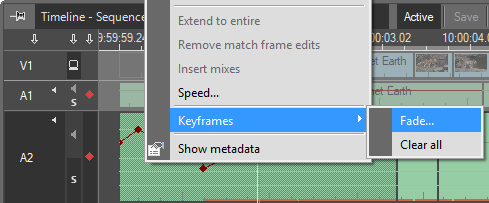
To fade an existing keyframe, right-click the appropriate track segment and choose the "Fade…" command from the "Keyframes" menu:
The following dialog box appears:
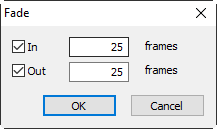
Enter the desired frame fade values or accept the default values suggested. Press the "OK" button to create the fade in and fade out effects.
|
The fade in and fade out effect |

|
Note
|
The default values are defined in the "Timeline Preferences" dialog. |
If there are any keyframes in the middle of the clip, these will not be affected by the fade effect:

|
Note
|
The "Fade" command also works with Vx tracks, creating transparency fade in-out. |
|
Note
|
The "Fade" dialog does not allow you to enter values that exceed the duration of the selected clip. |
The "Clear all" command clears all existing keyframes in the zone of the applied "Fade in" / "Fade out" effects.